For 1990-2009 cars only
Removal Procedure
Tools Required
| • | J 28467-A Engine Support Fixture |
| • | J 28467-90 Engine Support Adapter |
| • | J 36462 Support Adapter Leg Set |
- Remove the air cleaner intake duct. Refer to Air Cleaner Inlet Duct Replacement Engine Controls.
- Install the J 28467-A
- Install the J 28467-90
- Install the J 36462
- Raise and support the vehicle. Refer to Lifting and Jacking the Vehicle in General Information.
- Remove the left front wheel. Refer to Tire and Wheel Removal and Installation in Tires and Wheels.
- Remove the left engine splash shield. Refer to Wheelhouse Panel Replacement in Body Front End.
- Remove the stabilizer shaft brackets from the lower control arms. Refer to Stabilizer Shaft Link Replacement in Front Suspension.
- Remove the left tie rod end from the steering knuckle. Refer to Rack and Pinion Outer Tie Rod End Replacement in Front Suspension.
- Remove the wheel speed sensor harness connector.
- Remove the left lower ball joint from the left lower control arm. Refer to Lower Control Arm Ball Joint Replacement in Front Suspension.
- Disconnect the left drive axle from the transaxle. Refer to Wheel Drive Shaft Replacement in Drive Axle.
- Secure the drive axle to the steering knuckle/strut.
- Remove the pinch bolt at the intermediate steering shaft. Refer to Intermediate Steering Shaft Replacement in Steering Wheel and Column On-Vehicle Service.
- Remove the intermediate shaft from the steering gear. Refer to Intermediate Steering Shaft Replacement in Steering Wheel and Column On-Vehicle Service.
- Disconnect the three-way catalytic converter pipe to the right (rear) exhaust manifold. Refer to Catalytic Converter Replacement in Engine Exhaust.
- Support the right side of the frame with jackstands.
- Support the left side of the frame with jackstands.
- Remove the transaxle mount bracket. Refer to Transmission Mount Replacement .
- Remove the transaxle mount. Refer to Transmission Mount Replacement .
- Loosen the engine mount lower nuts. Refer to Engine Mount Replacement in Engine Mechanical.
- Loosen the right side frame to body bolts. Refer to Frame Removal in Body Dimensions, Frame and Underbody.
- Remove the left side frame to body bolts. Refer to Frame Removal in Body Dimensions, Frame and Underbody.
- Adjust the jackstand to the lower left side of the frame.
- Position the drain pan under the transaxle.
- Remove the wiring harness connector.
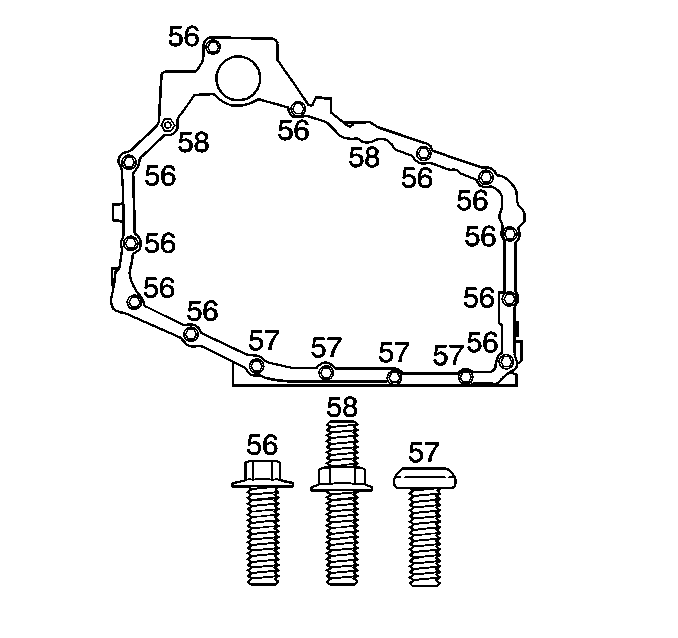
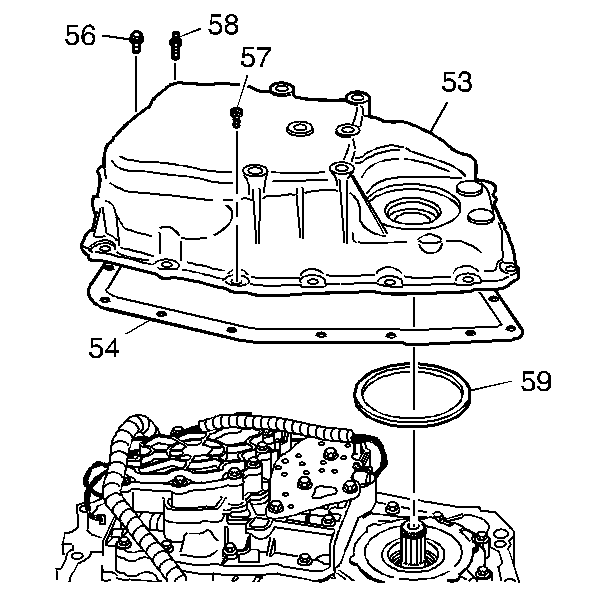
- Remove the case side cover bolts (56-58).
- Remove the case side cover pan (53).
- Remove the case side cover gasket (54).
- Clean the case.
- Clean the side cover gasket surfaces.


Installation Procedure
Tools Required
| • | Engine Support Fixture |
| • | Engine Support Adapter |
| • | Engine Support Adapter Leg Set |
- Install the case side cover gasket (54).
- Install the case side cover pan (53).
- Install the case side cover bolts (56-58).
- Remove the drain pan from under the transaxle.
- Install the wiring harness connector.
- Adjust the jackstand to raise the left side of the frame.
- Install the left side frame to body bolts. Refer to Frame Removal in Body Dimensions, Frame and Underbody.
- Install the right side frame to body bolts. Refer to Frame Removal in Body Dimensions, Frame and Underbody.
- Install the engine mount lower nuts. Refer to Engine Mount Replacement in Engine Mechanical.
- Install the transaxle mount. Refer to Transmission Mount Replacement
- Install the transaxle mount bracket. Refer to Transmission Mount Replacement .
- Remove the jackstand support from the right side of the frame.
- Remove the jackstand support from the left side of the frame.
- Connect the three-way catalytic converter pipe to the right (rear) exhaust manifold. Refer to Catalytic Converter Replacement in Engine Exhaust.
- Install the intermediate shaft to the steering gear. Refer to Steering Wheel and Column On-Vehicle Service.
- Install the pinch bolt at the intermediate steering shaft. Refer to Steering Wheel and Column On-Vehicle Service.
- Install the left drive axle to the transaxle. Refer to Wheel Drive Shaft Replacement in Drive Axle.
- Install the left lower ball joint to the left lower control arm. Refer to Lower Control Arm Ball Joint Replacement in Front Suspension.
- Install the wheel speed sensor harness connector.
- Install the left tie rod end to the steering knuckle. Refer to Rack and Pinion Outer Tie Rod End Replacement in Front Suspension.
- Install the stabilizer shaft brackets to the lower control arms. Refer to Stabilizer Shaft Link Replacement in Front Suspension.
- Install the left engine splash shield. Refer to Wheelhouse Panel Replacement in Body Front End.
- Install the left front wheel. Refer to Tire and Wheel Removal and Installation in Tires and Wheels.
- Lower the vehicle.
- Remove theJ 28467-A Engine Support Fixture.
- Remove the J 28467-90 engine Support Adapter.
- Remove theJ 36462 Support Adapter Leg Set.
- Remove the air cleaner intake duct. Refer to Air Cleaner Inlet Duct Replacement in Engine Controls.
- Connect the battery ground (negative) cable.
- Adjust the fluid level. Refer to Fluid Capacity Specifications
- Inspect for proper completion of the repairs.
- Inspect for fluid leaks.


Tighten
Tighten the case side cover bolts (56-58) to 25 N·m (18 lb ft).
.
and Transmission Fluid Check .
