Front Frame Replacement Rear Wheel Drive
Special Tools
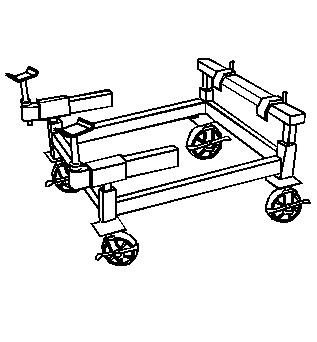
J 39580
Engine Support Stand
Removal Procedure
- Install the engine support fixture. Refer to
Engine Support Fixture.
- Raise and support the vehicle. Refer to
Lifting and Jacking the Vehicle.
- Remove the front wheels. Refer to
Tire and Wheel Removal and Installation.
- Remove the front compartment lower noise shield. Refer to
Front Compartment Lower Noise Shield Replacement.
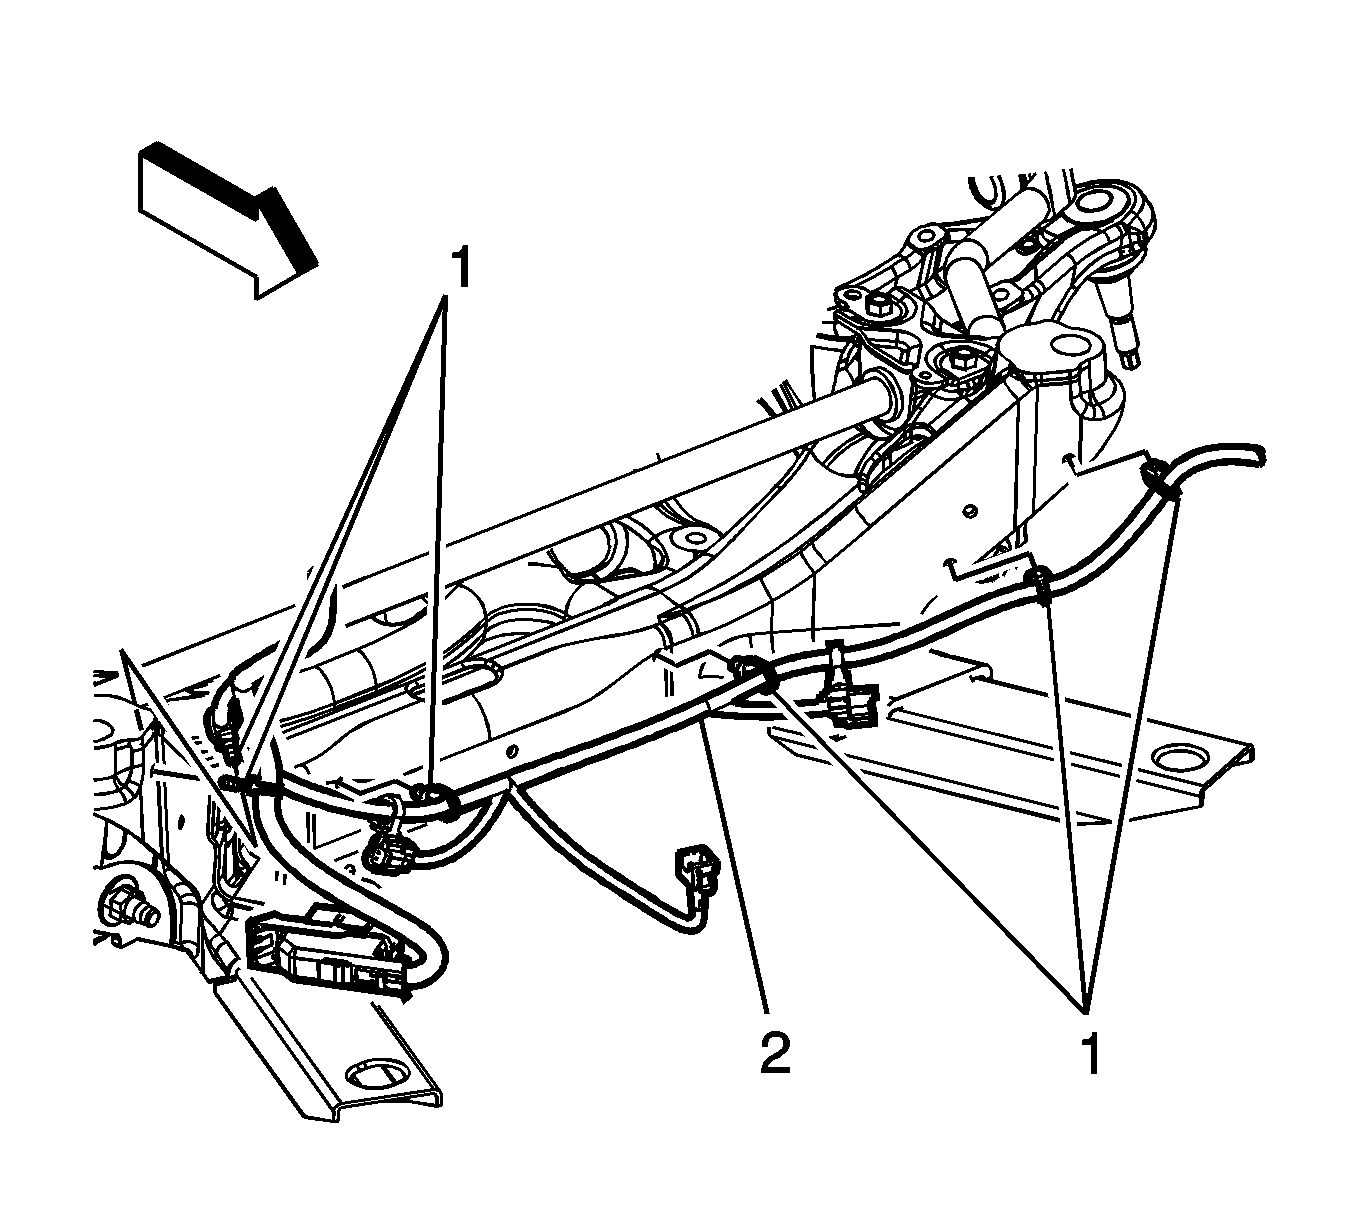
- Remove the electrical harness retainers (1) securing the engine harness (2) to the frame.
- Remove the wheel speed sensor wire harness from the frame.
- Remove the brake pipes from the frame.
- Remove the brake pressure modulator valve from the bracket assembly. Refer to
Brake Pressure Modulator Valve Replacement.
- Using mechanics wire, support the radiator and AC condenser assembly to the vehicle body.
- Remove the washer bottle bracket from the frame. Refer to
Windshield Washer Solvent Container Replacement.
Note: Mark the stabilizer shaft to ensure the correct position when reinstalling.
- Loosen the stabilizer shaft mounting bolts.
- Remove the lower stabilizer shaft link from the lower control arm. Refer to
Stabilizer Shaft Link Replacement.
- Remove the power steering gear mounting bolts. Refer to
Steering Gear Replacement.
- Using mechanics wire secure the power steering gear to the engine.
- Separate the outer tie rod from the steering knuckle. Refer to
Steering Linkage Outer Tie Rod Replacement.
- Disconnect the lower ball joint from the steering knuckle. Refer to
Lower Control Arm Replacement.
- Remove the shock module yokes from the lower control arms. Refer to
Front Shock Absorber Yoke Replacement.
- Remove the engine mounts lower retaining nuts.
- Install
J 39580
under the frame.
- Lower the vehicle to the frame support table.
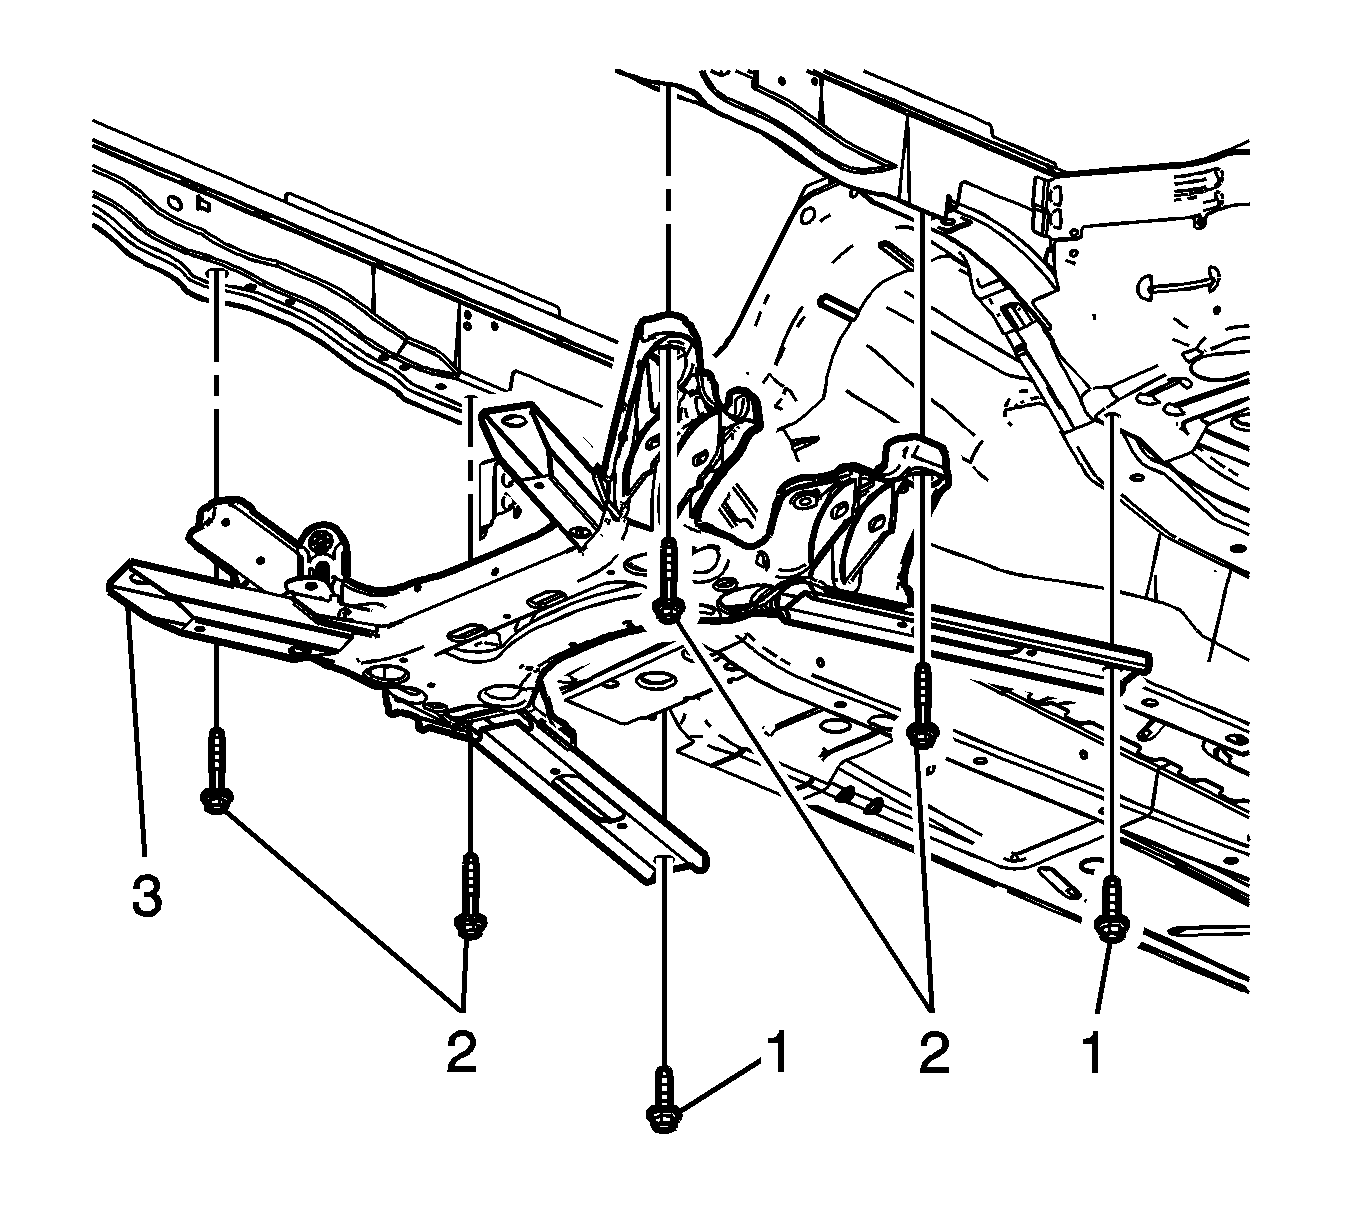
- Remove the frame mounting bolts (1, 2).
- With the aid of an assistant, carefully raise the body from the frame.
- Ensure when raising the body the following items are clear from the frame:
| • | Electrical wiring harnesses |
- Remove the lower control arms. Refer to
Lower Control Arm Replacement.
- Remove the stabilizer shaft. Refer to
Stabilizer Shaft Replacement.
- With the aid of an assistant, remove the frame from the support fixture.
Installation Procedure
- Install the lower control arm to the frame. Refer to
Lower Control Arm Replacement.
- Install the stabilizer shaft to the frame. Refer to
Stabilizer Shaft Replacement.
Do not tighten the stabilizer shaft mounting bolts at this time.
- With the aid of an assistant, position and secure the new frame assembly to the support fixture.
- With the aid of an assistant, carefully lower the body to the frame.
- Ensure the following components are clear from the frame:
| • | The steering knuckle assembly |
Caution: Refer to Fastener Caution in the Preface section.
- Install the frame mountings bolts (2) and tighten to
191 N·m (141 lb ft).
- Install the frame to body bolts (1) and tighten to
250 N·m (180 lb ft)
- Raise the vehicle.
- Install the engine mount lower retaining nuts and tighten to
50 N·m (37 lb ft).
- Remove the
J 39580
from under the vehicle.
- Remove the mechanics wire supporting the power steering gear.
- Install the shock module yokes to the lower control arms. Refer to
Front Shock Absorber Yoke Replacement.
- Install the power steering gear mounting bolts. Refer to
Steering Gear Replacement.
- Install the ball joint to the steering knuckle. Refer to
Lower Control Arm Replacement.
- Install the outer tie rod to the steering knuckle. Refer to
Steering Linkage Outer Tie Rod Replacement.
Note: Ensure correct position from the previously marked spots.
- Tighten the stabilizer shaft bolts and tighten
65 N·m (48 lb ft).
- Install the stabilizer shaft link to the lower control arms. Refer to
Stabilizer Shaft Link Replacement.
- Install the brake pressure modulator valve to the bracket. Refer to
Brake Pressure Modulator Valve Replacement.
- Install the brake pipes to the frame.
- Install the washer bottle bracket to the frame. Refer to
Windshield Washer Solvent Container Replacement.
- Remove the mechanics wire supporting the radiator.
- Install the wheel speed sensor wire harness to the frame.
- Install the electrical harness retainers (1) securing the engine harness (2) to the frame.
- Install the front compartment lower noise shield. Refer to
Front Compartment Lower Noise Shield Replacement.
- Install the front tires and wheels. Refer to
Tire and Wheel Removal and Installation.
- Lower the vehicle.
- Remove the engine support fixture. Refer to
Engine Support Fixture.
- Align the vehicle. Refer to
Wheel Alignment Measurement.
Front Frame Replacement All Wheel Drive
Special Tools
J 39580
Engine Support Stand
Removal Procedure
- Install the engine support fixture. Refer to
Engine Support Fixture.
- Raise and support the vehicle. Refer to
Lifting and Jacking the Vehicle.
- Remove the front wheels. Refer to
Tire and Wheel Removal and Installation.
- Remove the front compartment lower noise shield. Refer to
Front Compartment Lower Noise Shield Replacement.
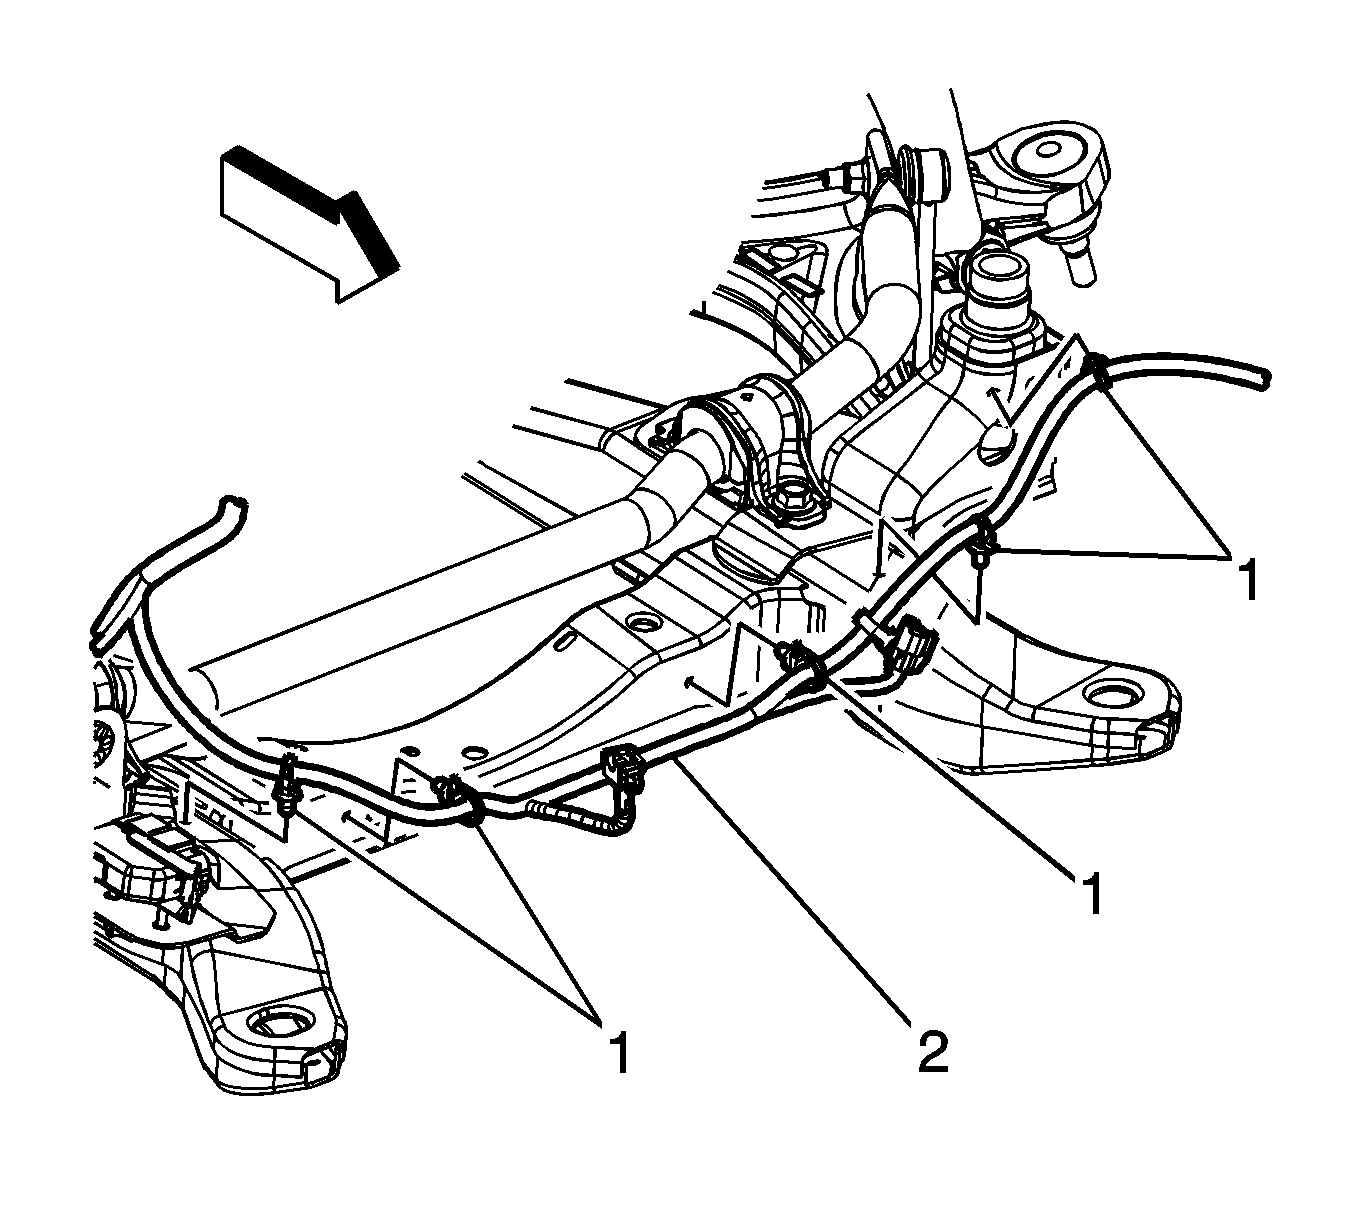
- Remove the electrical harness retainers (1) securing the engine harness (2) to the frame.
- Remove the wheel speed sensor wire harness from the frame.
- Remove the brake pipes from the frame.
- Remove the brake pressure modulator valve from the bracket assembly. Refer to
Brake Pressure Modulator Valve Replacement.
- Using mechanics wire, support the radiator and AC condenser assembly to the vehicle body.
Note: Mark the stabilizer shaft to ensure the correct position when reinstalling.
- Loosen the stabilizer shaft mounting bolts.
- Remove the antilock brake system wire harness from the sway bar links.
- Remove the lower stabilizer shaft link from the lower control arm. Refer to
Stabilizer Shaft Link Replacement.
- Remove the power steering gear mounting bolts. Refer to
Steering Gear Replacement.
- Using mechanics wire secure the power steering gear to the engine.
- Remove the lower control arms. Refer to
Lower Control Arm Replacement.
- Remove the power steering and brake line retainers from the frame.
- Remove the engine mounts lower retaining nuts.
- Install
J 39580
under the frame.
- Lower the vehicle to the frame support table.
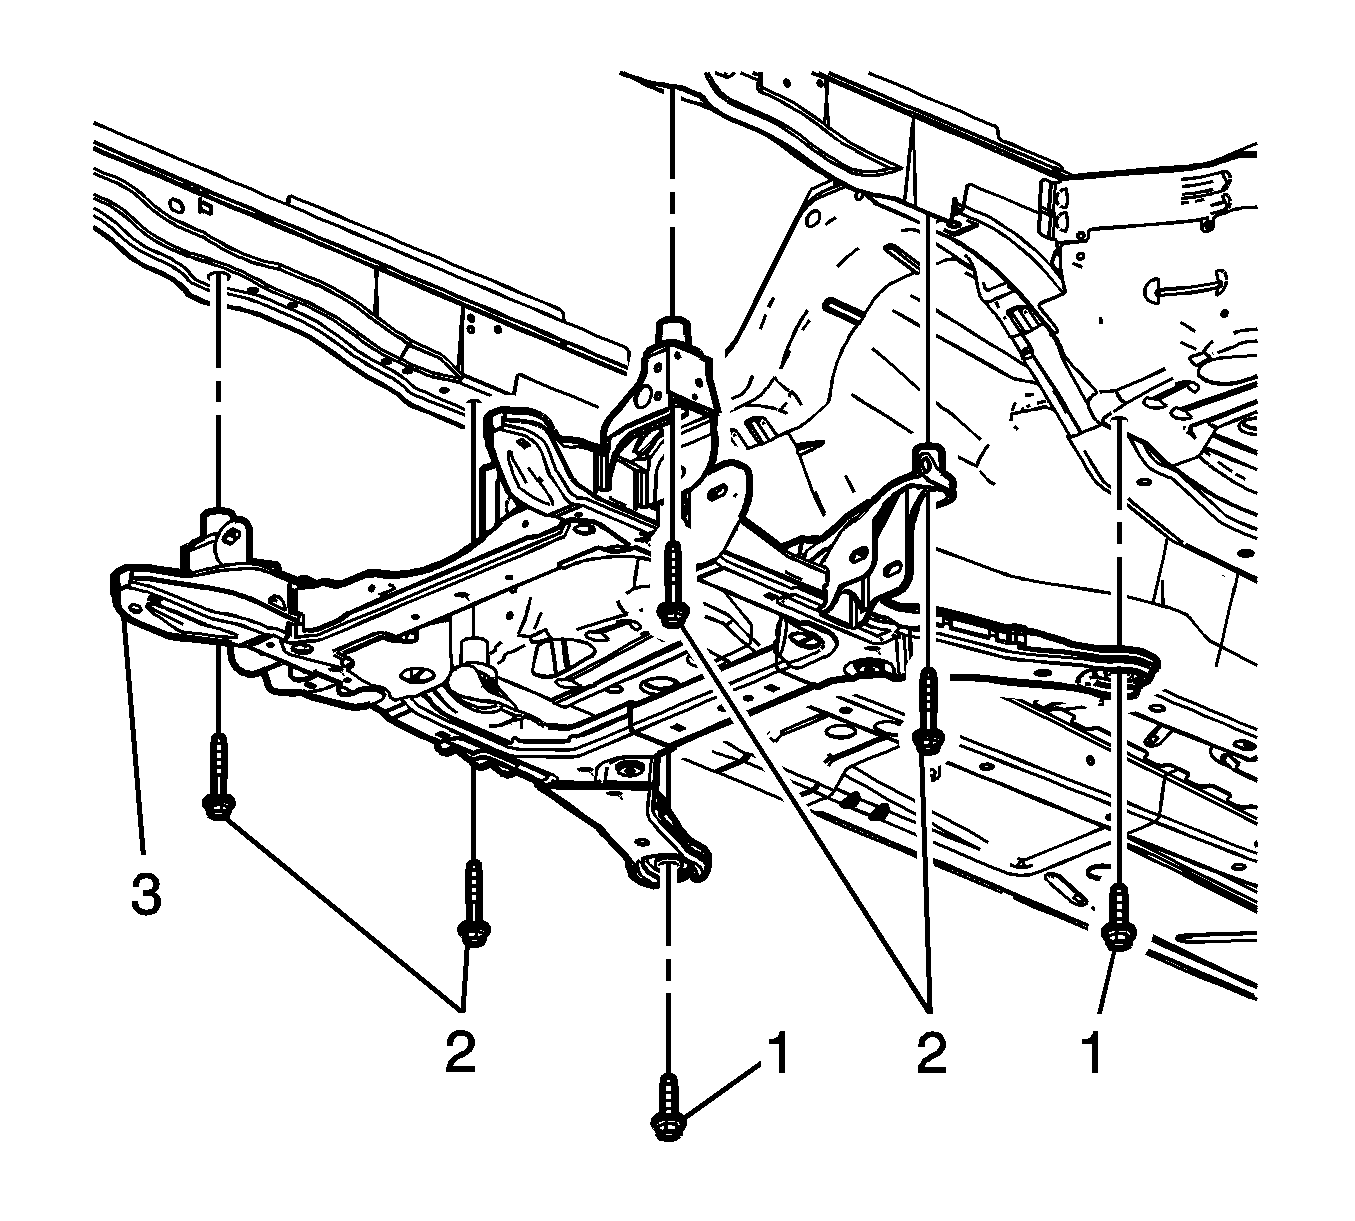
- Remove the frame mounting bolts (1, 2).
- With the aid of an assistant, carefully raise the body from the frame.
- Ensure when raising the body the following items are clear from the frame.
| • | Electrical wiring harnesses |
- Remove the stabilizer shaft. Refer to
Stabilizer Shaft Replacement.
- With the aid of an assistant, remove the frame from the support fixture.
Installation Procedure
- Install the stabilizer shaft to the frame. Refer to
Stabilizer Shaft Replacement.
Do not tighten the stabilizer shaft mounting bolts at this time.
- With the aid of an assistant, position and secure the new frame assembly to the support fixture.
- With the aid of an assistant, carefully lower the body to the frame.
- Ensure the following components are clear from the frame.
| • | The steering knuckle assembly |
Caution: Refer to Fastener Caution in the Preface section.
- Install the frame mountings bolts (2) and tighten to
191 N·m (141 lb ft).
- Install the frame to body bolts (1) and tighten to
250 N·m (180 lb ft)
- Raise the vehicle.
- Install the engine mount lower retaining nuts (2) and tighten to
50 N·m (37 lb ft).
- Remove the
J 39580
from under the vehicle.
- Install the power steering and brake line retainers to the frame.
- Remove the mechanics wire supporting the power steering gear.
- Install the power steering gear mounting bolts. Refer to
Steering Gear Replacement.
- Install the lower control arms. Refer to
Lower Control Arm Replacement.
Note: Ensure correct position from the previously marked spots.
- Tighten the stabilizer shaft bolts to
110 N·m (81 lb ft).
- Install the stabilizer shaft link to the lower control arms. Refer to
Stabilizer Shaft Link Replacement.
- Install the brake pressure modulator valve to the bracket. Refer to
Brake Pressure Modulator Valve Replacement.
- Install the brake pipes to the frame.
- Remove the mechanics wire supporting the radiator.
- Install the wheel speed sensor wire harness to the frame.
- Install the electrical harness retainers (1) securing the engine harness (2) to the frame.
- Install the front compartment lower noise shield. Refer to
Front Compartment Lower Noise Shield Replacement.
- Install the front tires and wheels. Refer to
Tire and Wheel Removal and Installation.
- Lower the vehicle.
- Remove the engine support fixture. Refer to
Engine Support Fixture.
- Align the vehicle. Refer to
Wheel Alignment Measurement.
