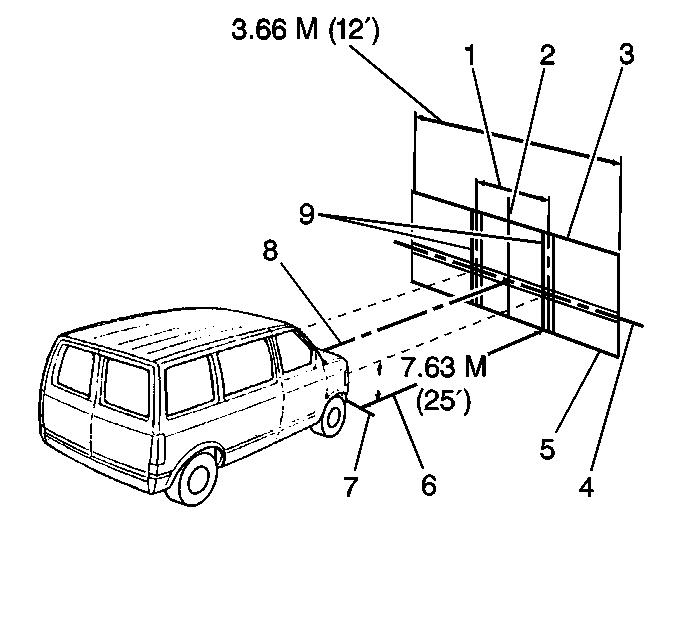
- Ensure that the aiming
area has the following characteristics:
| • | Large enough area in order to accommodate the vehicle and an additional
7.6 m (25 ft) measured from the face of the headlamp to the
visual screen (5) |
| • | Ensure that the floor is level with the bottom of the screen. |
| • | Compensate for a floor that is not level. |
- Ensure that the aiming screen (5) has the following characteristics:
| • | Is 1.52 m (5 ft) high by 3.66 m (12 ft)
wide |
| • | Has a matte white surface |
| • | Is well shaded from outside light |
| • | Is properly adjusted to the floor on which the vehicle stands |
| • | Has the following lines: |
| - | A vertical centerline (8) |
| - | 2 laterally adjustable vertical tapes (9) |
| - | A vertically adjustable horizontal tape (3) |
| - | If a regular commercial aiming screen is not available, the screen may
consist of a vertical wall having a clear uninterrupted area approximately
1.83 m (6 ft) high by 3.66 m (12 ft) wide,
finished with a washable non-gloss white paint. |
Important: Use the following procedure when checking different vehicles:
| • | Adjust the horizontal line or tape (3) on the screen for each
vehicle that you check. |
| | Vehicles of the same model and year will have different standing height
for the headlamps. |
| • | Align the screen parallel with the rear axle. |
| • | Draw a horizontal line that is perpendicular to the centerline
of the screen and pass the line through the center point between the headlamps
(8). |
| • | Paint a reference line (7) on the floor once you have set the
screen in a permanent location. |
| | Use the reference line in order to identify the proper location of the
headlamps while you are aiming the headlamps. |
- Use the following procedure in order to check for beam aim:
| 3.1. | Completely assemble all of the components on the vehicle. |
| 3.2. | Verify that the fuel load is at one-half tank or less. |
| 3.3. | Ensure that the only other load in the vehicle is the driver. |
| 3.4. | Position the vehicle square with the aiming screen. |
| 3.5. | Ensure that the headlamps are directly over the reference line
(7) that has been painted on the floor. |
| 3.6. | Locate the vertical centerline (2) on the aiming screen (5) so
that the aiming screen is in line with the center of the vehicle (8). |
| 3.8. | Rock the vehicle sideways in order to stabilize the suspension. |
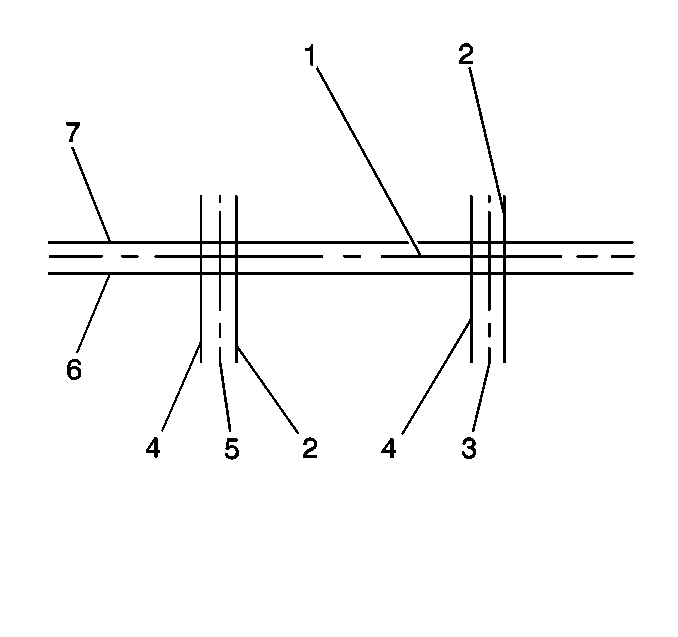
- Switch the headlamps ON
to low beam.
- Observe the left and the top edges of the high intensity zone
on the screen.
- Adjust the horizontal aim by using the horizontal adjusting screw,
if the left edge is beyond the following specifications:
| • | 102 mm (4 in) right (2) of the straight ahead position
(3,5) |
| • | 102 mm (4 in) left (4) of the straight ahead position
(3,5) |
- Adjust the vertical aim by using the vertical adjusting screw,
if the top edge is beyond the following specifications:
| • | 102 mm (4 in) above (7) the horizontal line (1). |
| • | 102 mm (4 in) below (6) the horizontal line (1). |
