For 1990-2009 cars only
Removal Procedure
- Unlatch the folding top. Refer to Power Folding Top Operation .
- Lower the folding top. Refer to Power Folding Top Operation .
- Remove the windshield garnish molding. Refer to Windshield Pillar Garnish Molding Replacement in Interior Trim.
- Disengage the header weatherstrip push pins.
- Remove the header weatherstrip clips.
- Remove the header weatherstrip (1):
Important: You do not need to remove the weatherstrip retainers if only the weatherstrip needs service.
The header weatherstrip push pins are located at the top of the right and left A-pillars.
The header weatherstrip clips are located at the base of the right and left A-pillars.
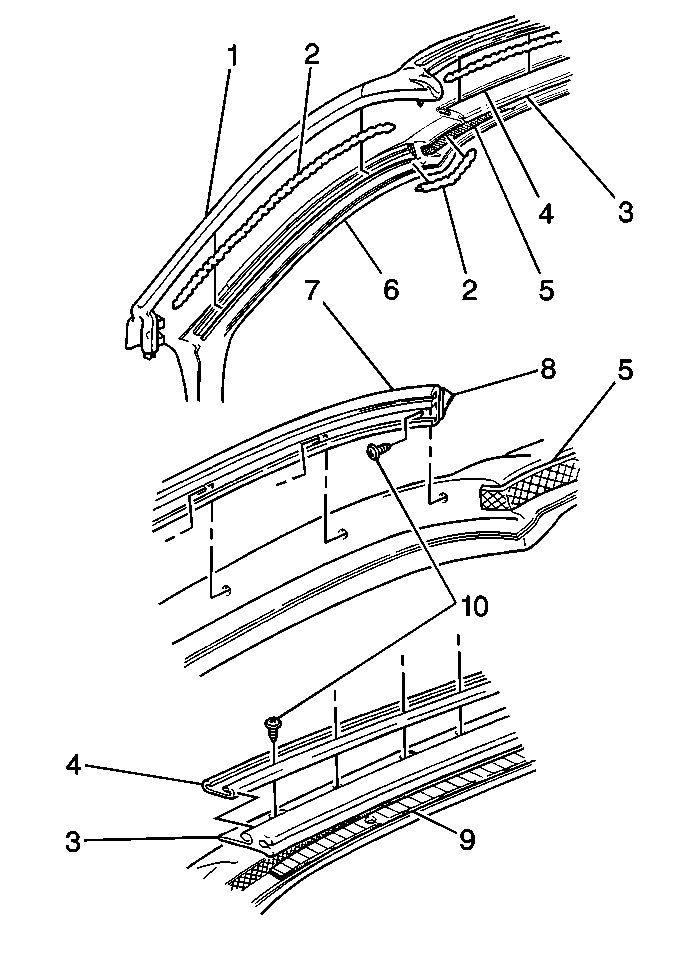
| 6.1. | Pull up the weatherstrip. |
| 6.2. | Insert a flat-blade tool between the weatherstrip and retainers in order to break the cement bond. |
| 6.3. | Remove the screws (10) from the A-pillar weatherstrip retainer (7). |
| 6.4. | Remove the screws (10) from the header weatherstrip retainer (4) and the header garnish molding retainer (3). |
Cleaning and Inspection
- Clean the adhesive from the header weatherstrip (1) if reusing the weatherstrip.
- Clean the adhesive from the header weatherstrip retainer (4) and the A-pillar weatherstrip retainer (7).
- Clean the foam tape (8) from the A-pillar weatherstrip retainer (7).
- Remove the butyl tape (5) from the header surface.
- Remove the foam tape (9) from the header surface.
- Inspect the surface skin of the header weatherstrip (1) for holes, tears, and breaks.
- Replace the weatherstrip if any of the above conditions exist.
Installation Procedure
- Install the foam tape (10) between the header garnish molding retainer (3) and the header surface.
- Use retaining screws (10) in order to install the header weatherstrip retainer (4) and the header garnish molding retainer (3).
- Install foam tape (8) to the rear of the A-pillar weatherstrip retainer (7).
- Use the retaining screws (10) in order to install the A-pillar weatherstrip retainer (7).
- Install 1 mm of butyl tape (5) to the header surface.
- Apply a continuous bead of weatherstrip adhesive (2) to the retainers.
- Install the header weatherstrip (1) to the header weatherstrip retainer (4).
- Engage the front header weatherstrip push pins to the holes at the top of the right and left A-pillars.
- Install the header weatherstrip clips to the pinch flange at the base of the right and left A-pillars.
- Install the windshield garnish molding. Refer to Windshield Pillar Garnish Molding Replacement in Interior Trim.
- Clean any weatherstrip adhesive from the header weatherstrip that may contact the folding top or door glass.
- Raise and latch the folding top. Refer to Power Folding Top Operation .
- Inspect the front header weatherstrip alignment along the front rail weatherstrip, and door glass edge.
Install the tape from the left A-pllar retainer to the right A-pillar retainer.
Important: Seal all components of the weatherstrip with 1 continuous bead of weatherstrip adhesive. Apply a bead of adhesive along the inside of each retainer, ditch moldings, and across body contact surfaces .
Begin installation at the center of the weatherstrip and work outward.
