Tools Required
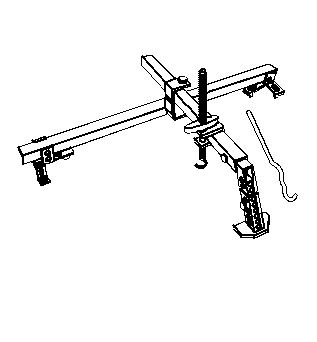
| • | J 28467-360 Engine Support Fixture Adapter |
| • | J 39579 Camshaft Sprocket Wrench |
Removal Procedure
- Disconnect the negative battery cable. Refer to Battery Negative Cable Disconnection and Connection in Engine Electrical.
- Remove the engine front cover. Refer to Engine Front Cover Replacement .
- Raise and support the vehicle. Refer to Lifting and Jacking the Vehicle in General Information.
- Drain cooling system. Refer to Cooling System Draining and Filling in Engine Cooling.
- Remove the timing chain and tensioner. Refer to Camshaft Timing Chain, Sprocket, and Tensioner Replacement .
- Remove the coolant pump assembly to the timing chain housing nuts. Refer to Water Pump Replacement in Engine Cooling.
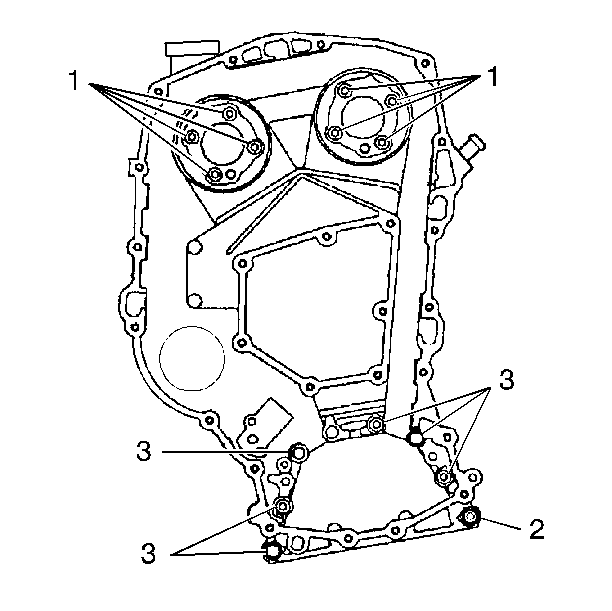
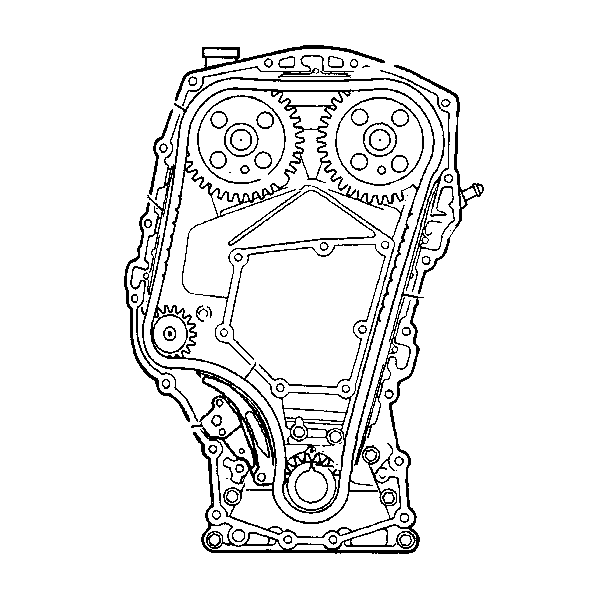
- Remove the timing chain housing to the block fasteners (2, 3).
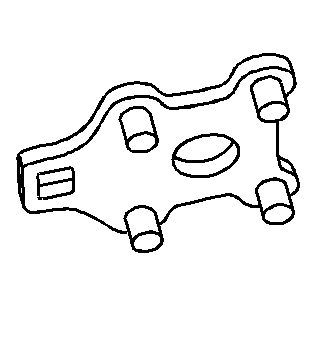
- Remove strut mount bracket. Refer to Engine Mount Strut Bracket Replacement .
- Remove the four oil pan to front cover bolts.
- Remove the lowest front cover retaining stud from the timing chain housing.
- Lower the vehicle.
- Remove the camshaft sprocket retaining bolts and the washers while holding the sprockets with the J 39579 .
- Remove the camshaft sprockets.
- Remove the chain housing to the camshaft housing bolts (1).
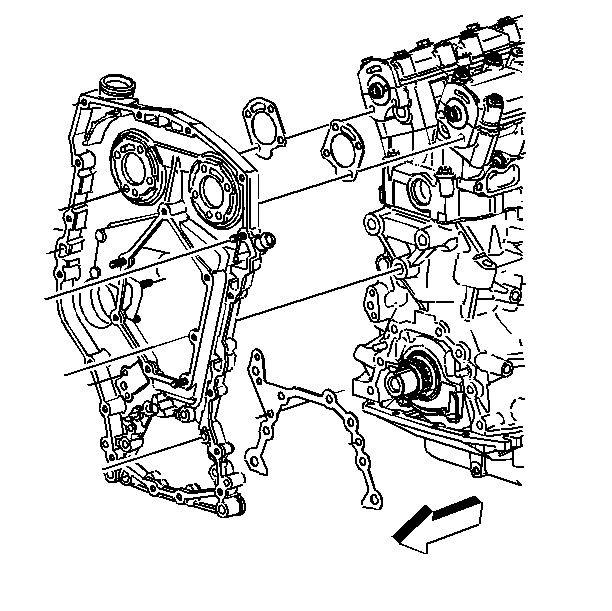
- Remove the timing chain housing and the gaskets.
- Inspect the oil pan gasket silicone bead for the following conditions:
- If any of the conditions exist, replace the pan gasket.
- Inspect the silicone bead across the top of the aluminum carrier at the oil pan, in the cylinder block, and to the timing chain housing three way joint. Repair a damaged bead using the Silicone Rubber Sealant GM P/N 12345739 (Canadian P/N 10953541) or the equivalent.
Important: The timing chain housing to cylinder block and the camshaft housing gaskets can be replaced without removing the timing chain housing from the vehicle.
Removal of the timing chain housing is only required when additional service is being performed on the timing chain housing.Important: The timing chain must be marked prior to removal. If the chain is installed with the wear pattern in the opposite direction, noise and increased wear may occur.
This stud will catch on the body if it is not removed.

The camshaft sprockets are identical and interchangeable.
It may be necessary to raise the engine slightly using the J 28467-360 .
| • | Cuts or nicks |
| • | Deformation |
| • | Separation from the aluminum carrier |
Important: Use only enough sealant to restore the silicone bead to its original dimension. Excess application of sealant may cause part misalignment and oil leaks.
Installation Procedure
- Prior to installing the timing chain housing, ensure that the alignment dowel pins are in the cylinder block and the timing chain housing. The dowel pins ensure proper chain housing and the front cover location for correct front oil seal-to-crankshaft alignment.
- Install the timing chain housing and the new gaskets. Gasket sealer is unnecessary.
- Install the chain housing to the camshaft housing bolts and hand tighten.
- Raise and support the vehicle. Refer to Lifting and Jacking the Vehicle in General Information.
- Install the timing chain housing block fasteners and hand tighten.
- Install the oil pan to the timing chain housing bolts and hand tighten.
- Tighten the timing chain housing block fasteners.
- Tighten the oil pan to the timing chain housing bolts.
- Install the lowest front cover retaining stud into the timing chain housing.
- Install the coolant pump to the timing chain housing and the timing chain housing nuts.
- Lower the vehicle.
- Tighten the timing chain housing to the camshaft housing bolts.
- Install the camshaft sprockets.
- Install the camshaft sprocket bolts and the washers.
- Tighten the camshaft sprocket bolts and the washers while holding the sprocket with the J 39579 .
- Use adhesive/sealant compound GM P/N 12345493 (Canadian P/N 10953488) or equivalent on the camshaft sprocket bolts.
- Clean the old sealant off of the bolt with a wire brush.
- Clean the threaded hole in the camshaft with a round nylon brush.
- Clean the threaded hole in the camshaft with a round nylon brush.
- Install the timing chain and the tensioner. Refer to Camshaft Timing Chain, Sprocket, and Tensioner Replacement .
- Install the front cover and the gaskets. Refer to Engine Front Cover Replacement .
- Connect the negative battery cable. Refer to Battery Negative Cable Disconnection and Connection in Engine Electrical.
Important: Hand tighten all chain housing bolts before tightening to specifications.
Notice: Use the correct fastener in the correct location. Replacement fasteners must be the correct part number for that application. Fasteners requiring replacement or fasteners requiring the use of thread locking compound or sealant are identified in the service procedure. Do not use paints, lubricants, or corrosion inhibitors on fasteners or fastener joint surfaces unless specified. These coatings affect fastener torque and joint clamping force and may damage the fastener. Use the correct tightening sequence and specifications when installing fasteners in order to avoid damage to parts and systems.
Tighten
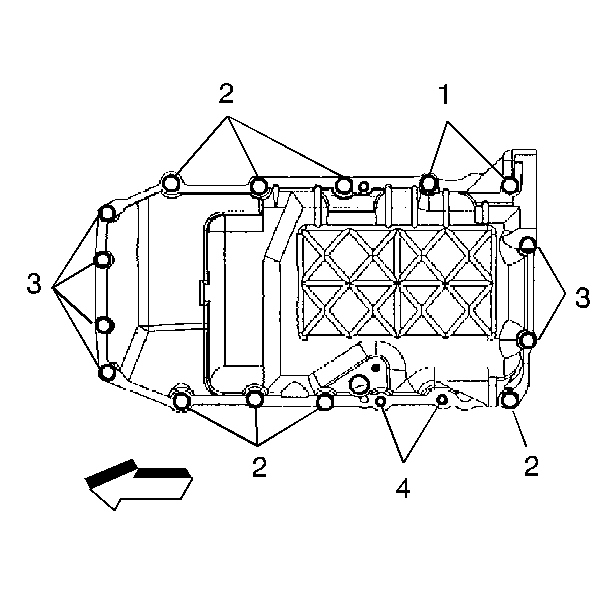
| • | Tighten the M8 X 1.25 X 25 bolts (1) to 26 N·m (19 lb ft). |
| • | Tighten the M8 X 1.55 X 55 bolts (2) to 50 N·m (37 lb ft). |
| • | Tighten the M10 X 1.25 X 35 bolts (3) to 29 N·m (21 lb ft). |
Tighten
Tighten the M6 X 1.00 X 25 bolts (3) to 12 N·m (106 lb ft).
Tighten
Tighten the timing chain housing nuts to 26 N·m (19 lb ft).
Tighten
| • | Tighten the M8 X 1.25 X 25 bolts (1) to 26 N·m (19 lb ft). |
| • | Tighten the M10 X 1.55 X 55 bolts (2) to 50 N·m (37 lb ft). |
| • | Tighten the M8 X 1.25 X 35 bolts (3) to 29 N·m (21 lb ft). |
The camshaft sprockets are identical and interchangeable.
Tighten
Tighten the camshaft sprocket bolts to 70 N·m (52 lb ft).
Important: The side of the timing chain that was marked during the removal must be showing when the chain is installed.
