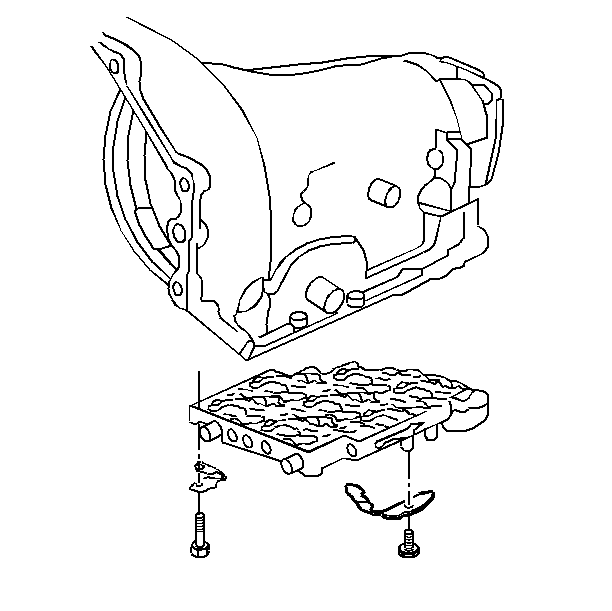
Removal Procedure
- Remove the oil pan, gasket, and filter. Refer to
Automatic Transmission Fluid and Filter Replacement
.
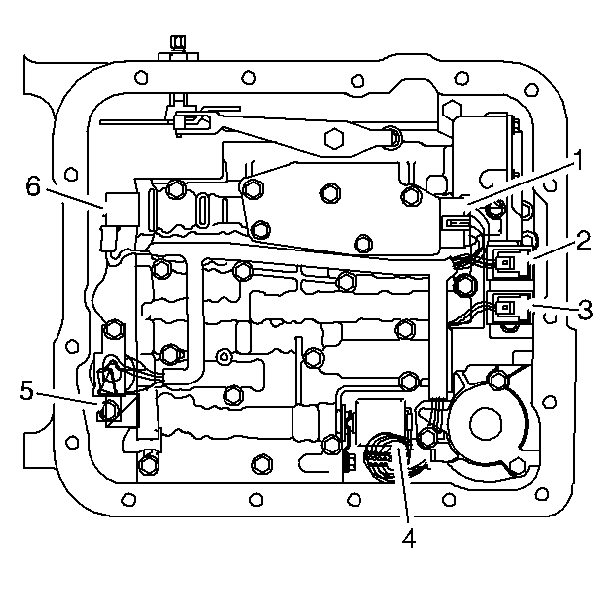
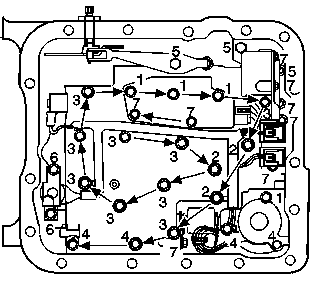
- Disconnect the electrical connectors from the control valve body components.
The electrical connectors locations are referenced by callouts (1) through (6).
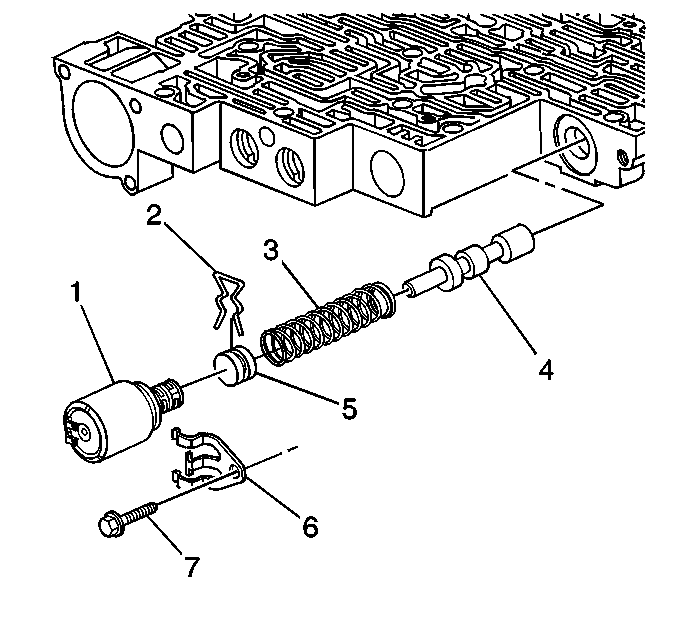
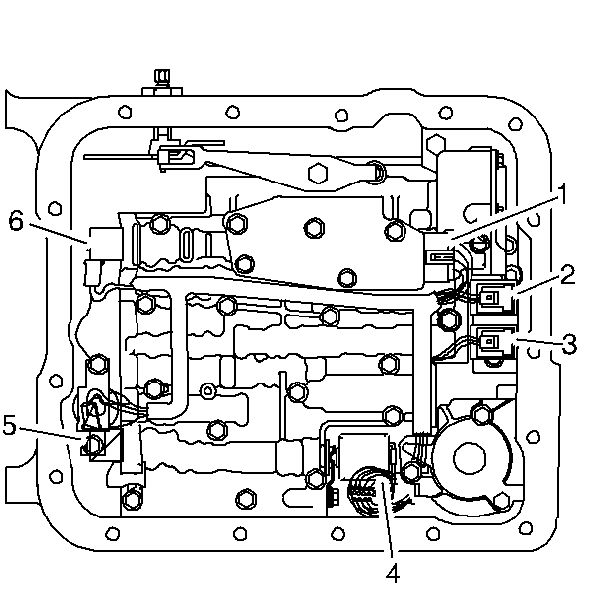
- Remove the bolts securing the pressure switch to the control valve body.
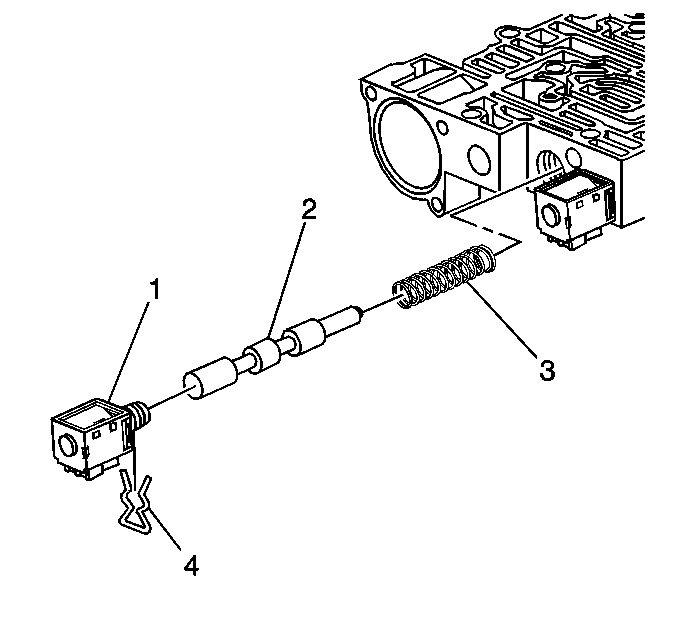
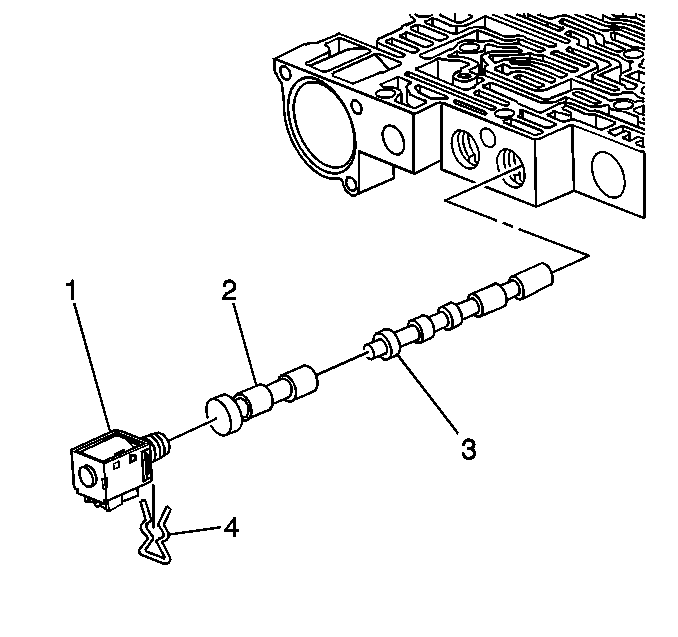
- Remove the torque converter clutch solenoid bolts.
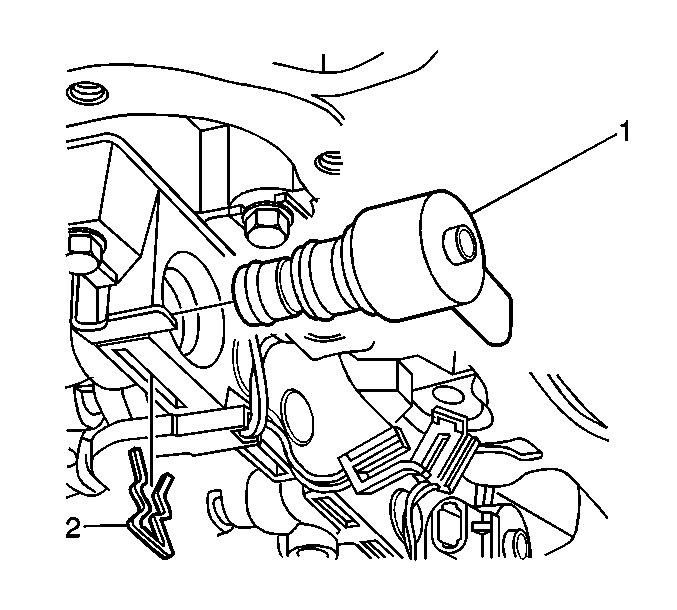
- Remove the retainer clip (2) and torque converter clutch solenoid (1).
- Remove the wiring harness bolts and let the wiring harness hang.
- Remove the manual shift detent spring bolt.
- Remove the manual shift detent spring assembly.
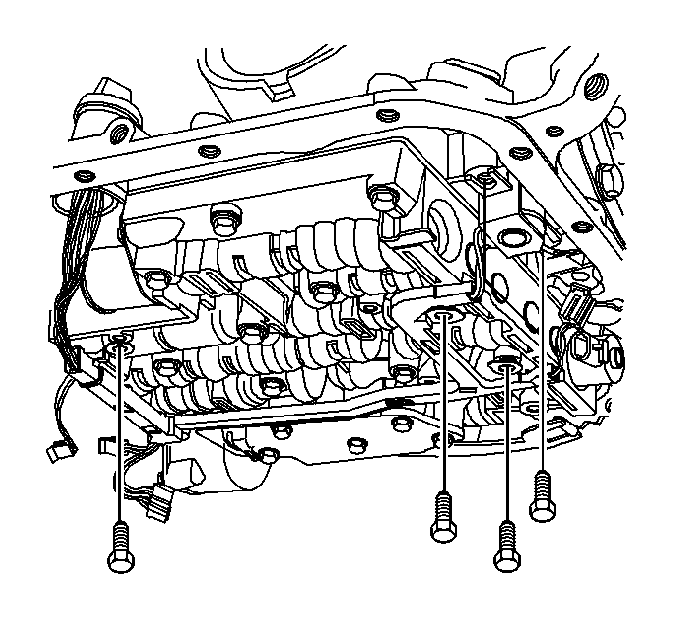
- Remove the remaining control valve body bolts.
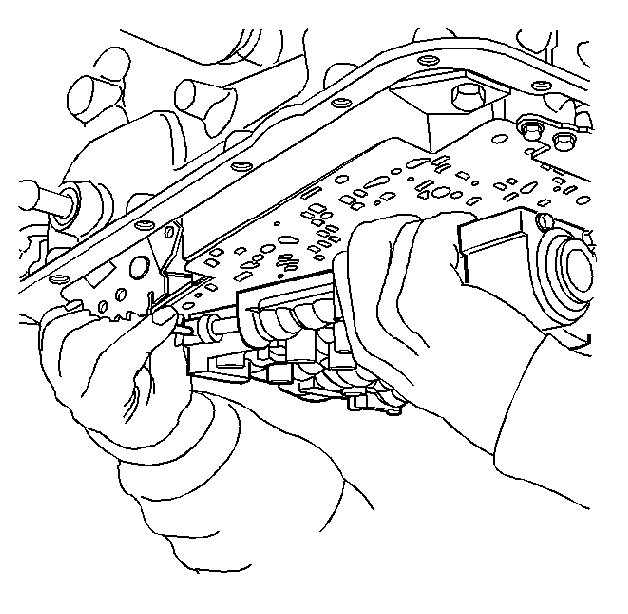
- Remove the manual valve link and the control valve body from the transmission case.
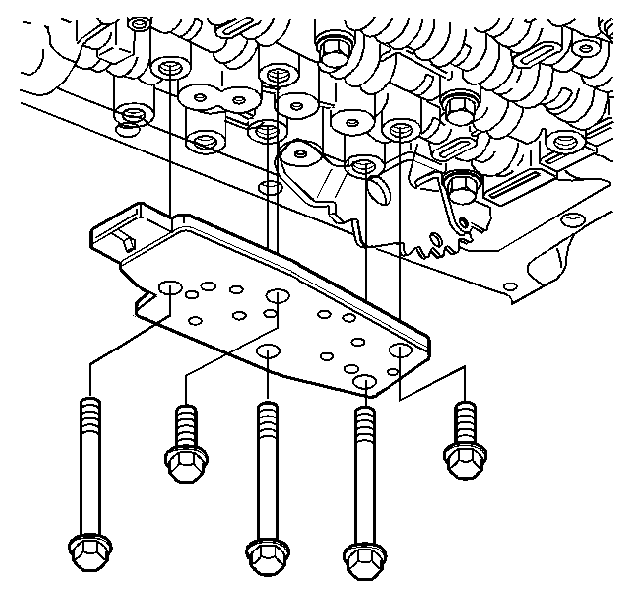
- Remove the accumulator, spacer plate, and gaskets. Refer to
Accumulator Assembly, Spacer Plate, and Gaskets
.
Disassembly Procedure
- Remove the solenoid retainer (4) and the 1-2 shift solenoid (1).
- Remove the 1-2 shift valve (2) and the 1-2 shift valve spring (3).
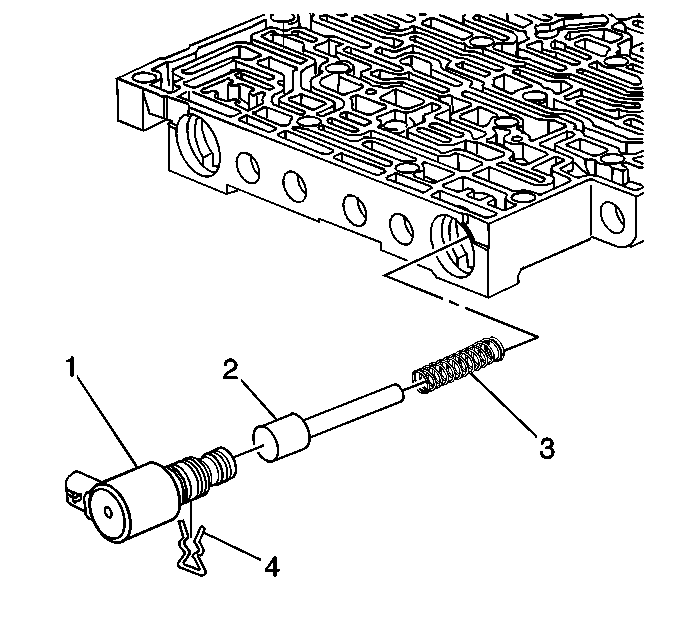
- Remove the solenoid retainer (4) and the 2-3 shift solenoid (1).
- Remove the 2-3 shuttle valve (2) and the 2-3 shift valve (3).
- Remove the coiled spring pin (1).
- Remove the 1-2 accumulator valve sleeve (2).
- Remove the 1-2 accumulator valve (3) and the 1-2 accumulator valve spring (4).
- Remove the solenoid retainer bolt (7) and the solenoid retainer (6). Remove the pressure control solenoid (1).
- Compress the actuator feed limit valve spring (3).
- Remove the bore plug retainer (2) and release the spring slowly.
- Remove the bore plug (5).
- Remove the actuator feed limit valve spring (3) and the actuator feed limit valve (4).
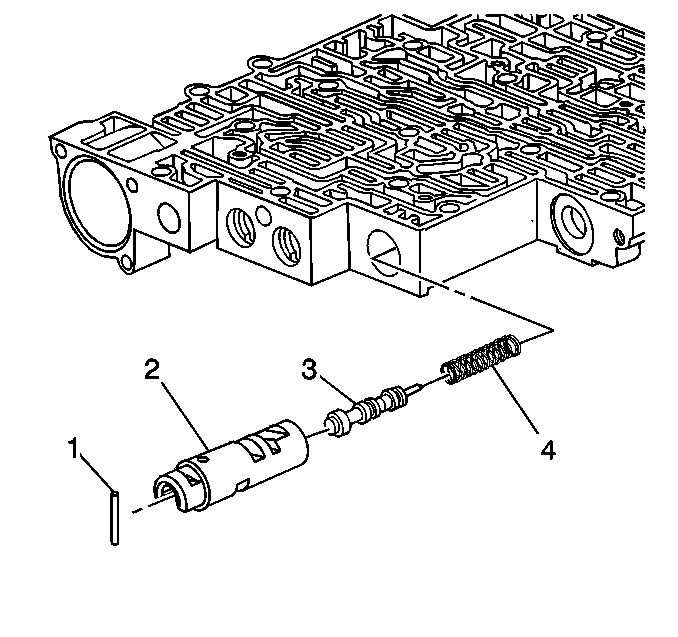
- Remove the solenoid retainer (4) and the 3-2 control solenoid (1).
- Remove the 3-2 control valve (2) and the 3-2 control valve spring (3).
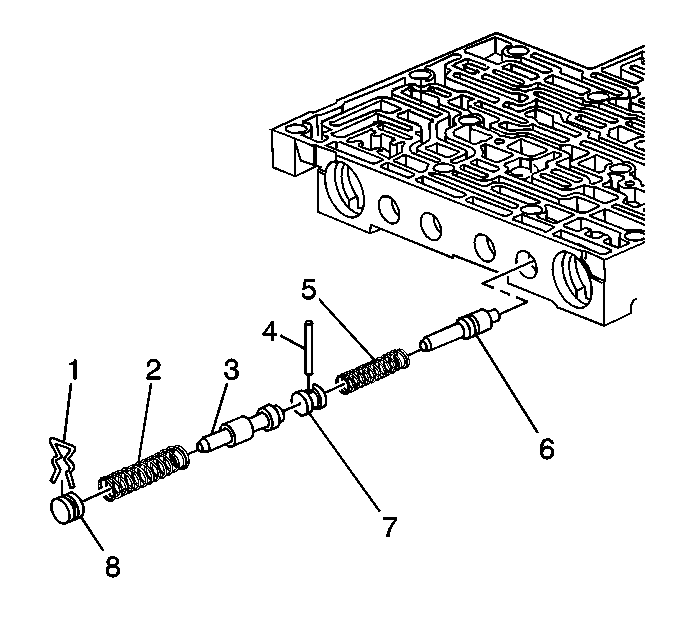
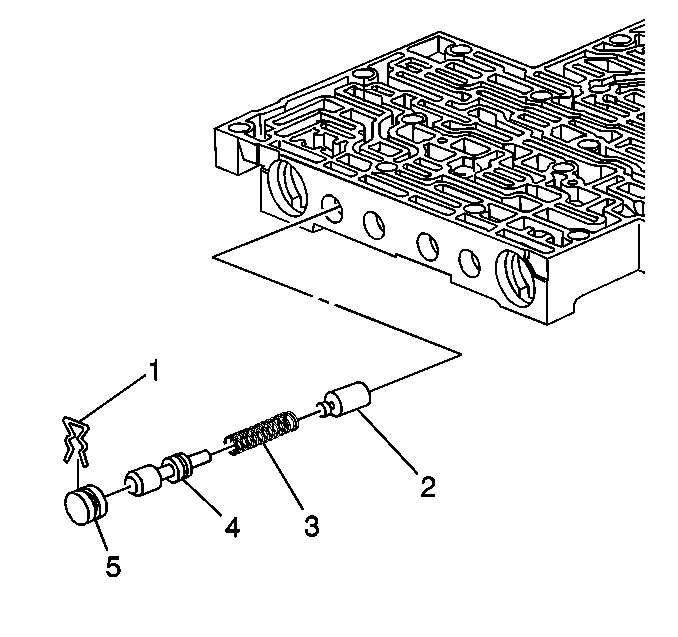
- Remove the bore plug retainer (1) and the bore plug (8).
- Remove the 3-2 downshift valve spring (2) and the 3-2 downshift valve (3).
- Remove the coiled spring pin (4) and the bore plug (7).
- Remove the reverse abuse valve spring (5) and the reverse abuse valve (6).

- Remove the bore plug retainer (1) and the bore plug (4).
- Remove the 3-4 shift valve spring (2) and the 3-4 shift valve (3).
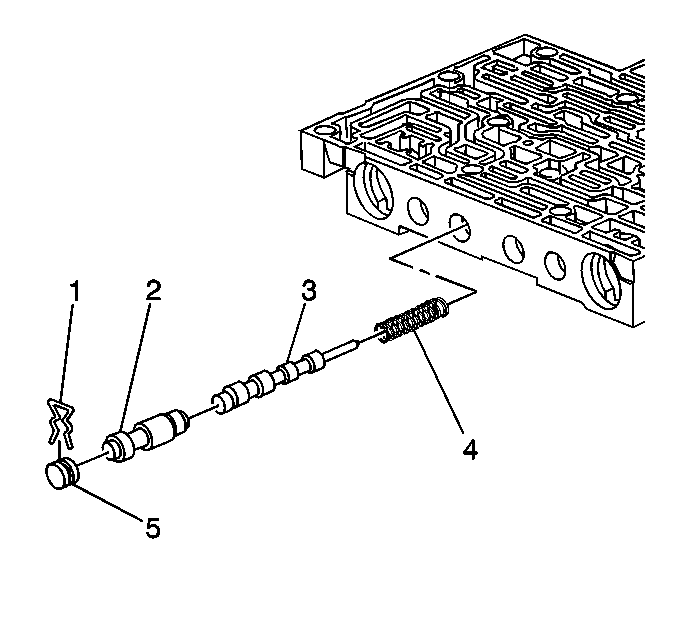
- Remove the bore plug retainer (1) and the bore plug (5).
- Remove the 3-4 relay valve (2) and the 4-3 sequence valve (3) and the 4-3 sequence valve spring (4).
- Remove the bore plug retainer (1) and the bore plug (5).
- Remove the regulator apply valve (4) and the regulator apply spring (3) and the isolator valve (2).
Assembly Procedure
- Install the following items:
| 1.1. | The isolator valve (2) |
| 1.2. | The regulator apply spring (3) |
| 1.3. | The regulator apply valve (4) |
| 1.5. | The bore plug retainer (1) |
Important: Lubricate all parts with Dexron® VI automatic transmission fluid before installation.
- Install the following items:
| 2.1. | The 4-3 sequence valve spring (4) |
| 2.2. | The 4-3 sequence valve (3) |
| 2.3. | The 3-4 relay valve (2) |
| 2.5. | The bore plug retainer (1) |
- Install the following items:
| 3.1. | The 3-4 shift valve (3) |
| 3.2. | The 3-4 shift valve spring (2) |
| 3.4. | The bore plug retainer (1) |
- Install the following items:
| 4.1. | The reverse abuse valve (6) |
| 4.2. | The reverse abuse valve spring (5) |
| 4.4. | The coiled spring pin (4) |
| 4.5. | The 3-2 downshift valve (3) |
| 4.6. | The 3-2 downshift valve spring (2) |
| 4.8. | The bore plug retainer (1) |
- Install the following items:
| 5.1. | The 3-2 control valve spring (3) |
| 5.2. | The 3-2 control valve (2) |
| 5.3. | The 3-2 control solenoid (1) |
| 5.4. | The solenoid retainer (4) |
- Install the following items:
| 6.1. | The actuator feed limit valve (4) |
| 6.2. | The actuator feed limit valve spring (3) |
| 6.4. | The bore plug retainer (2) |
| 6.5. | The pressure control solenoid (1) |
| 6.6. | The solenoid retainer (6) |
| 6.7. | The solenoid retainer bolt (7) |
- Install the following items:
| 7.1. | The 1-2 accumulator valve spring (4) |
| 7.2. | The 1-2 accumulator valve (3) in the 1-2 accumulator valve sleeve (2) |
| 7.3. | The 1-2 accumulator valve and sleeve assembly |
| 7.4. | The coiled spring pin (1) |
- Install the following items:
| 8.1. | The 2-3 shift valve (3) |
| 8.2. | The 2-3 shuttle valve (2) |
| 8.3. | The 2-3 shift solenoid valve (1) |
| 8.4. | The solenoid retainer (4) |
- Install the following items:
| 9.1. | The 1-2 shift valve spring (3) |
| 9.2. | The 1-2 shift valve (2) |
| 9.3. | The 1-2 shift solenoid valve (1) |
| 9.4. | The solenoid valve retainer (4) |
- Install the following items:
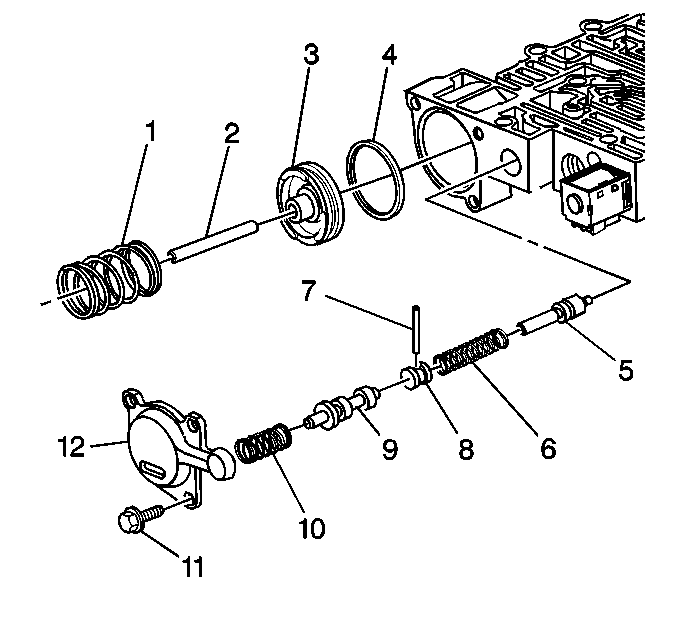
| 10.1. | The forward abuse valve (5) |
| 10.2. | The forward abuse valve spring (6) |
| 10.4. | The coiled spring pin (7) |
| 10.5. | The low overrun valve (9) |
| 10.6. | The low overrun valve spring (10) |
- Install the following items:
| 11.1. | The forward accumulator oil seal (4) on the forward accumulator piston (3) |
| 11.2. | The forward accumulator pin (2) |
| 11.3. | The forward accumulator piston (3) |
| 11.4. | The forward accumulator spring (1) |
| 11.5. | The forward accumulator cover (12) |
| 11.6. | The forward accumulator cover bolts (11) |
- Install the manual valve (1).
Installation Procedure
- Install the accumulator, spacer plate, and gaskets. Refer to
Accumulator Assembly, Spacer Plate, and Gaskets
.
- Install the manual valve link and the control valve body to the transmission case.
Notice: Refer to Fastener Notice in the Preface section.
- Install the remaining control valve body bolts in sequence.
Tighten
Tighten the bolts to 11 N·m (8 lb ft).
- Install the manual shift detent spring assembly.
- Install the manual shift detent spring bolt.
- Install the torque converter clutch solenoid (1) and retainer clip (2).
- Install the wiring harness and bolts.
Tighten
Tighten the bolts to 11 N·m (8 lb ft).
- Install the torque converter clutch solenoid bolts.
Tighten
Tighten the bolts to 11 N·m (8 lb ft).
- Install the bolts securing the pressure switch to the control valve body.
Tighten
Tighten the bolts to 11 N·m (8 lb ft).
- Connect the electrical connectors to the control valve body components.
The electrical connectors locations are referenced
by callouts (1) through (6).
- Install the filter, gasket, and oil pan . Refer to
Automatic Transmission Fluid and Filter Replacement
.
Important: It is recommended that the transmission adaptive pressure (TAP) information be reset.
Resetting the TAP values using a scan tool will erase all learned values in all cells. As a result, the ECM, PCM or TCM
will need to relearn the TAP values. Transmission performance may be affected as new TAP values are learned,
- Reset the TAP values. Refer to
Adapt Function
.
