Steering Knuckle Replacement Independent
Removal Procedure
For control arms and components, refer to
Upper Control Arm Replacement
or
Lower Control Arm Replacement
.
Tools Required
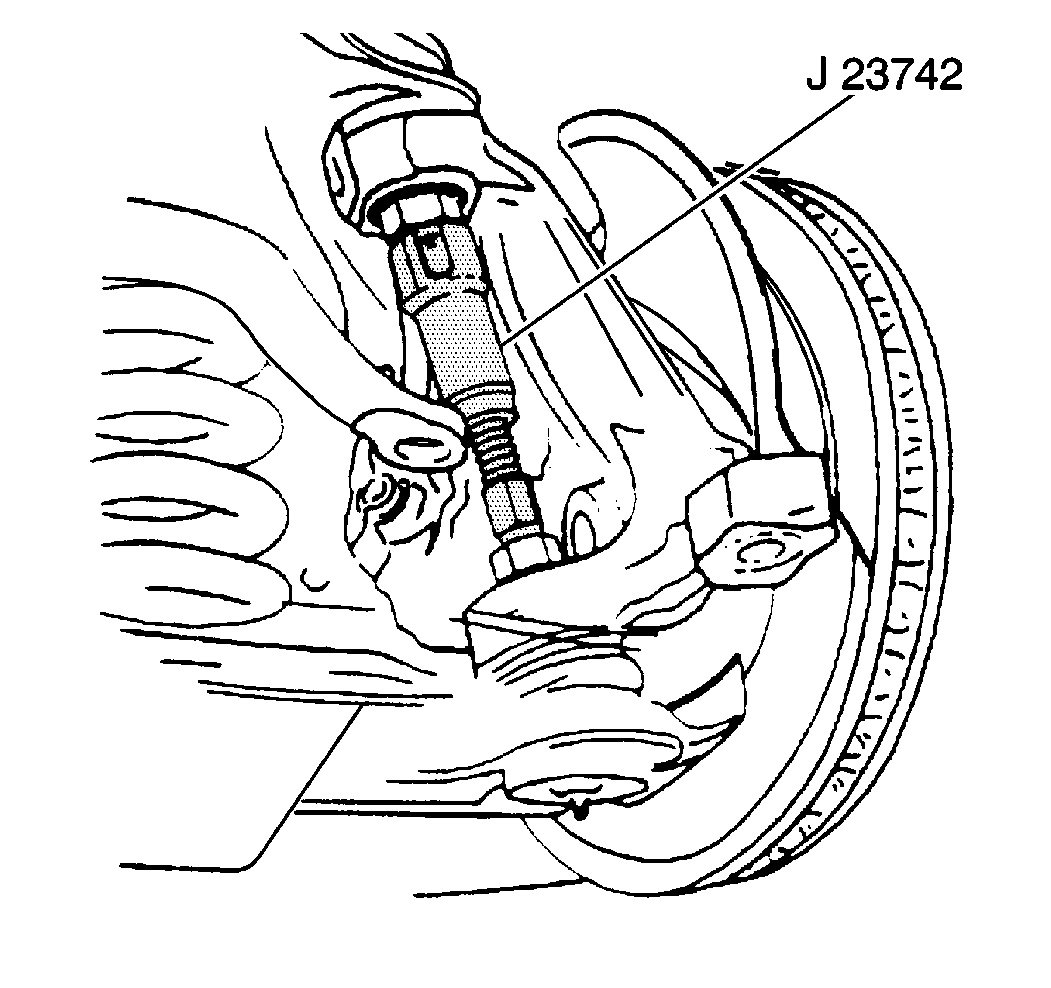
J 23742 Ball Joint
Separator
Important:
| • | Raise and support the vehicle on a twin-post hoist in order to
compress the front coil spring and provide accessibility to the wheel and
the steering knuckle assembly. |
| • | If a frame hoist is used, support the lower control arm with an
adjustable jackstand in order to safely retain the spring in the curb height
position. |
- Raise the vehicle.
- Remove the tire and wheel assembly. Refer to
Tire and Wheel Removal and Installation
in Tires and Wheels.
- Remove the brake caliper. Refer to
Brake Caliper Replacement
in Disc Brakes.
- Remove the hub/rotor. Refer to
Front Wheel Hub, Bearing, and Seal Replacement
.
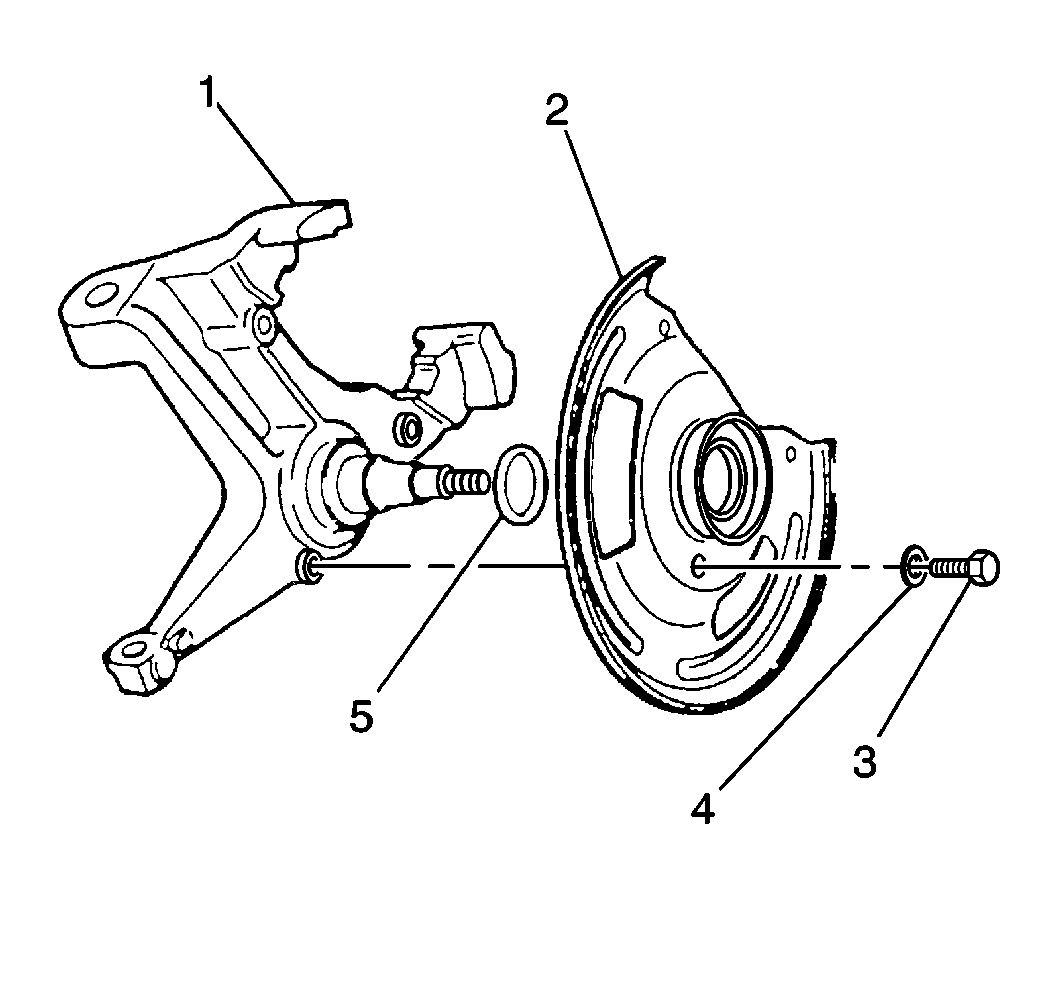
- Remove the bolts (3) and
the washers (4) of the splash shield.
- Remove the gaskets (5).
- Remove the splash shield (2).
- Disconnect the steering knuckle from the tie rod end. Refer to
Tie Rod Replacement
in Steering Linkage.
Caution: Floor jack must remain under the lower control arm during
removal and installation to retain the lower control arm in position. Failure
to do so could result in personal injury.
- Disconnect the steering knuckle from the upper ball joint. Refer to
Upper Control Arm Replacement
.
- Disconnect the steering
knuckle from the lower ball joint.
| 10.1. | Use the J 23742
in
order to break the lower ball joint free from the steering knuckle. |
| 10.2. | Lift the steering knuckle off of the lower ball joint. |
- Inspect the tapered holes in the steering knuckle that attach
to the ball joints and the tie rod end.
| • | If any tapered hole is out of round, deformed, or damaged in any
way, replace the steering knuckle. |
- Inspect the spindle for wear or damage. If the spindle is damaged
or worn, replace the steering knuckle.
Installation Procedure
For control arms and components, refer to
Upper Control Arm Replacement
or
Lower Control Arm Replacement
.
- Connect the steering knuckle to the lower ball joint. Press the
steering knuckle onto the lower ball joint until the knuckle is fully seated.
- Connect the steering knuckle to the upper ball joint. Lower the
upper control arm in order to seat the upper ball joint into the steering
knuckle.
Notice: Use the correct fastener in the correct location. Replacement fasteners
must be the correct part number for that application. Fasteners requiring
replacement or fasteners requiring the use of thread locking compound or sealant
are identified in the service procedure. Do not use paints, lubricants, or
corrosion inhibitors on fasteners or fastener joint surfaces unless specified.
These coatings affect fastener torque and joint clamping force and may damage
the fastener. Use the correct tightening sequence and specifications when
installing fasteners in order to avoid damage to parts and systems.
- Install the lower
and the upper control arm nuts.
Tighten
Tighten the nuts to 122 N·m (90 lb ft).
Important: Maximum torque on the nuts to align the cotter pin is 175 N·m
(130 lb ft).
- Install the cotter pins. If necessary, tighten the nuts an additional
amount in order to align the cotter pin.
- Remove the floor jack.
- Connect the tie rod end to the steering knuckle. Refer to
Tie Rod Replacement
in Steering Linkage.
- Install the splash shield
(2).
- Install the washers (4) and the bolts (3).
Tighten
Tighten the bolts to 13 N·m (120 lb in).
- Install the hub/rotor assembly. Refer to
Front Wheel Hub, Bearing, and Seal Replacement
.
- Install the caliper. Refer to
Brake Caliper Replacement
in Disc Brakes.
- Adjust the wheel bearings. Refer to
Wheel Bearing Adjustment
.
- Install the tire and wheel assembly. Refer to
Tire and Wheel Removal and Installation
in Tires and Wheels.
- Lower the vehicle.
- Check the front wheel alignment. Refer to
Wheel Alignment Specifications
in Wheel Alignment.
Steering Knuckle Replacement I-Beam
Removal Procedure
For front axle, steering knuckle, and hub components, refer to
Front Axle, Steering Knuckle, Hub, and Components (I-Beam Suspension)
- Raise the vehicle. Support the vehicle with safety stands.
- Remove the tire and wheel assembly. Refer to
Tire and Wheel Removal and Installation
in Tires and Wheels.
- Remove the caliper. Refer to
Brake Caliper Replacement
in Disc Brakes.
- Remove the hub/rotor assembly. Refer to
Front Wheel Hub, Bearing, and Seal Replacement
.
- Remove the following components:
- Remove the following components:
| • | Pull the anchor plate and the splash shield off of the knuckle. |
| • | The steering arm hangs from the tie rods. |
- Remove the bolts and the washers in order to separate the anchor
plate from the splash shield. In order to separate the steering arm from the
tie rod and the pitman arm, refer to
Tie Rod Replacement
in Steering Linkage.
- Remove the bolts and the washers from the brake hose bracket.
- Remove the brake hose bracket.
- Remove the steering knuckle gaskets.
- Remove the caps from the steering knuckle.
- Remove the nut and washer from the lock pin.
- Remove the lock pin.
- Remove the king pin from the steering knuckle.
| • | Drive out the king pin using a drift. |
| • | The spacers and the bushings will also come out. |
- Remove the steering knuckle from the axle.
- Remove the following comonents:
Installation Procedure
For front axle, steering knuckle, and hub components, refer to
Front Axle, Steering Knuckle, Hub, and Components (I-Beam Suspension)
- Install the steering knuckle bushings. Ream the new bushings to
29.982-30.022 mm (1.1804-1.1820 in) after installation.
- Install the steering knuckle.
- Install the following components:
- Prelube the thrust bearing. Refer to
Fluid and Lubricant Recommendations
in Maintenance and Lubrication.
- Install the king pin and the lock pin.
| 5.1. | Prelube the king pin. |
| 5.2. | Insert the spacers in the proper order. |
Notice: Use the correct fastener in the correct location. Replacement fasteners
must be the correct part number for that application. Fasteners requiring
replacement or fasteners requiring the use of thread locking compound or sealant
are identified in the service procedure. Do not use paints, lubricants, or
corrosion inhibitors on fasteners or fastener joint surfaces unless specified.
These coatings affect fastener torque and joint clamping force and may damage
the fastener. Use the correct tightening sequence and specifications when
installing fasteners in order to avoid damage to parts and systems.
- Install the washer
and the nut.
Tighten
Tighten the nut to 40 N·m (29 lb ft).
- Install the steering knuckle gaskets.
- Install the caps on the steering knuckle.
- Install the brake hose bracket.
- Install the brake hose bracket washers and the bolts.
Tighten
Tighten the bolts to 7 N·m (60 lb in).
- Install the following components:
- Install the bolts and the washers that attach the splash shield
to the anchor plate.
- Install the following components:
- Attach the anchor plate and the steering arm to the steering knuckle.
Tighten
| • | Tighten the bolts to 16 N·m (12 lb ft). |
| • | Tighten the nuts to 312 N·m (230 lb ft). |
- Install the steering arm to the steering linkage. Refer to Tie
Rod Replacement (I-Beam) in Steering Linkage.
- Install the hub/rotor assembly. Refer to
Front Wheel Hub, Bearing, and Seal Replacement
.
- Adjust the wheel bearings. Refer to
Wheel Bearing Adjustment
.
- Install the caliper. Refer to
Brake Caliper Replacement
in Disc Brakes.
- Install the tire and wheel assembly. Refer to
Tire and Wheel Removal and Installation
in Tires and Wheels.
- Lower the vehicle.
- Check the front wheel alignment. Refer to
Wheel Alignment Specifications
in Wheel Alignment.
