Tools Required
J 1859-A Steering Wheel Puller
Removal Procedure
- Ensure that the turn signal lever on the multifunction switch is in the center or OFF position.
- Disconnect the battery negative cable.
- Disable the SIR system. Refer to Disabling the SIR System in SIR.
- Remove the inflator module. Refer to Inflatable Restraint Steering Wheel Module Replacement in SIR.
- Remove the steering wheel nut.
- Use the J 1859-A in order to remove the steering wheel. Refer to Steering Wheel Replacement .
- Remove the knee bolster. Refer to Driver Knee Bolster Replacement in Instrument Panel, Gages and Console.
- Remove the two TORX head screws from the lower column cover.
- Tilt the cover down and slide the cover back in order to disengage the locking tabs.
- Remove the two TORX® head screws from the upper column cover.
- Remove the steering column lock set. Refer to Ignition Lock Cylinder Replacement - On Vehicle Tilt or Ignition Lock Cylinder Replacement - On Vehicle Standard.
- Remove the upper column cover.
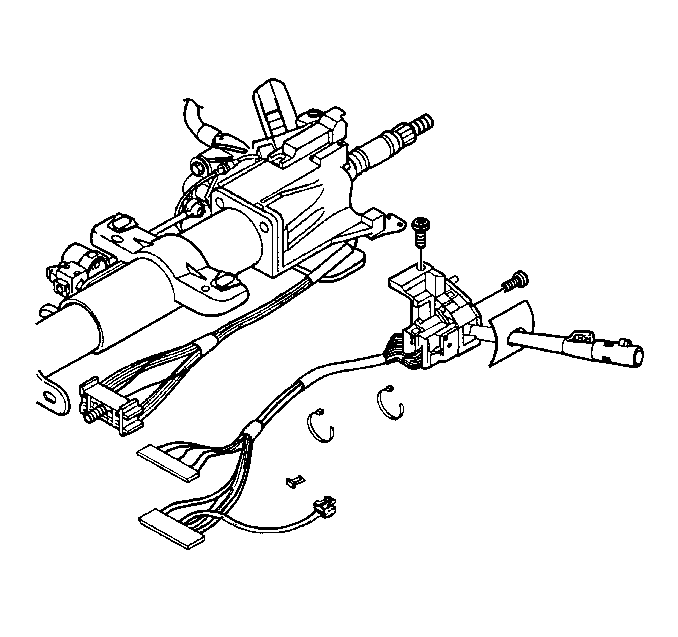
- Remove the two wire harness straps from the steering column wire harness.
- Remove the connector position assurance (CPA) retainer from the brake transmission shift interlock (BTSI).
- Disconnect the steering column bulkhead connector from the vehicle harness.
- Disconnect the gray and black connectors of the switch from the column bulkhead connector.
- Remove the two TORX head screws from the switch.
- Remove the multifunction turn signal/hazard switch from the vehicle.
Caution: Unless directed otherwise, the ignition and start switch must be in the OFF or LOCK position, and all electrical loads must be OFF before servicing any electrical component. Disconnect the negative battery cable to prevent an electrical spark should a tool or equipment come in contact with an exposed electrical terminal. Failure to follow these precautions may result in personal injury and/or damage to the vehicle or its components.
Caution: This vehicle is equipped with a Supplemental Inflatable Restraint (SIR) System. Failure to follow the correct procedure could cause the following conditions:
• Air bag deployment • Personal injury • Unnecessary SIR system repairs • Refer to SIR Component Views in order to determine if you are performing service on or near the SIR components or the SIR wiring. • If you are performing service on or near the SIR components or the SIR wiring, disable the SIR system. Refer to Disabling the SIR System.
Lower the column cover.
Installation Procedure
- Install the multifunction switch to the steering column.
- Install the screws that retain the multifunction switch to the steering column.
- Install the gray and black wiring harness connectors to the steering column bulkhead connector.
- Install the steering column bulkhead connector to the vehicle wire harness.
- Install the connector and the CPA and retainer to the BTSI.
- Install the straps that secure the steering column wiring harness.
- Install the steering column upper cover.
- Install the knee bolster. Refer to Driver Knee Bolster Replacement in Instrument Panel, Gages and Console.
- Install the steering column lock set. Refer to Ignition Lock Cylinder Replacement - On Vehicle .
- install the two TORX head screws to the upper column cover.
- Install the lower column cover.
- Install the two TORX head screws to the lower column cover.
- Make sure the lever is in the center or the OFF position.
- Install the steering wheel onto the steering shaft. Refer to Steering Wheel Replacement .
- Install the steering wheel nut.
- Install the inflator module. Refer to Inflatable Restraint Steering Wheel Module Replacement in SIR.
- Enable the SIR system. Refer to Enabling the SIR System in SIR.
- Connect the battery negative cable.
| • | Use a small screwdriver in order to compress the electrical contact and move the multifunction switch into position. |
| • | The electrical contact must rest on the canceling cam assembly. |
Tighten
Tighten the screws to 6 N·m (53 lb in).
Tighten
Tighten the center screw to 6 N·m (53 lb in).
Tighten
Tighten the steering column bracket nuts to 30 N·m
(22 lb ft).
Tighten
Tighten the screws to 1.4 N·m (12 lb in).
Tighten
Tighten the screws to 6 N·m (53 lb in).
Tighten
Tighten the steering wheel nut to 40 N·m
(29 lb ft).
