Air Conditioning Compressor Replacement L18
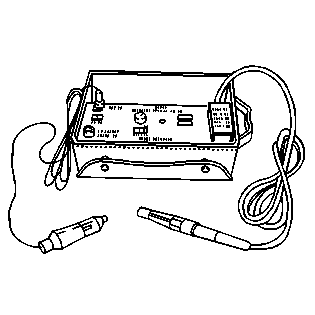
Special Tools
J 39400-A Halogen Leak Detector
Removal Procedure
- Remove the right wheelhouse panel. Refer to Wheelhouse Panel Replacement.
- Recover the refrigerant from the A/C system. Refer to Refrigerant Recovery and Recharging.
- Remove the air cleaner layer. Refer to Air Cleaner Replacement.
- Remove the drive belt. Refer to Drive Belt Replacement.
- Disconnect the compressor clutch electrical connector.
- Disconnect the high pressure switch electrical connector.
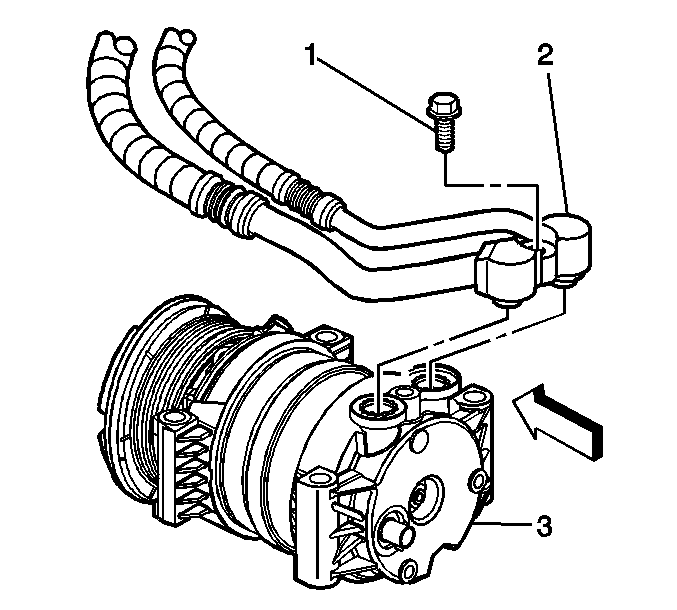
- Remove the compressor hose bolt (1).
- Disconnect the compressor hose (2).
- Remove the refrigerant hoses (2) from the compressor (3).
- Remove the compressor sealing washers and discard.
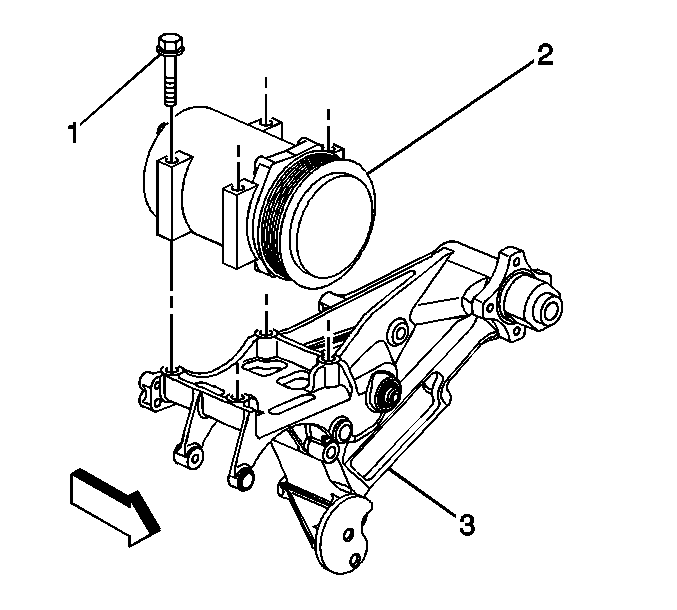
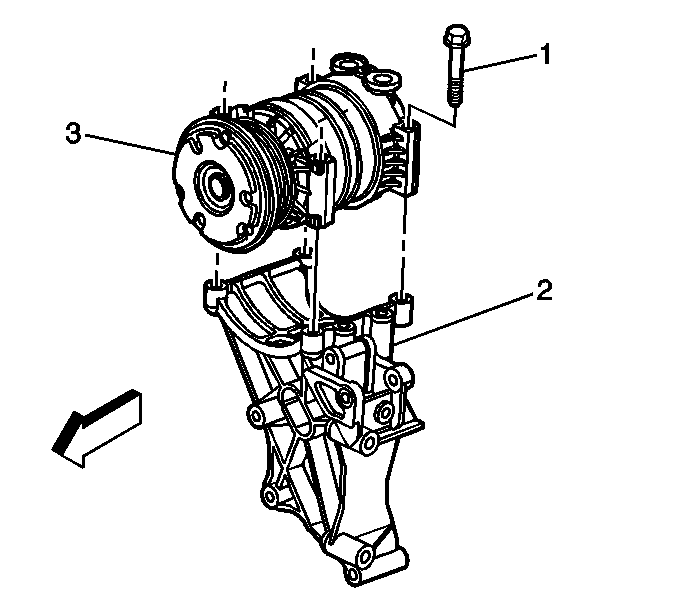
- Remove the compressor mounting bolts (1).
- Remove the compressor (2).
- If replacing the compressor, balance the refrigerant oil. Refer to Air Conditioning Compressor Oil Balancing.

Note: When removing the sealing washers, prevent dirt and foreign material from getting on the following sealing surfaces:
• The washers • The hose fitting • The compressor sealing surface
Installation Procedure
- Identify the clutch coil electrical connector. Refer to Component Connector End Views.
- Splice the new pigtail into the wiring harness to replace the clutch coil electrical connector. Refer to Splicing Copper Wire Using Splice Sleeves.
- Install the compressor (2).
- Install the new compressor sealing washers. Refer to Sealing Washer Replacement.
- Install the compressor mounting bolts (1).
- Install the new compressor sealing washers. Refer to Sealing Washer Replacement.
- Connect the refrigerant hoses (2) to the compressor (3).
- Install the compressor hose bolt (1).
- Connect the compressor clutch electrical connector.
- Connect the high pressure switch electrical connector.
- Install the drive belt. Refer to Drive Belt Replacement.
- Install the air cleaner layer. Refer to Air Cleaner Replacement.
- Evacuate and recharge the A/C system. Refer to Refrigerant Recovery and Recharging.
- Leak test the fittings of the component using the J 39400-A .
- Install the right wheelhouse panel. Refer to Wheelhouse Panel Replacement.
Note: If installing a Sanden compressor on a vehicle previously equipped with a Delphi compressor, perform installation steps 1 and 2 before installing the A/C compressor.
Caution: Refer to Fastener Caution in the Preface section.
Tighten
Tighten the bolts to 50 N·m (37 lb ft).
Tighten
Tighten the bolt to 35 N·m (26 lb ft).
Air Conditioning Compressor Replacement LMM
Special Tools
J 39400-A Halogen Leak Detector
Removal Procedure
- Remove the left wheelhouse panel. Refer to Wheelhouse Panel Replacement.
- Remove the air cleaner assembly. Refer to Air Cleaner Assembly Replacement.
- Remove the drive belt. Refer to Drive Belt Replacement.
- Recover the refrigerant from the A/C system. Refer to Refrigerant Recovery and Recharging.
- Disconnect the compressor clutch electrical connector.
- Disconnect the high pressure switch connector.
- Remove the compressor hose bolt (1).
- Disconnect the compressor hose.
- Remove the refrigerant hoses (2) from the compressor (3).
- Remove the compressor sealing washers. Discard the compressor sealing washers.
- Remove the compressor mounting bolts (1).
- Remove the compressor (3) from the drive belt tensioner bracket (2).
- If replacing the compressor, balance the refrigerant oil. Refer to Air Conditioning Compressor Oil Balancing.
Note: When removing the sealing washers, prevent dirt and foreign material from getting on the following sealing surfaces:
• The washers • The hose fitting • The compressor sealing surface
Installation Procedure
- Identify the clutch coil electrical connector. Refer to Inline Harness Connector End Views.
- Splice the new pigtail into the wiring harness to replace the clutch coil electrical connector. Refer to Splicing Copper Wire Using Splice Sleeves.
- Install the compressor (3).
- Install the compressor mounting bolts (1).
- Install the new compressor sealing washers. Refer to Sealing Washer Replacement.
- Connect the refrigerant hoses (2) to the compressor (3).
- Install the compressor hose bolt (1).
- Connect the compressor clutch electrical connector.
- Connect the high pressure switch connector.
- Evacuate and recharge the A/C system. Refer to Refrigerant Recovery and Recharging.
- Install the drive belt. Refer to Drive Belt Replacement.
- Install the air cleaner assembly. Refer to Air Cleaner Assembly Replacement.
- Leak test the fittings of the component using the J 39400-A .
- Install the left wheelhouse panel. Refer to Wheelhouse Panel Replacement.
Note: If installing a Sanden compressor on a vehicle previously equipped with a Delphi compressor, perform installation steps 1 and 2 before installing the A/C compressor.
Caution: Refer to Fastener Caution in the Preface section.
Tighten
Tighten the bolts to 50 N·m (37 lb ft).
Tighten
Tighten the bolt to 35 N·m (26 lb ft).
