For 1990-2009 cars only
Air Conditioning Condenser Replacement V22
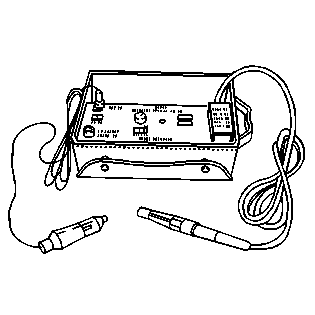
Special Tools
J 39400-A Halogen Leak Detector
Removal Procedure
- Recover the refrigerant from the A/C system. Refer to Refrigerant Recovery and Recharging.
- Remove the grille and the upper grille brackets, if equipped.
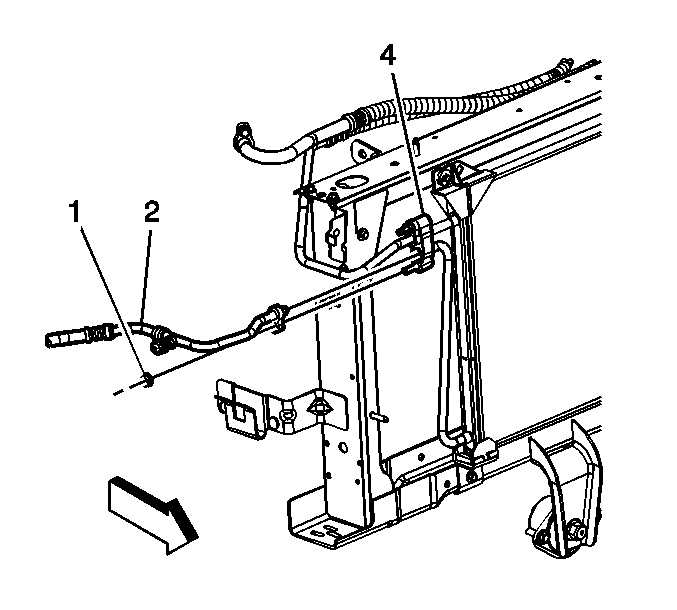
- Remove the condenser inlet hose nuts (3).
- Remove the condenser inlet hose (4) from the condenser.
- Remove the condenser outlet hose retaining nut (1).
- Remove the condenser outlet hose (2) from the condenser.
- Remove the upper transmission oil cooler bracket nuts, if equipped.
- Remove the transmission oil cooler from the studs, if equipped.
- Remove the sealing washers from the hoses.
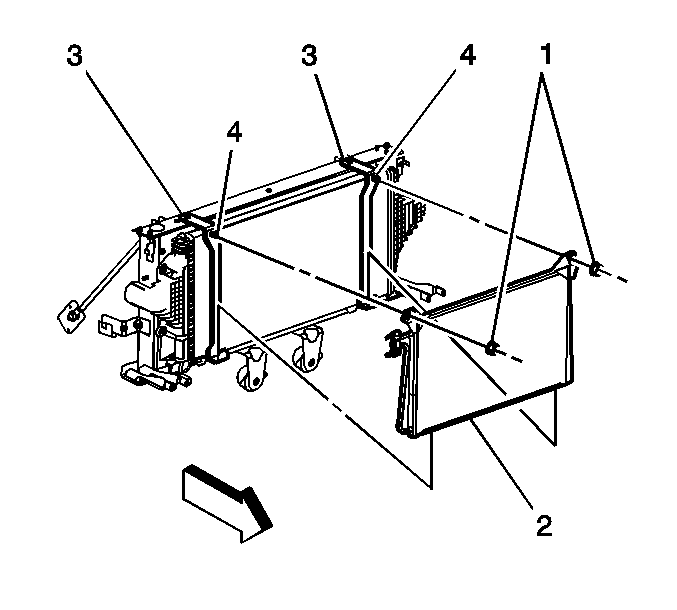
- Remove the condenser retaining nuts (1).
- Remove the condenser (2) by sliding it to the side and removing through the top center.
- Cap off the condenser fittings.

Installation Procedure
- Add PAG oil to the condenser. Refer to Refrigerant System Capacities.
- Remove the plugs from the condenser fittings.
- Install new sealing washers. Refer to Sealing Washer Replacement.
- Install the condenser from the top center.
- Install the condenser retaining nuts (1).
- Install the transmission oil cooler onto the studs.
- Install the transmission oil cooler nuts.
- Install the condenser outlet hose (2) to the condenser (4).
- Install the condenser outlet hose nut (1).
- Install the condenser inlet hose (4) to the condenser (1).
- Install the condenser inlet hose nuts (3).
- Evacuate and recharge the A/C system. Refer to Refrigerant Recovery and Recharging.
- Leak test the fittings of the component using the J 39400-A .
Caution: Refer to Fastener Caution in the Preface section.
Tighten
Tighten the nuts to 9 N·m (80 lb in).
Tighten
Tighten the nuts to 9 N·m (80 lb in).
Tighten
Tighten the nut to 16 N·m (12 lb ft).
Tighten
Tighten the nuts to 16 N·m (12 lb ft).
Air Conditioning Condenser Replacement GRW
Special Tools
J 39400-A Halogen Leak Detector
Removal Procedure
- Remove the right wheelhouse panel. Refer to Wheelhouse Panel Replacement.
- Recover the refrigerant from the A/C system. Refer to Refrigerant Recovery and Recharging.
- Remove the grille. Refer to Grille Replacement.
- Remove the compressor hose assembly retaining nuts (4).
- Remove the compressor hose from the condenser.
- Remove the evaporator hose retaining nut (1).
- Remove the evaporator hose assembly from the condenser.
- Remove the sealing washers from the hoses.
- Remove the condenser retaining nuts (1).
- Remove the condenser (2).
- Cap off the condenser fittings.
Installation Procedure
- Add PAG oil to the condenser. Refer to Refrigerant System Capacities.
- Remove the plugs from the condenser fittings.
- Install new sealing washers. Refer to Sealing Washer Replacement.
- Install the condenser.
- Install the condenser retaining nuts (1).
- Install the evaporator hose (2) to the condenser (4).
- Install the evaporator hose retaining nut (1).
- Install the compressor hose assembly (4) to the condenser (1).
- Install the compressor hose assembly nuts (3).
- Inspect the engine oil level. Refer to Approximate Fluid Capacities.
- Evacuate and recharge the A/C system. Refer to Refrigerant Recovery and Recharging.
- Install the grille. Refer to Grille Replacement.
- Leak test the fittings of the component using the J 39400-A .
- Install the right wheelhouse panel. Refer to Wheelhouse Panel Replacement.
Caution: Refer to Fastener Caution in the Preface section.
Tighten
Tighten the nuts to 9 N·m (80 lb in).
Tighten
Tighten the nut to 16 N·m (12 lb ft).
Tighten
Tighten the nuts to 16 N·m (12 lb ft).
