Fuel Tank Replacement Rear Mounted - 15 Gal
Removal Procedure
- Drain the fuel tank. Refer to Fuel Tank Draining .
- Raise and suitably support the vehicle, if required. Refer to Lifting and Jacking the Vehicle .
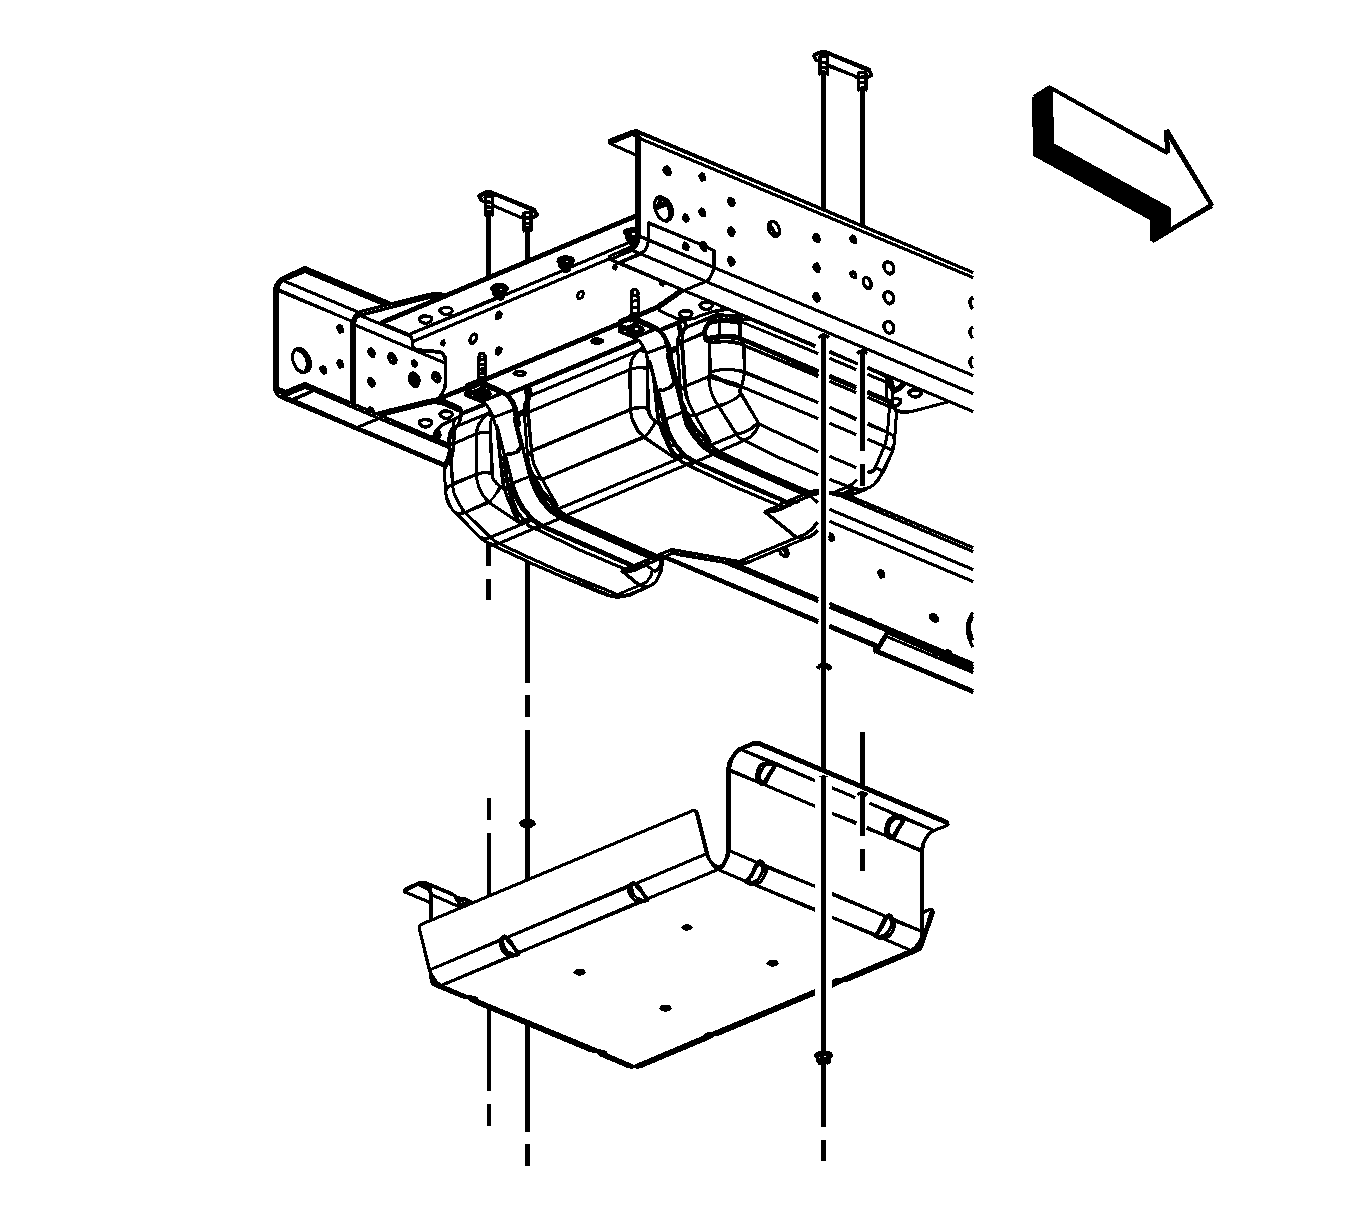
- Place a adjustable jack under the fuel tank shield.
- Remove the fuel tank shield nuts.
- Using the adjustable jack, lower and remove the fuel tank shield.
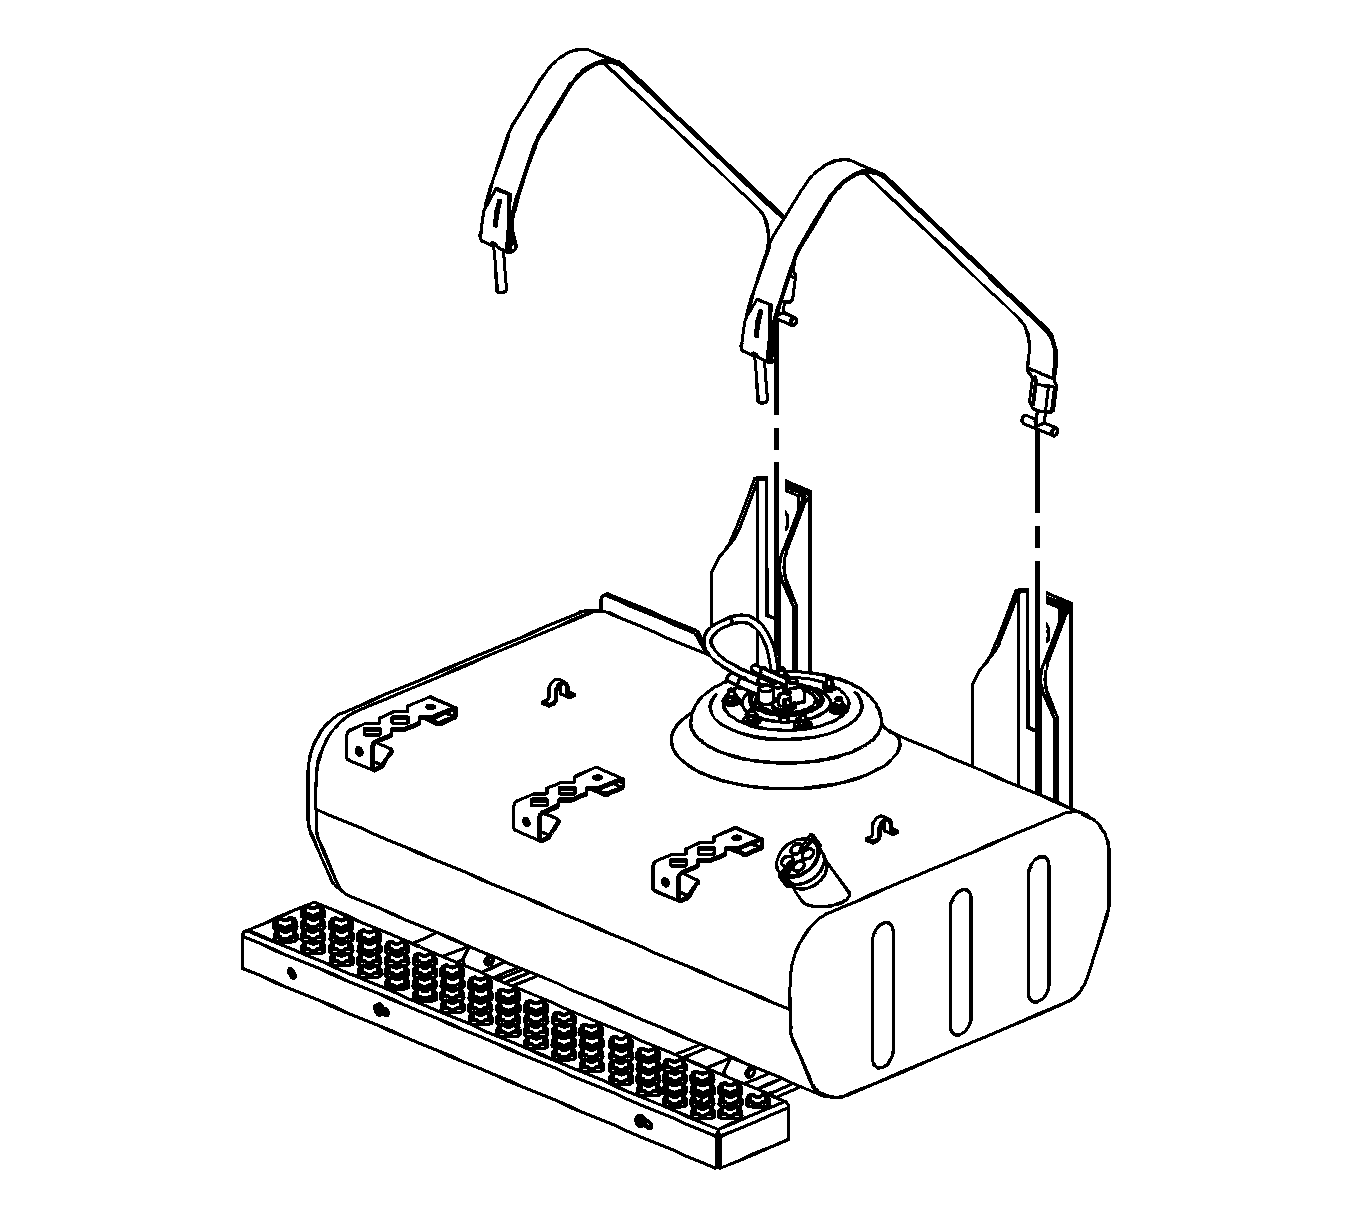
- Disconnect the fuel tank vent hose at the fuel tank, as required.
- Disconnect the fuel tank fill pipe from the fuel tank, as required.
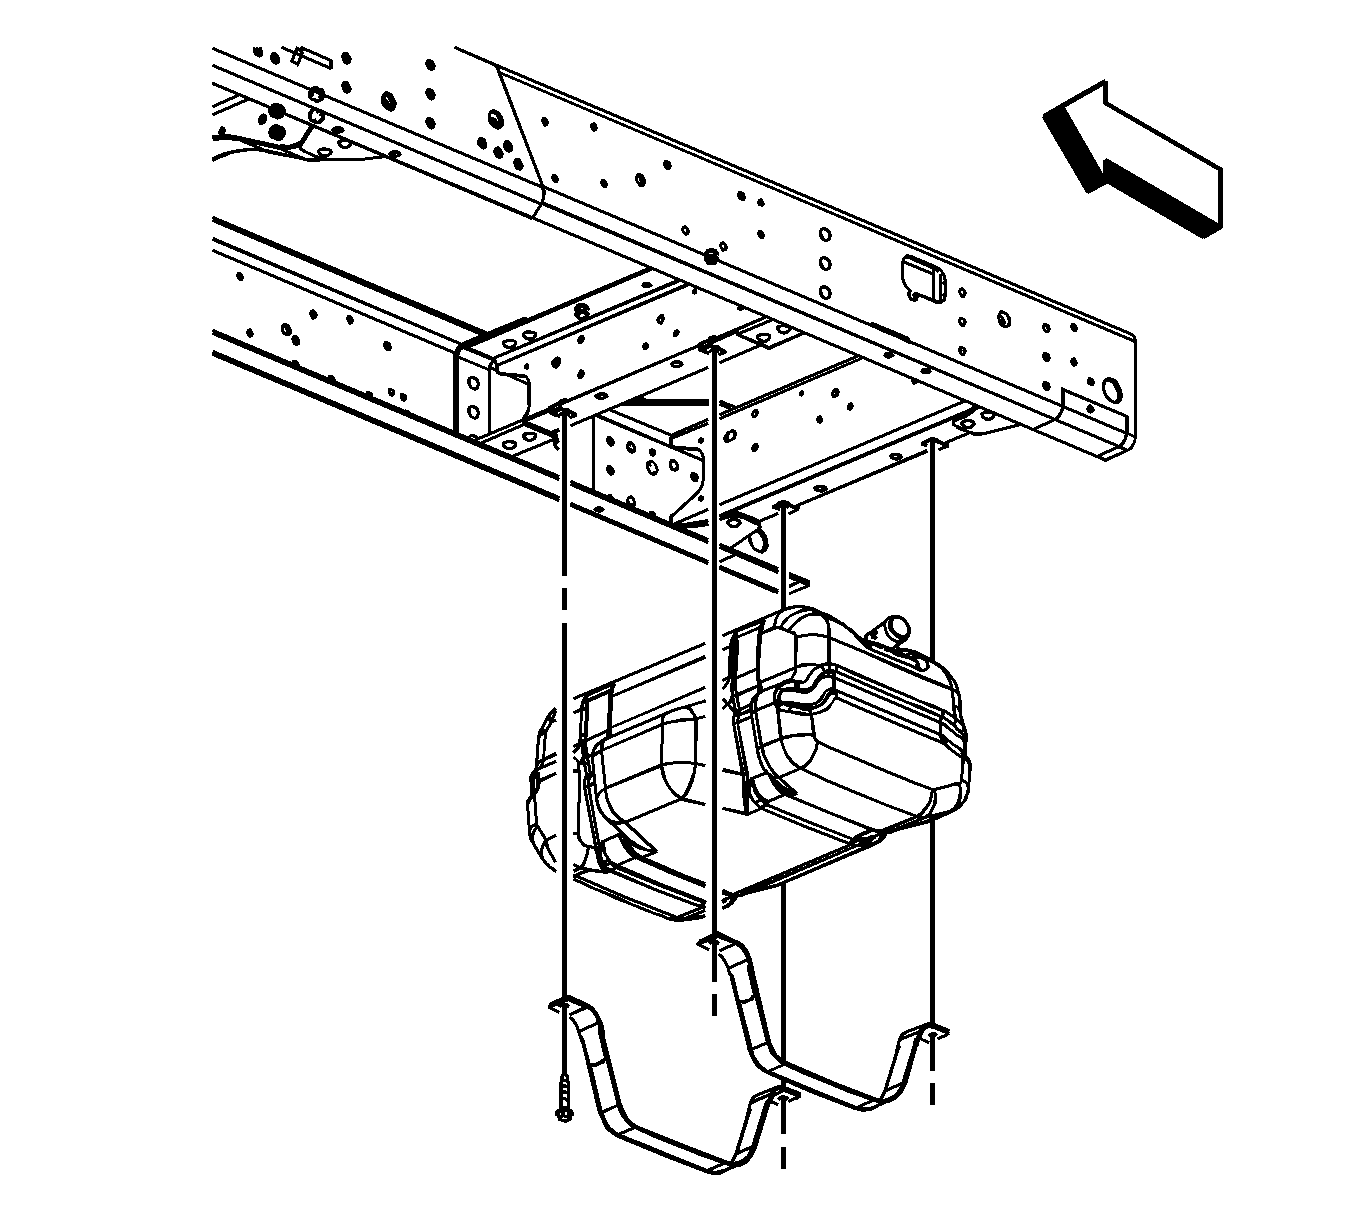
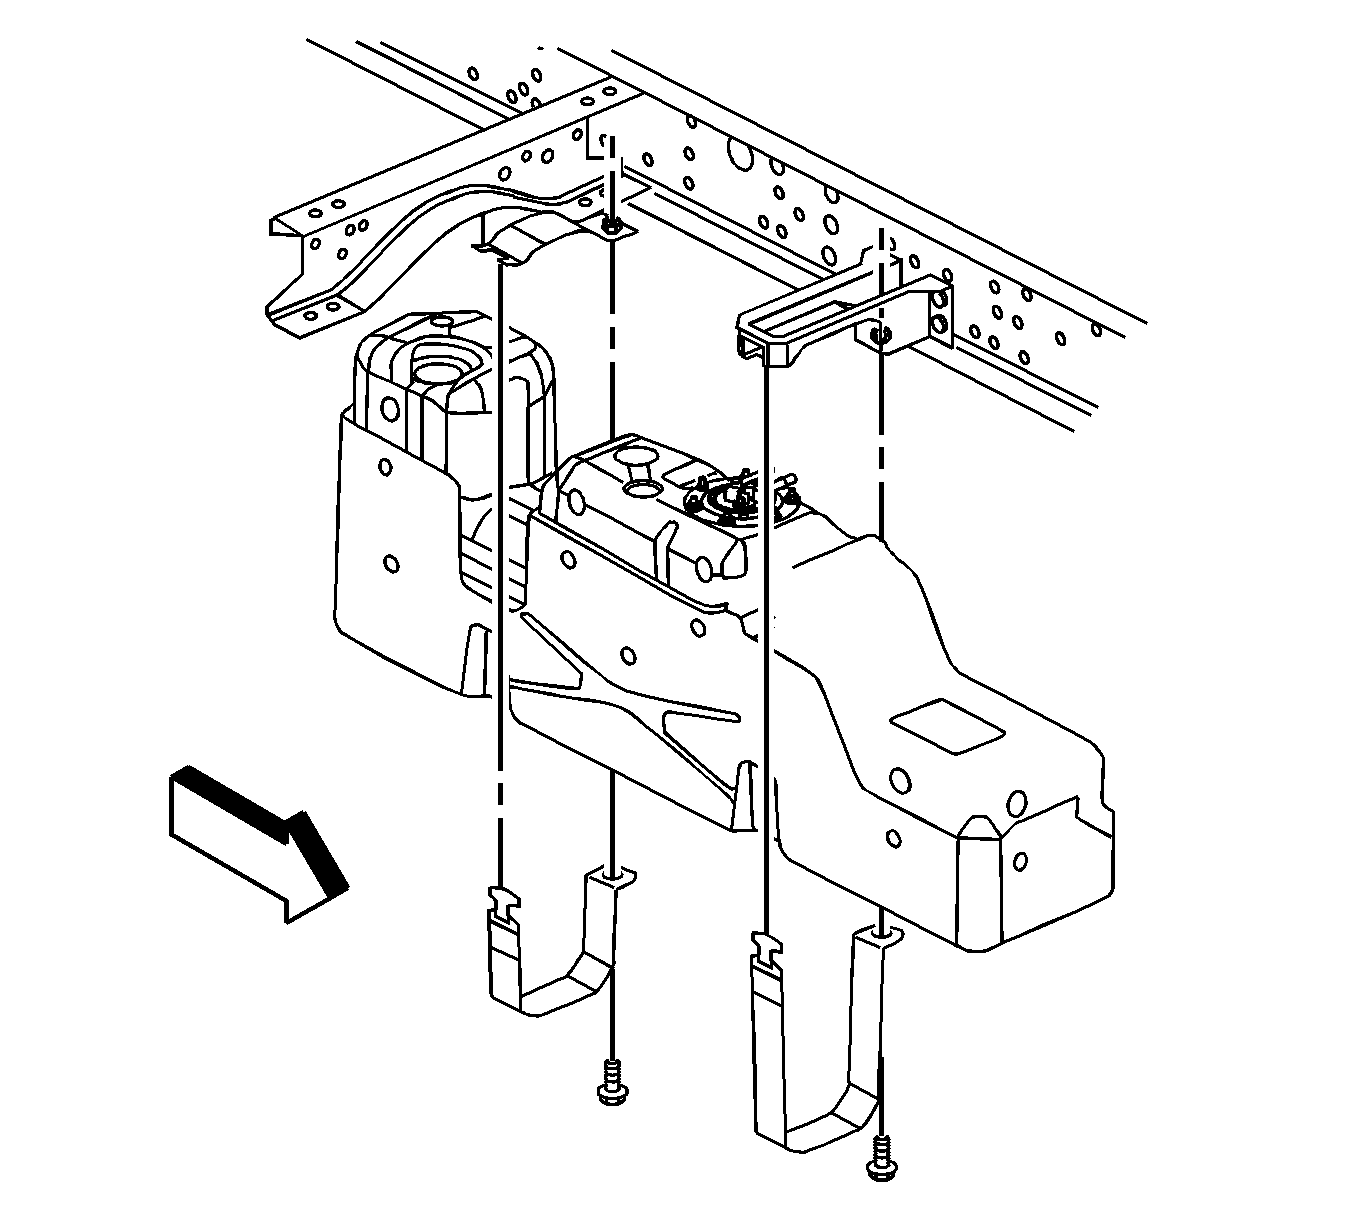
- Place a adjustable jack under the fuel tank.
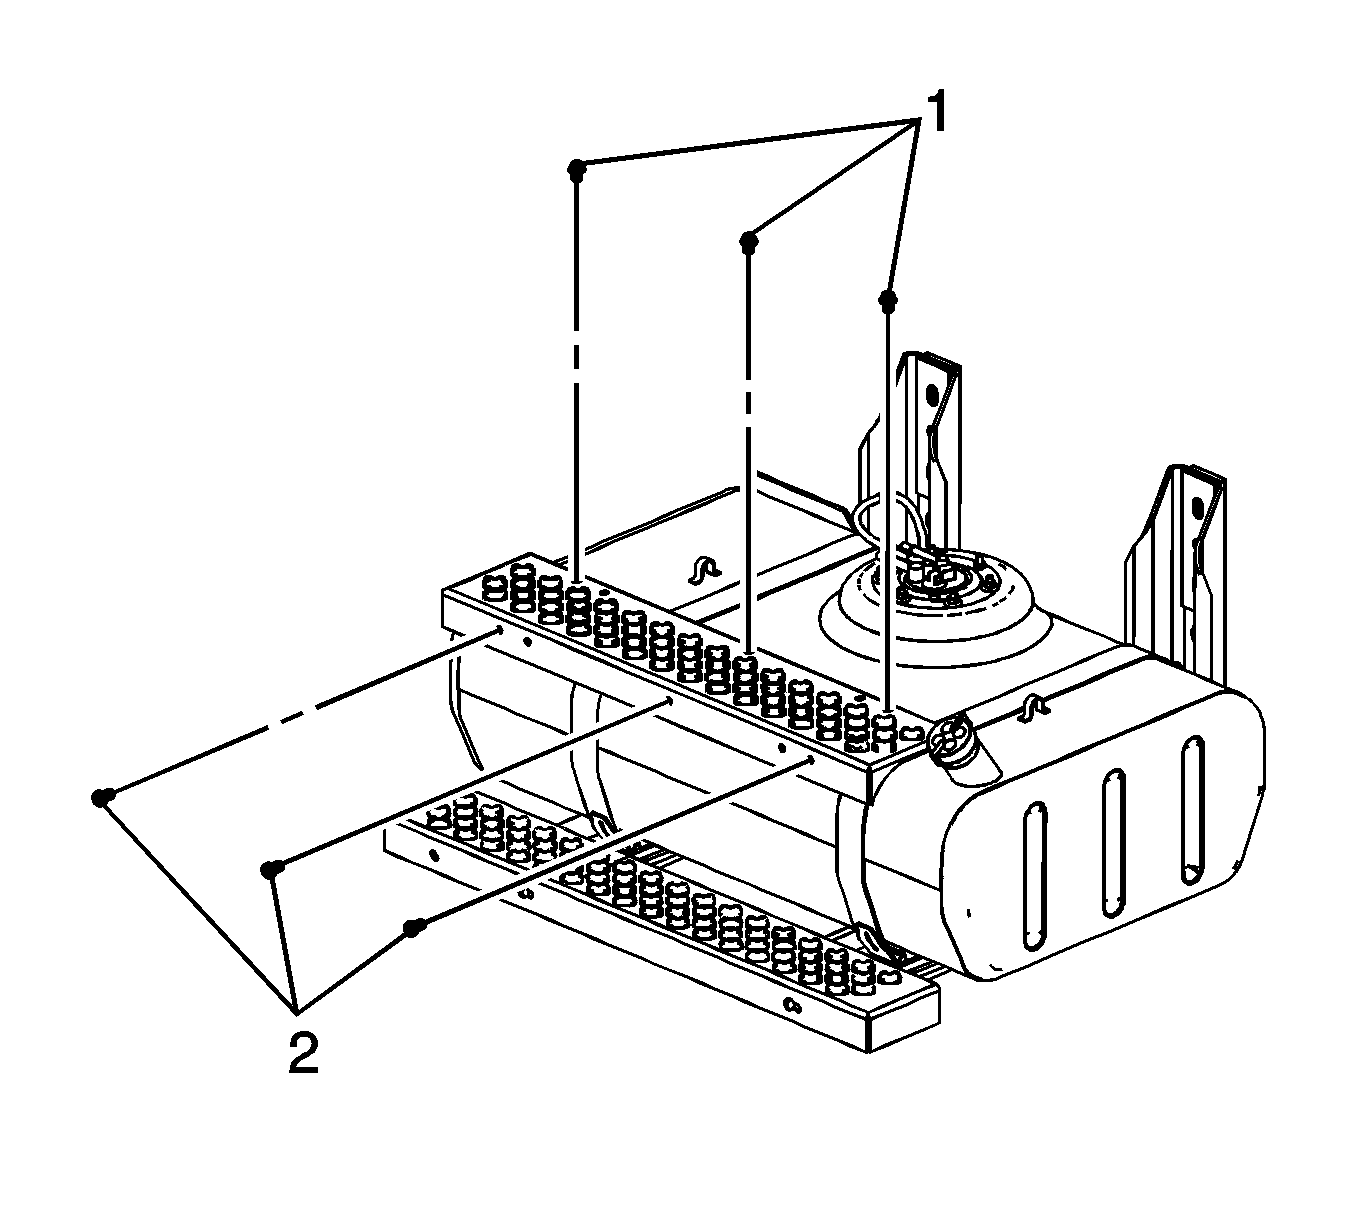
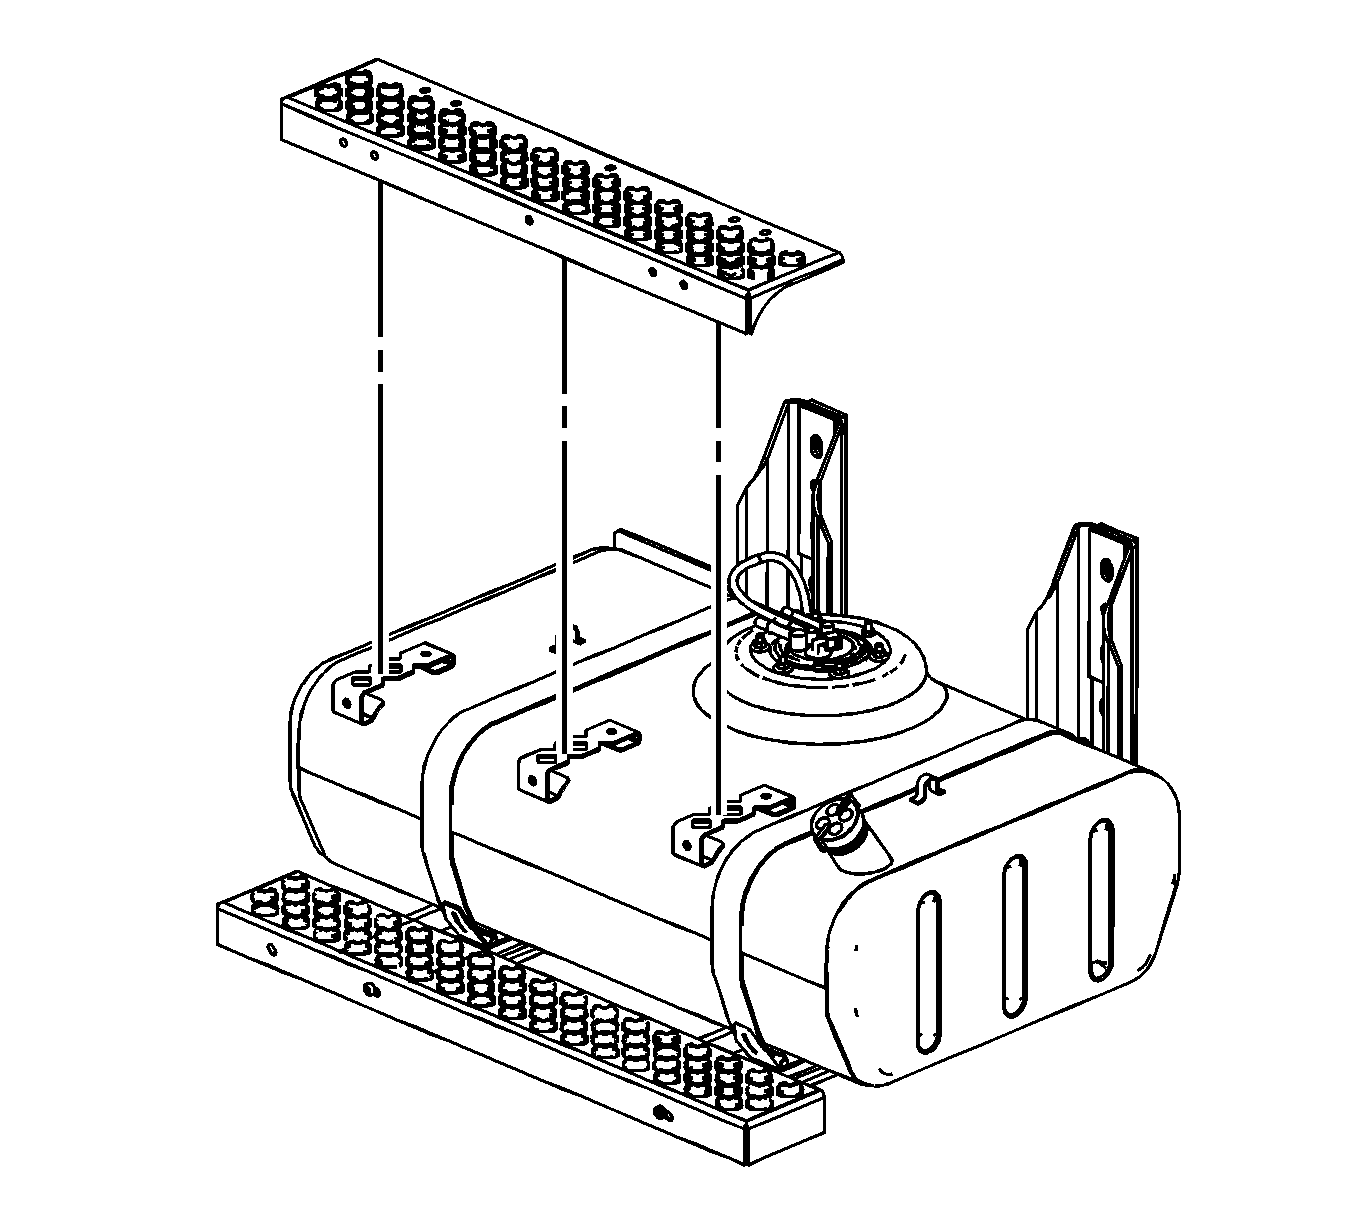
- Remove the fuel tank strap bolts and straps.
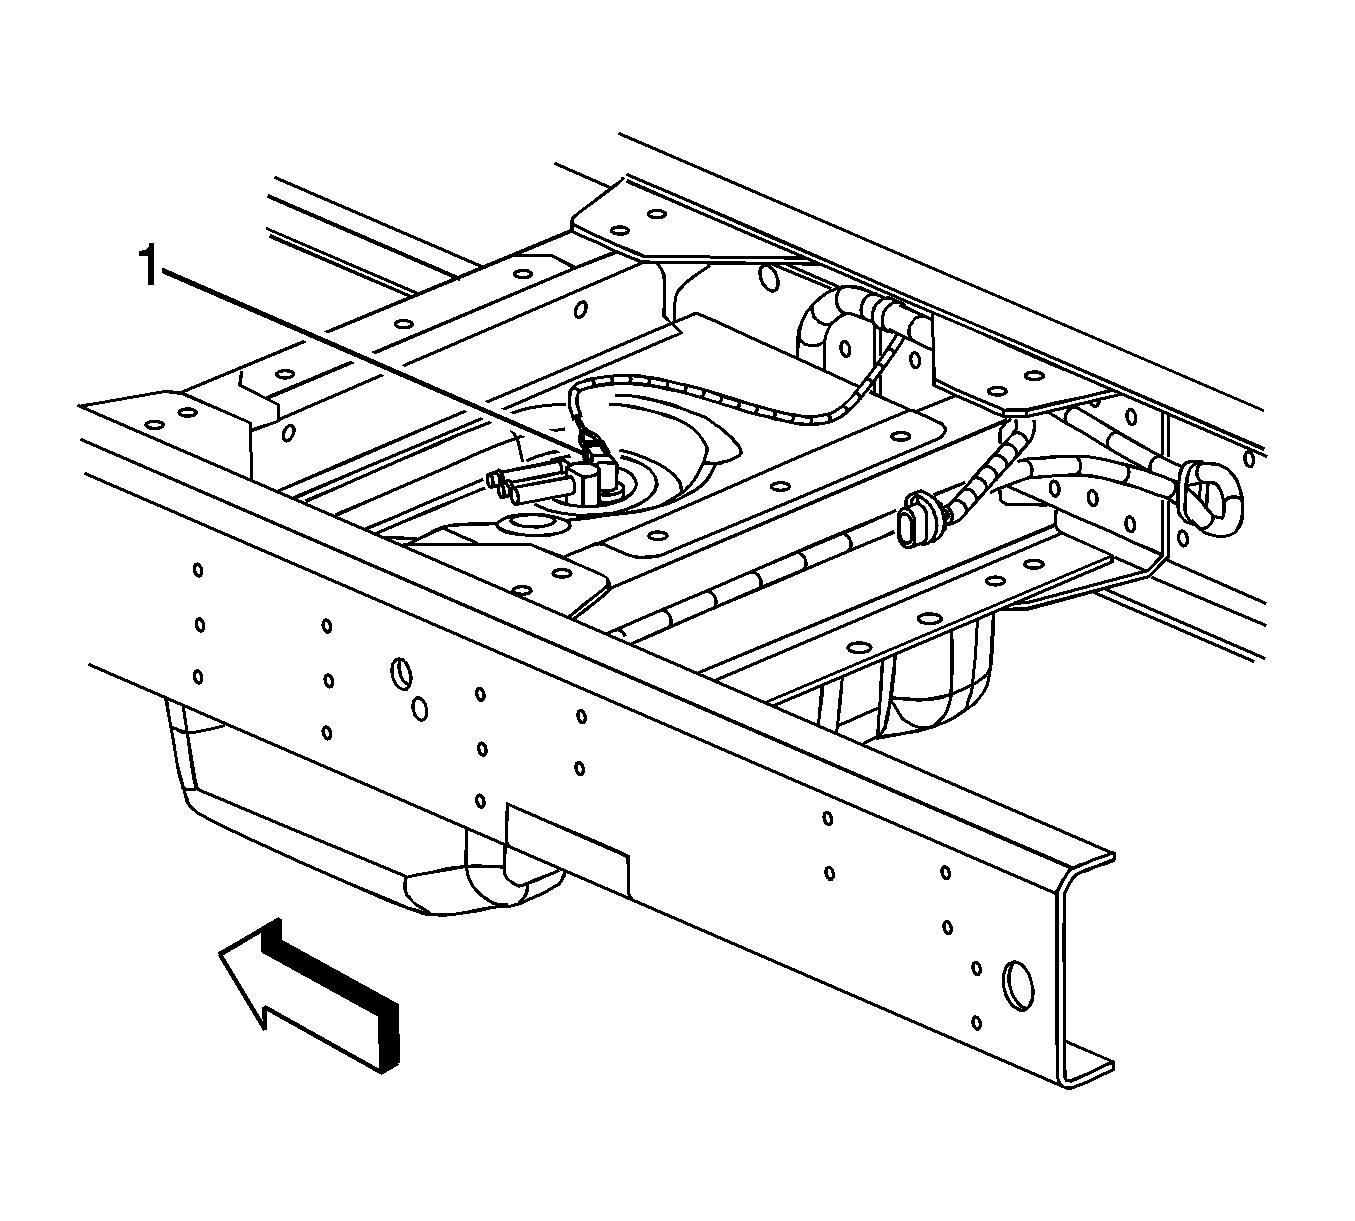
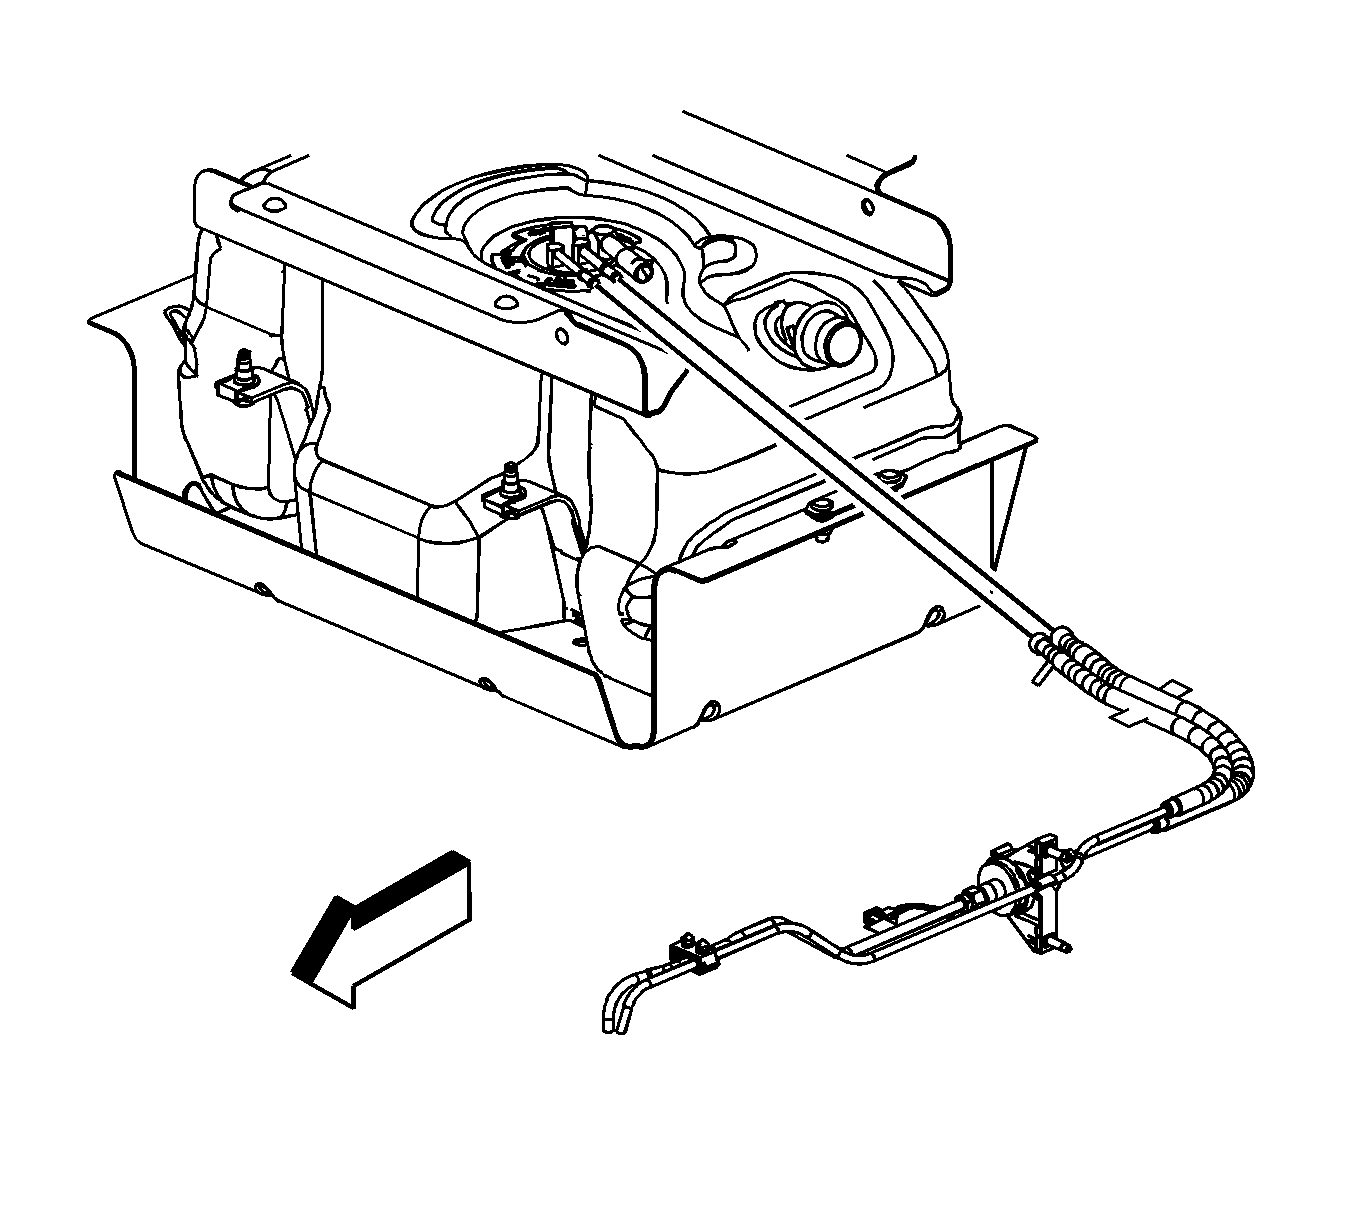
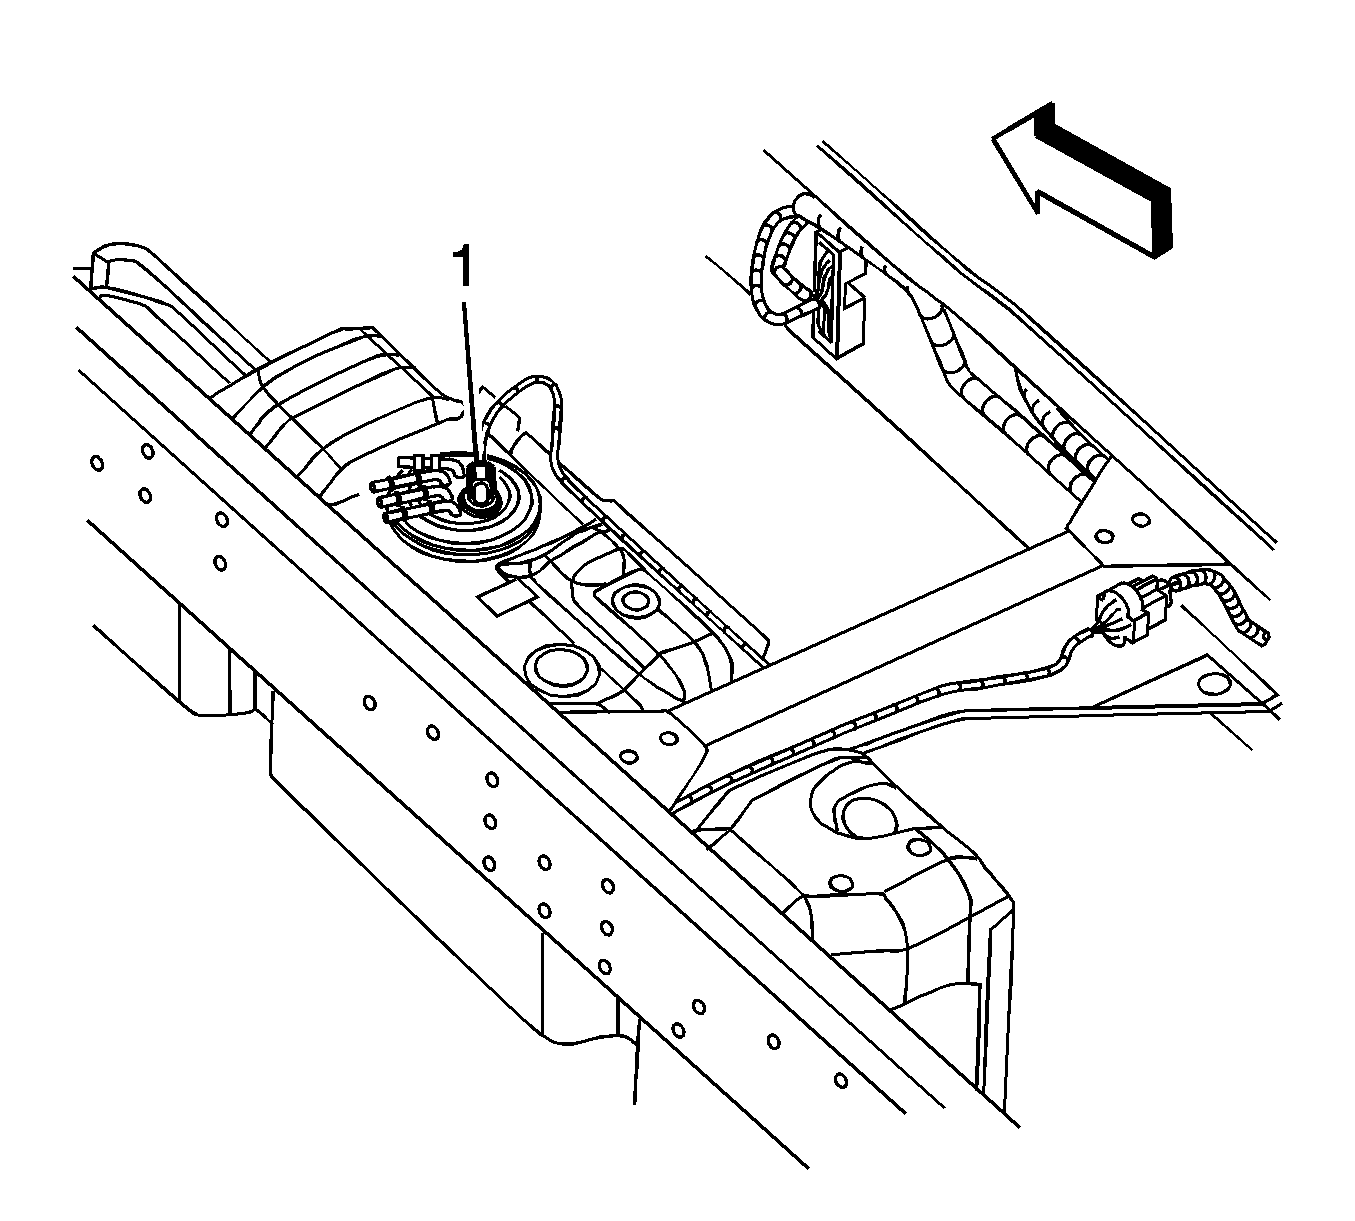
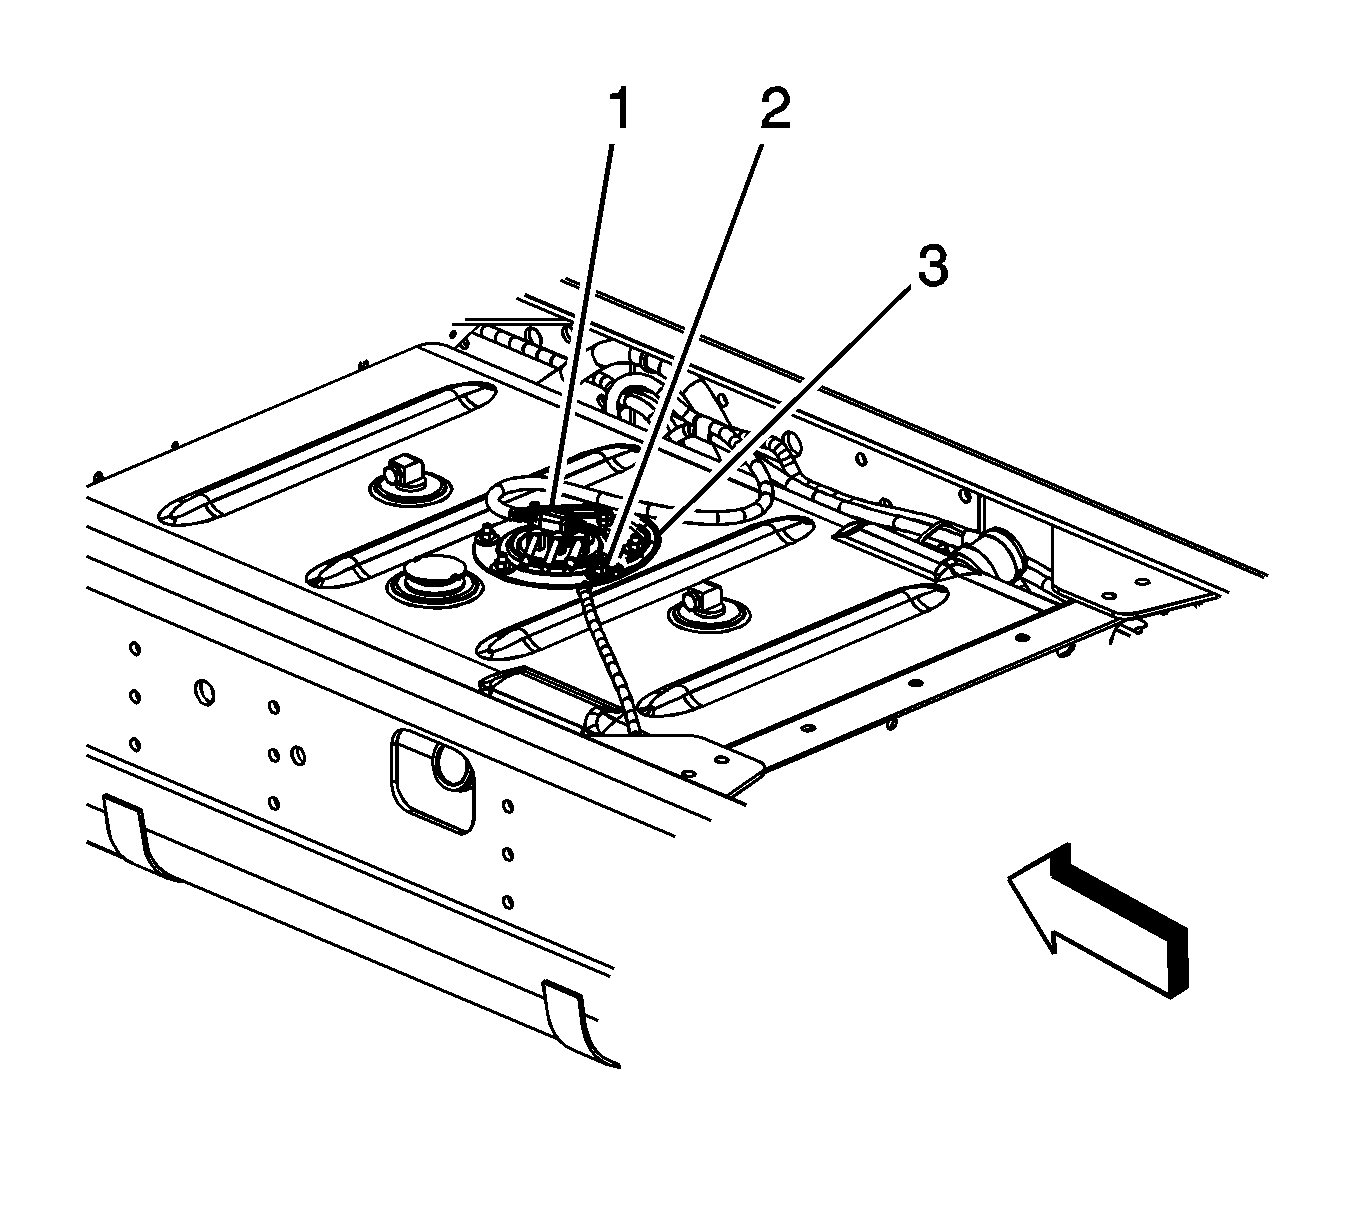
- Lower the fuel tank enough to disconnect the fuel sender harness electrical connector (1) from the tank module. (Body shown removed for clarity).
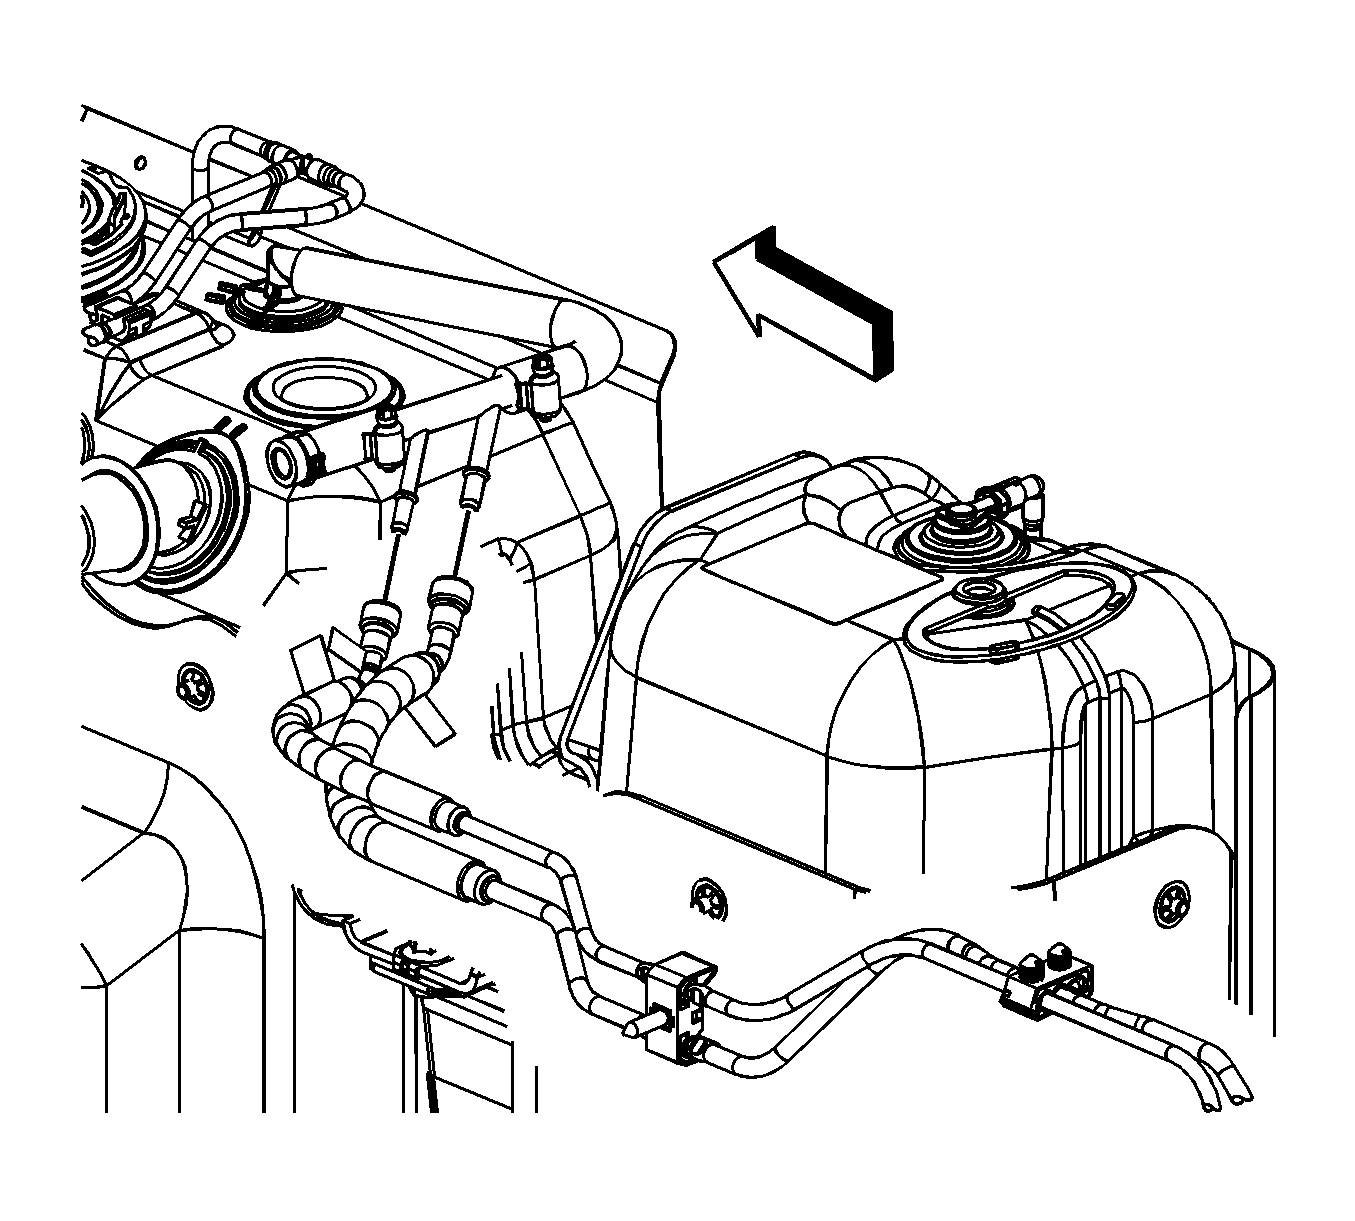
- Disconnect the chassis fuel feed and return line quick connect fittings from the fuel sender assembly. Refer to Metal Collar Quick Connect Fitting Service . (Body shown removed for clarity).
- Cap the fuel pipes on the vehicle in order to prevent possible fuel system contamination.
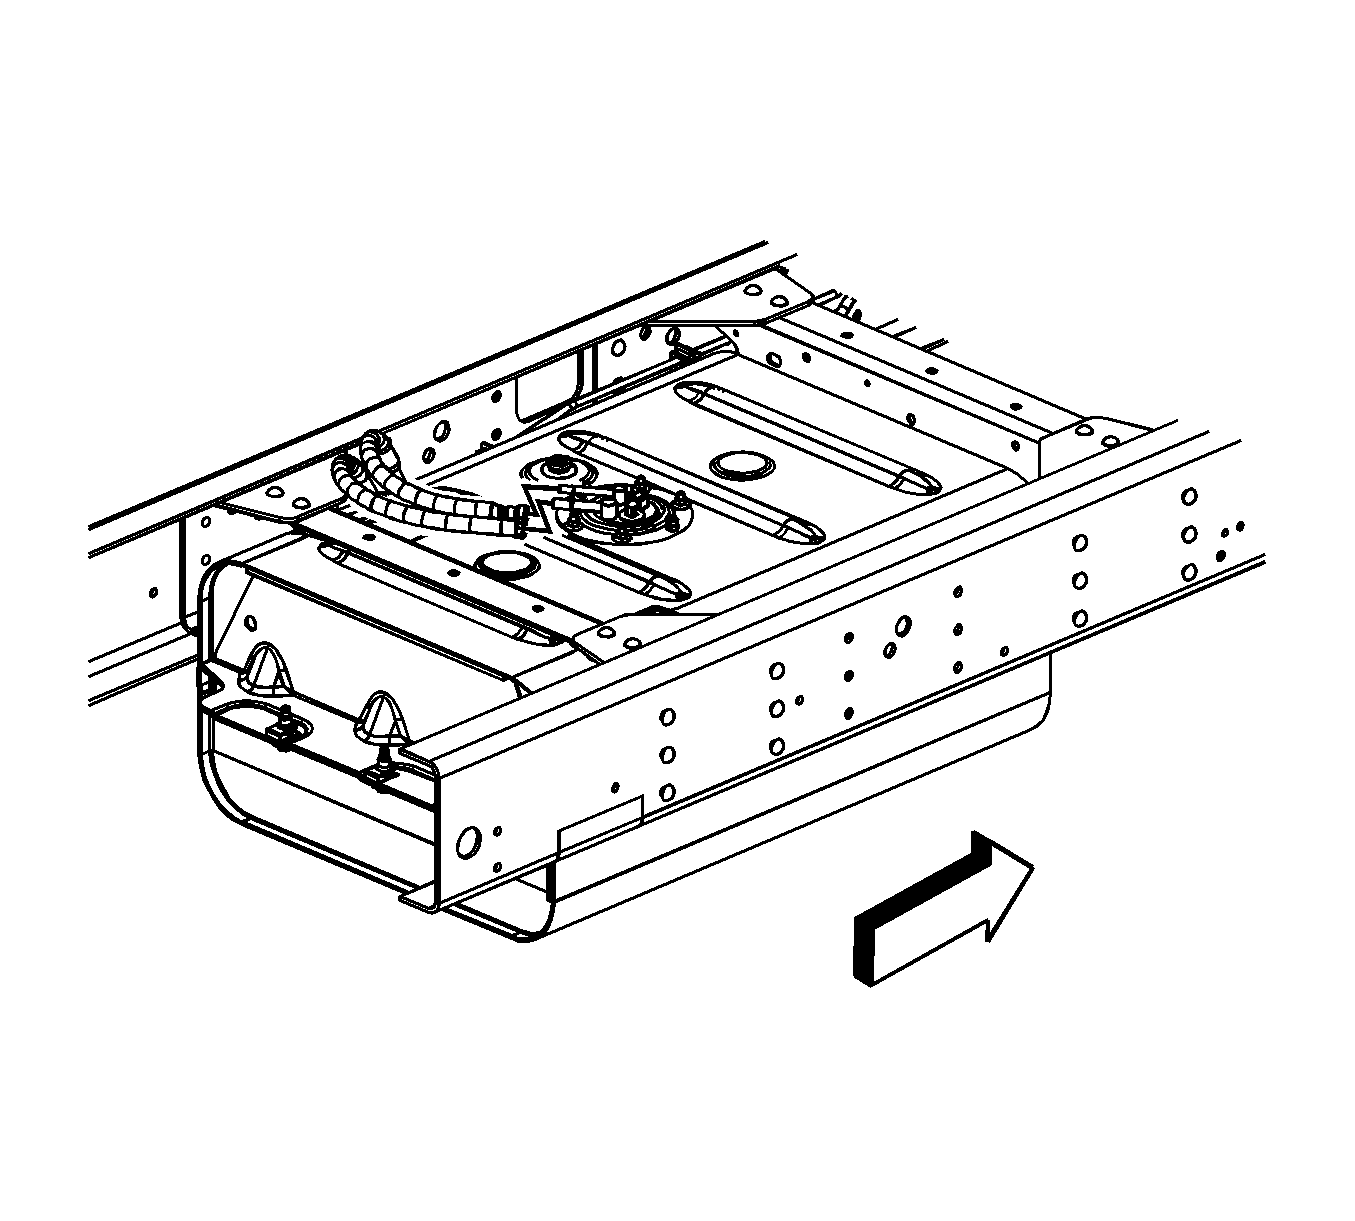
- With the aid of an assistant, completely lower and remove the fuel tank from the vehicle and place the tank in a suitable work area.
- Remove the fuel sender assembly, if required. Refer to Fuel Sender Assembly Replacement .
Important: Clean all the fuel pipe/hose connections as well as the surrounding areas before disconnecting the fuel pipes/hoses.
Notice: Do not bend the fuel tank straps. Bending the fuel tank straps may damage the straps.
Installation Procedure
- Install the fuel sender assembly, if required. Refer to Fuel Sender Assembly Replacement .
- With the aid of an assistant, place the tank on the adjustable jack and raise the fuel tank slightly.
- Remove the caps from the fuel pipes on the vehicle.
- Connect the chassis fuel feed and return line quick connect fittings to the fuel sender assembly. Refer to Metal Collar Quick Connect Fitting Service . (Body shown removed for clarity).
- Connect the fuel sender harness electrical connector (1) to the tank module and completely raise the fuel tank into position. (Body shown removed for clarity).
- Install the fuel tank straps and bolts.
- Remove the adjustable jack from under the fuel tank.
- Connect the fuel tank fill pipe to the fuel tank, as required.
- Connect the fuel tank vent hose at the fuel tank, as required.
- Place the fuel tank shield on the adjustable jack.
- Raise the fuel tank shield into position.
- Install the fuel tank shield nuts.
- Remove the adjustable jack from under the fuel tank shield.
- Lower the vehicle.
- Start the engine and inspect for leaks.
Notice: Refer to Fastener Notice in the Preface section.
Tighten
Tighten the bolts to 35 N·m (26 lb ft).
Tighten
Tighten the nuts to 85 N·m (63 lb ft).
Fuel Tank Replacement Mid Mounted
Removal Procedure
- Drain the fuel tank. Refer to Fuel Tank Draining .
- Raise and suitably support the vehicle, if required. Refer to Lifting and Jacking the Vehicle .
- Disconnect the fuel tank vent hose at the fuel tank, as required.
- Disconnect the fuel tank fill pipe from the fuel tank, as required.
- Place a adjustable jack under the fuel tank.
- Remove the fuel tank strap bolts and straps.
- Lower the fuel tank enough to disconnect the fuel sender harness electrical connector (1) from the tank module. (Body shown removed for clarity).
- Disconnect the chassis fuel feed and return line quick connect fittings from the fuel sender assembly. Refer to Metal Collar Quick Connect Fitting Service .
- Cap the chassis fuel pipes on the vehicle in order to prevent possible fuel system contamination.
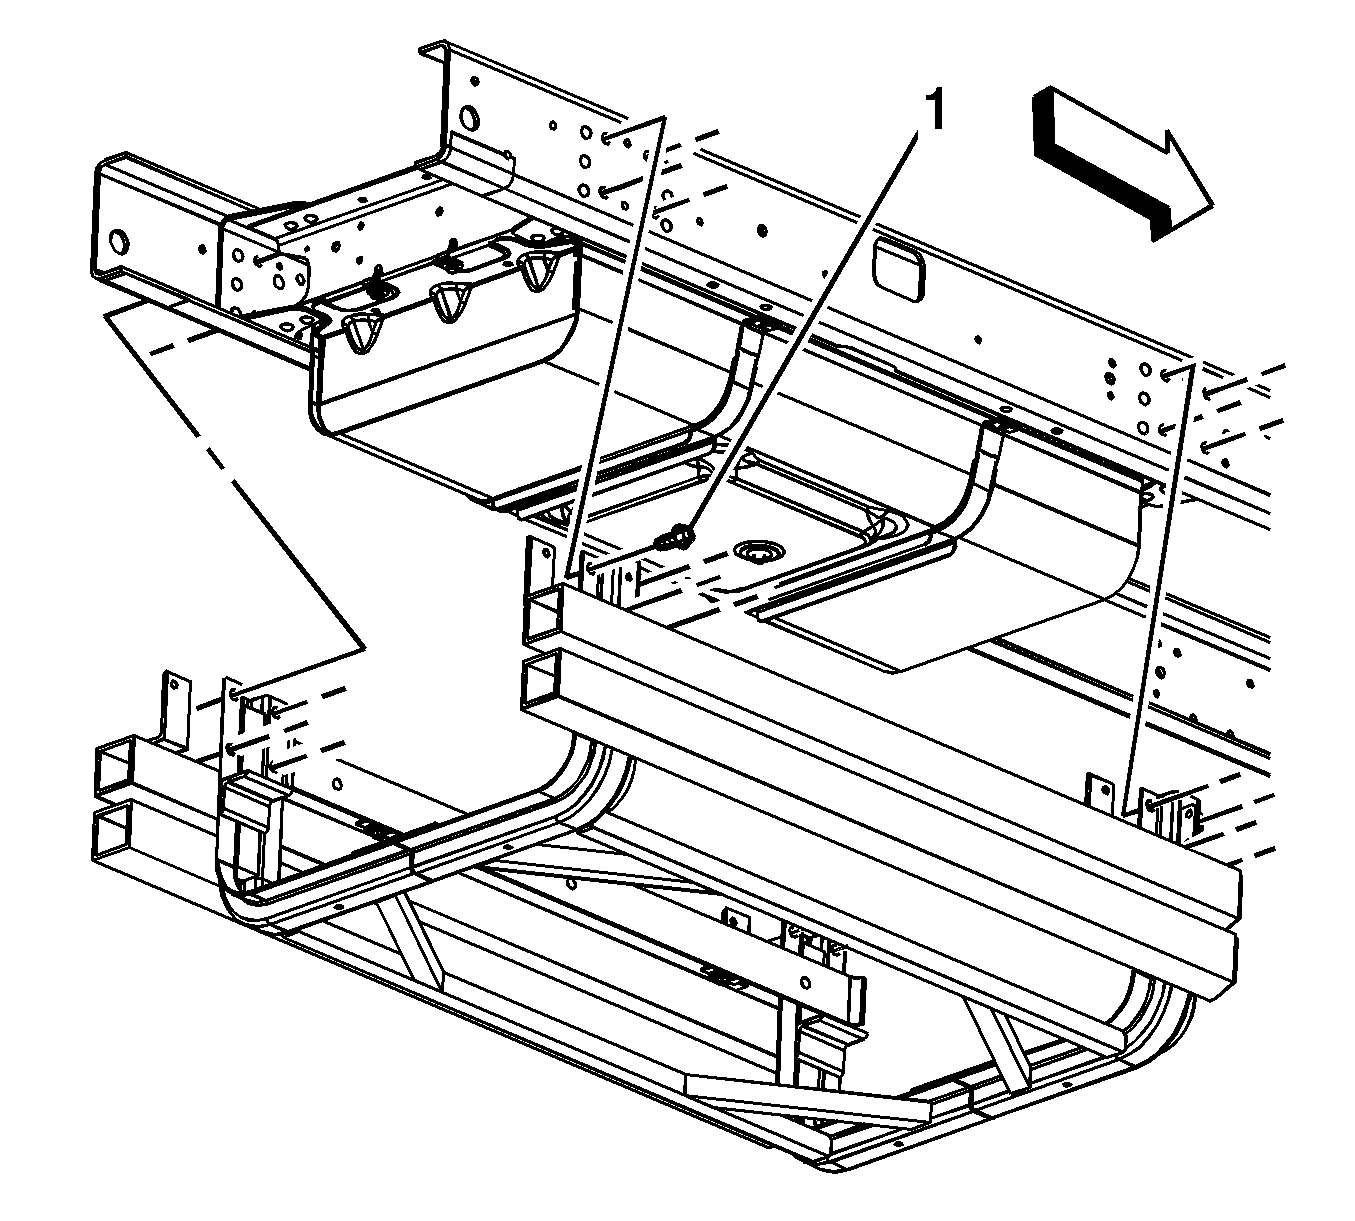
- If equipped with regular production option (RPO) NG6, disconnect the rear fuel feed and return pipes from the front tank. Refer to Metal Collar Quick Connect Fitting Service . (Body shown removed for clarity).
- Cap the chassis fuel pipes on the vehicle in order to prevent possible fuel system contamination.
- With the aid of an assistant, completely lower and remove the fuel tank from the vehicle and place the tank in a suitable work area.
- Remove the fuel sender assembly, if required. Refer to Fuel Sender Assembly Replacement .
Important: Clean all the fuel pipe/hose connections as well as the surrounding areas before disconnecting the fuel pipes/hoses.
Notice: Do not bend the fuel tank straps. Bending the fuel tank straps may damage the straps.
Installation Procedure
- Install the fuel sender assembly, if required. Refer to Fuel Sender Assembly Replacement .
- With the aid of an assistant, place the tank on the adjustable jack and raise the fuel tank slightly.
- Remove the caps from the chassis fuel pipes.
- If equipped with a dual fuel tanks, connect the rear fuel feed and return pipes to the front tank. Refer to Metal Collar Quick Connect Fitting Service . (Body shown removed for clarity).
- Remove the caps from the chassis fuel pipes.
- Connect the chassis fuel feed and return line quick connect fittings to the fuel sender assembly. Refer to Metal Collar Quick Connect Fitting Service .
- Connect the fuel sender harness electrical connector (1) to the tank module and completely raise the fuel tank into position. (Body shown removed for clarity).
- Install the fuel tank straps and bolts.
- Remove the adjustable jack from under the fuel tank.
- Connect the fuel tank fill pipe to the fuel tank, as required.
- Connect the fuel tank vent hose at the fuel tank, as required.
- Lower the vehicle.
- Start the engine and inspect for leaks.
Notice: Refer to Fastener Notice in the Preface section.
Tighten
Tighten the bolts to 35 N·m (26 lb ft).
Fuel Tank Replacement Rear Mounted
Removal Procedure
- Drain the fuel tank. Refer to Fuel Tank Draining .
- Raise and suitably support the vehicle, if required. Refer to Lifting and Jacking the Vehicle .
- If equipped, place a adjustable jack under the fuel tank shield.
- If equipped, remove the fuel tank shield bolts.
- Using the adjustable jack, lower and remove the fuel tank shield.
- Disconnect the fuel tank vent hose at the fuel tank, as required.
- Disconnect the fuel tank fill pipe from the fuel tank, as required.
- Place a adjustable jack under the fuel tank.
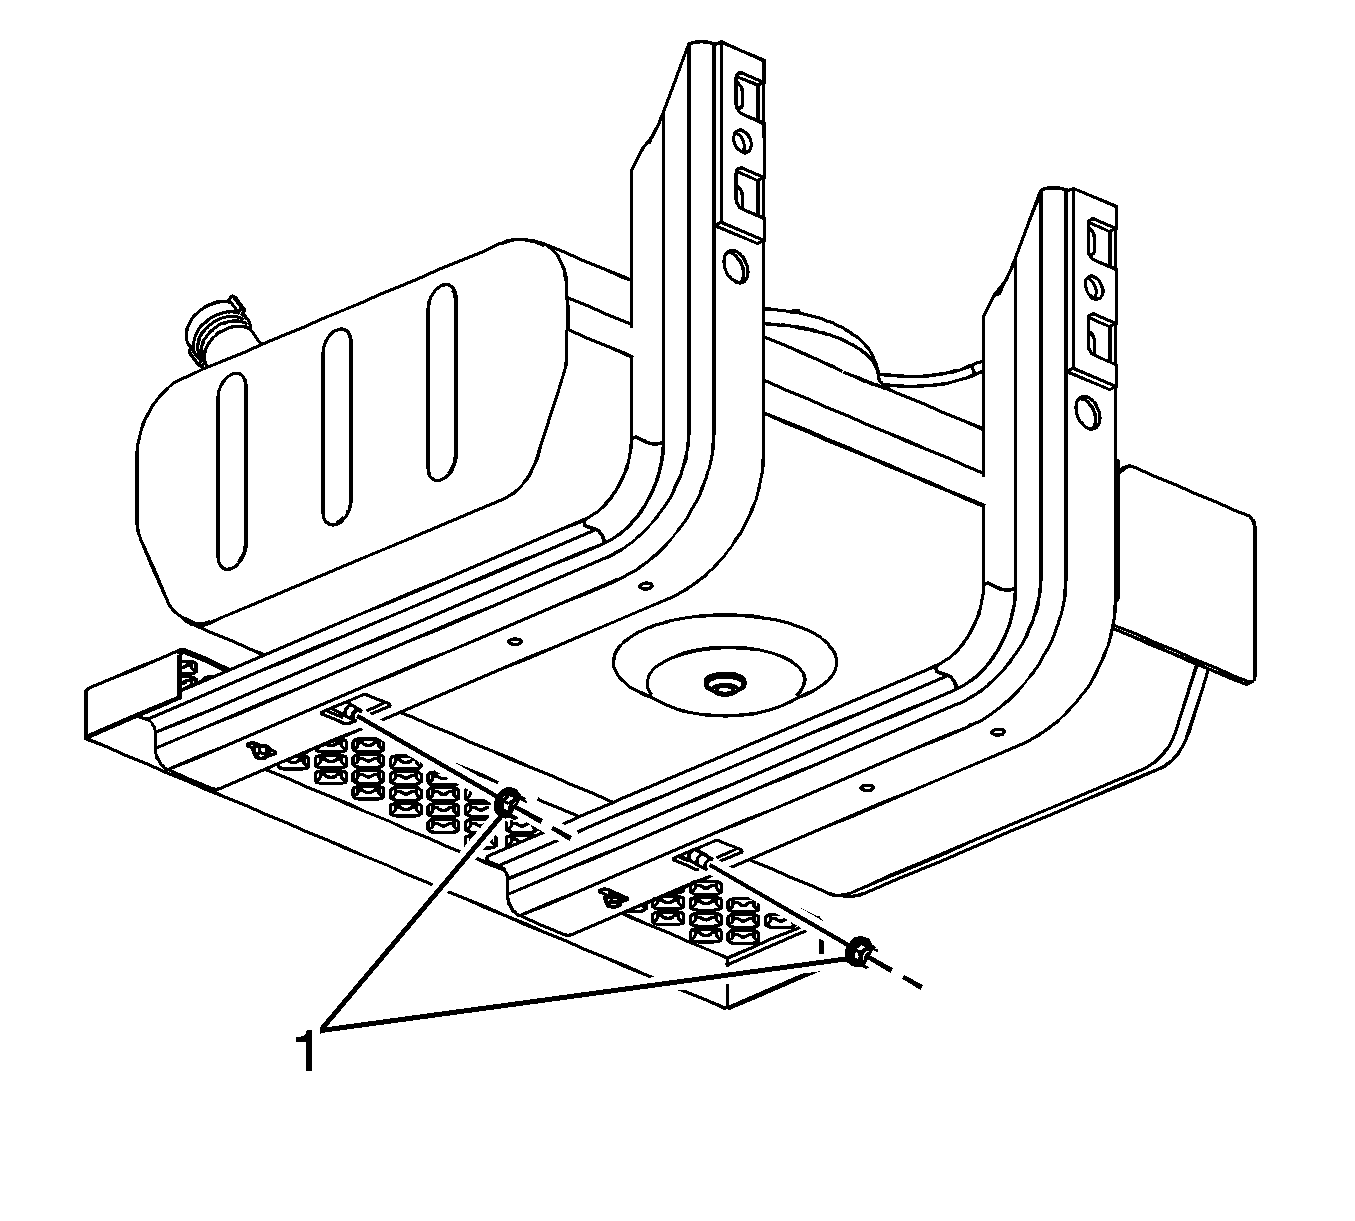
- Remove the fuel tank strap bolts (1 and 3) and straps.
- Remove the fuel tank bolts (2).
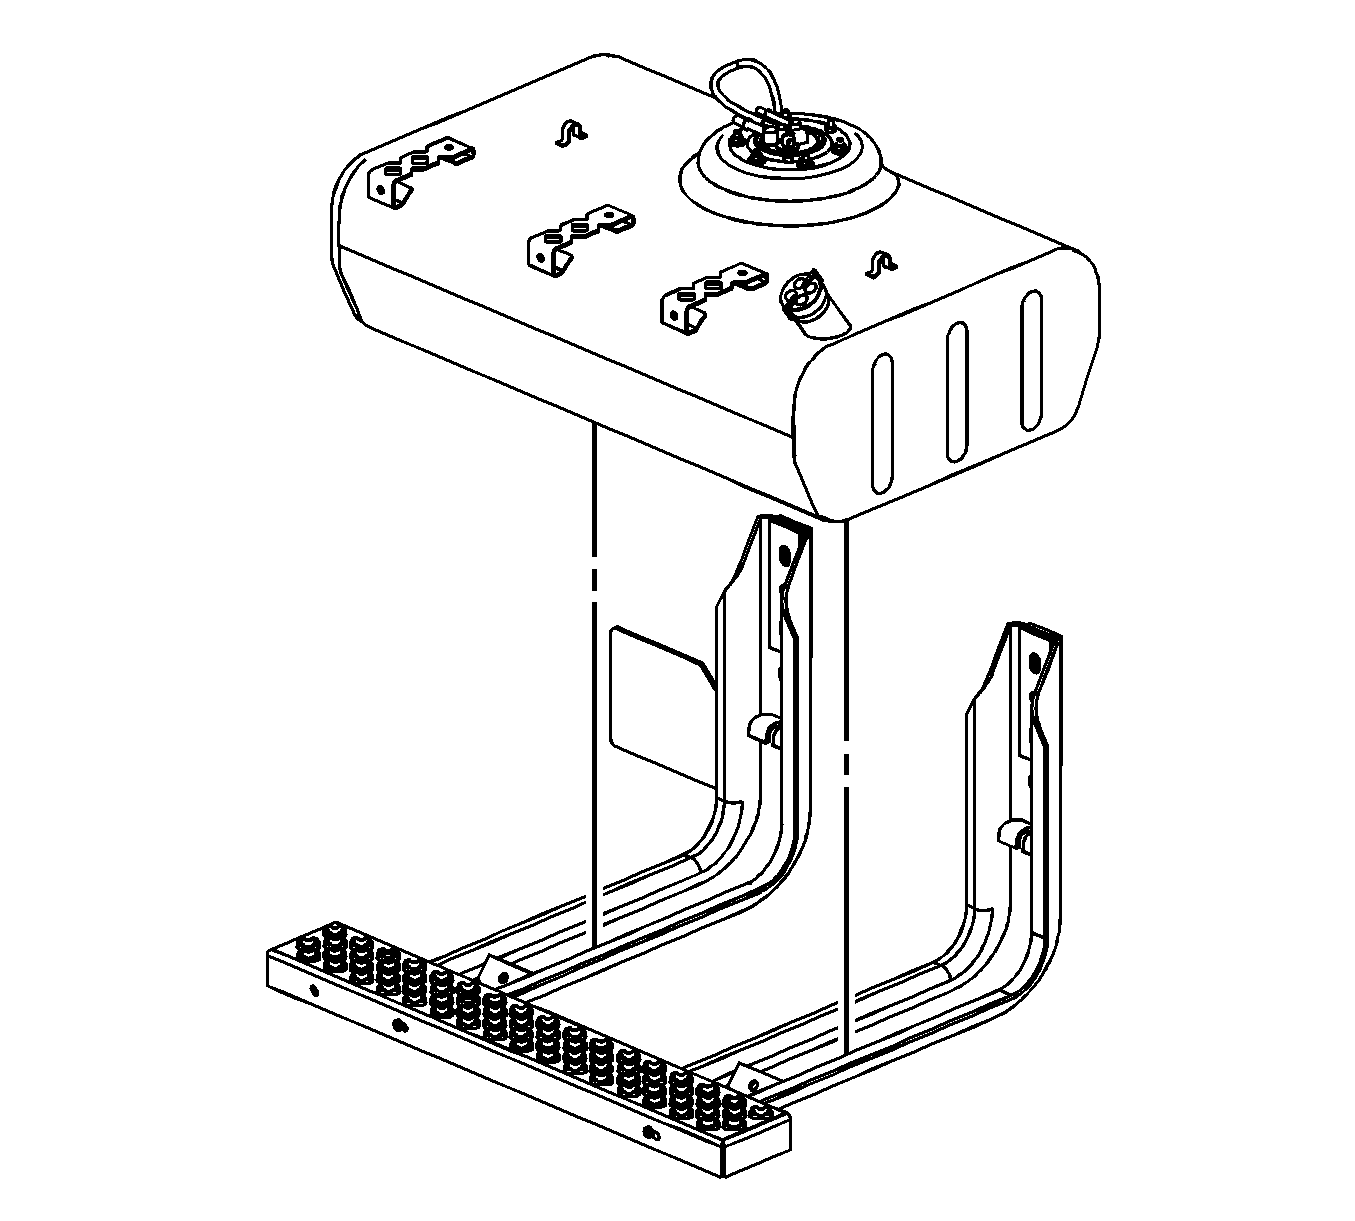
- Lower the fuel tank enough to disconnect the fuel sender harness electrical connector (1) from the tank module. (Body shown removed for clarity).
- Remove the fuel tank nut (2) and remove the ground wire (3) from the fuel tank.
- Disconnect the chassis fuel feed and return line quick connect fittings from the fuel sender assembly. Refer to Metal Collar Quick Connect Fitting Service . (Body shown removed for clarity).
- Cap the fuel pipes on the vehicle in order to prevent possible fuel system contamination.
- With the aid of an assistant, completely lower and remove the fuel tank from the vehicle and place the tank in a suitable work area.
- Remove the fuel sender assembly, if required. Refer to Fuel Sender Assembly Replacement .
Important: Clean all the fuel pipe/hose connections as well as the surrounding areas before disconnecting the fuel pipes/hoses.

Notice: Do not bend the fuel tank straps. Bending the fuel tank straps may damage the straps.
Installation Procedure
- Install the fuel sender assembly, if required. Refer to Fuel Sender Assembly Replacement .
- With the aid of an assistant, place the tank on the adjustable jack and raise the fuel tank slightly.
- Remove the caps from the chassis fuel pipes.
- Connect the chassis fuel feed and return line quick connect fittings to the fuel sender assembly. Refer to Metal Collar Quick Connect Fitting Service . (Body shown removed for clarity).
- Install the ground wire (3) onto the fuel tank and install the fuel tank nut (2).
- Connect the fuel sender harness electrical connector (1) to the tank module and completely raise the fuel tank into position. (Body shown removed for clarity).
- Install the fuel tank bolts (2).
- Install the fuel tank straps and bolts (1 and 3).
- Remove the adjustable jack from under the fuel tank.
- Connect the fuel tank fill pipe to the fuel tank, as required.
- Connect the fuel tank vent hose at the fuel tank, as required.
- Place the fuel tank shield on the adjustable jack, if equipped.
- Raise the fuel tank shield into position, if equipped.
- Install the fuel tank shield bolts, if equipped.
- Remove the adjustable jack from under the fuel tank shield.
- Lower the vehicle.
- Start the engine and inspect for leaks.
Notice: Refer to Fastener Notice in the Preface section.
Tighten
Tighten the nut to 9 N·m (80 lb in).
Tighten
Tighten the bolts to 85 N·m (63 lb ft).
Tighten
| • | Tighten the bolts (1) to 10 N·m (89 lb in). |
| • | Tighten the bolts (3) to 60 N·m (44 lb ft). |
Tighten
Tighten the bolts to 175 N·m (129 lb ft).
Fuel Tank Replacement Side Mounted
Removal Procedure
- Drain the fuel tank. Refer to Fuel Tank Draining.
- Lower the vehicle, if required.
- Disconnect the fuel feed and return line quick connect fittings from the fuel sender assembly. Refer to Metal Collar Quick Connect Fitting Service.
- Cap the fuel pipes on the vehicle in order to prevent possible fuel system contamination.
- Remove the fuel sender nut and remove the ground wire from the fuel tank.
- Disconnect the wiring harness electrical connector from the fuel sender assembly.
- Remove the upper step bolts (1) and screws (2).
- Remove the upper step from the fuel tank.
- Raise and support the vehicle. Refer to Lifting and Jacking the Vehicle.
- Remove the fuel tank strap nuts (1).
- Lower the vehicle.
- Remove the fuel tank straps.
- With the aid of an assistant, remove the fuel tank from the lower step brackets.

Important: Clean all the fuel pipe/hose connections as well as the surrounding areas before disconnecting the fuel pipes/hoses.
Notice: Do not bend the fuel tank straps. Bending the fuel tank straps may damage the straps.
Installation Procedure
- With the aid of an assistant, set the fuel tank onto the lower step brackets.
- Install the fuel tank straps.
- Raise and support the vehicle.
- Install the fuel tank strap nuts (1).
- Lower the vehicle.
- Place the upper step onto the fuel tank.
- Install the upper step bolts (1) and screws (2).
- Connect the wiring harness electrical connector to the fuel sender assembly.
- Install the ground wire onto the fuel tank and install the fuel sender nut.
- Remove the caps from the fuel pipes.
- Connect the fuel feed and return line quick connect fittings to the fuel sender assembly. Refer to Metal Collar Quick Connect Fitting Service.
- Start the engine and inspect for leaks.
Notice: Refer to Fastener Notice in the Preface section.
Tighten
Tighten the nuts to 60 N·m (44 lb ft).
Tighten
| • | Tighten the bolts (1) to 39 N·m (29 lb ft). |
| • | Tighten the screws (2) to 25 N·m (18 lb ft). |
Tighten
Tighten the nut to 9 N·m (80 lb in).
