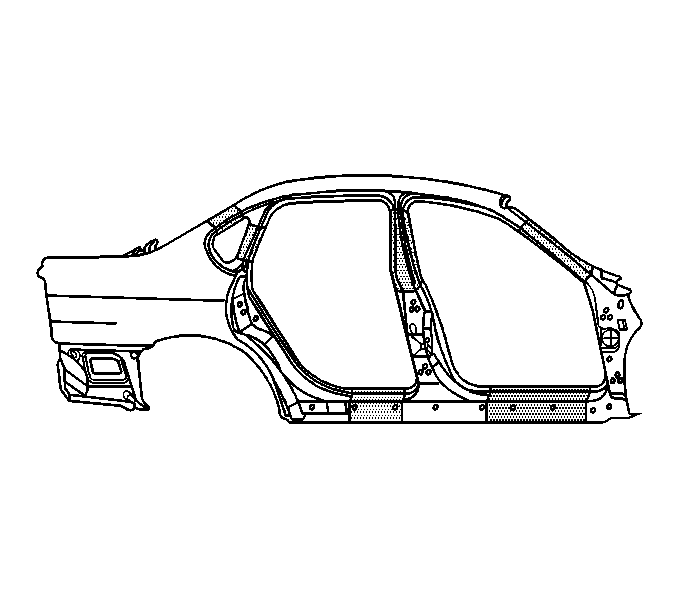
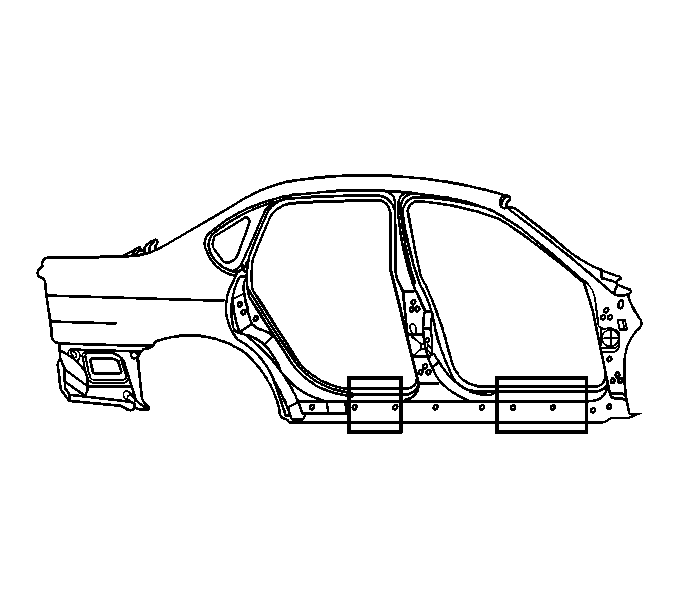
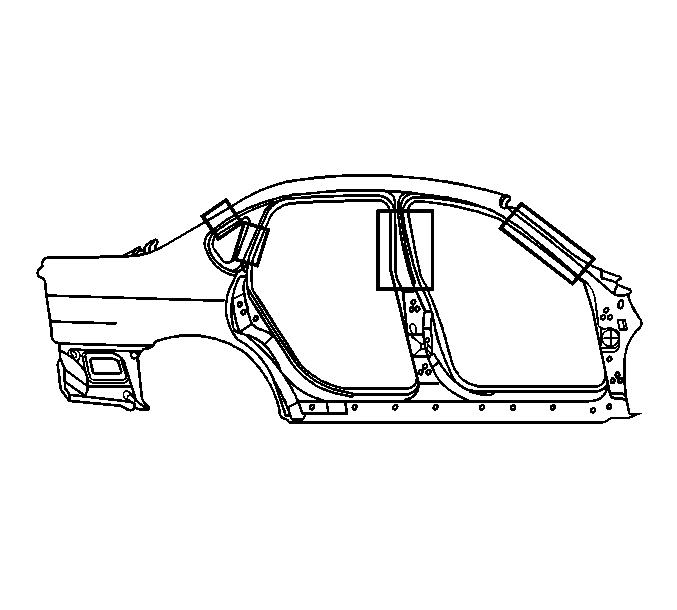
General Door Frame Opening Sectioning Impala
Removal Procedure
- Visually inspect and restore as much of the damage as possible.
- Remove all related panels and components.
- Remove sealers and anti-corrosion materials as necessary.
- Cut the panel in the areas where the sectioning is to take place. Sectioning should take place in shaded areas only.
- Locate and mark all factory welds. Note the number and location of welds for installation of the service assembly.
- Drill out all factory welds.
- Remove the damaged outer door opening frame.
Important: Use care not to cut the inner reinforcements when cutting the outer door opening frame.
Important: Note the location of the sound deadening foam for installation.
Installation Procedure
Important: Sectioning in the rocker locations requires the use of a 100 mm (4 in) backing plate.
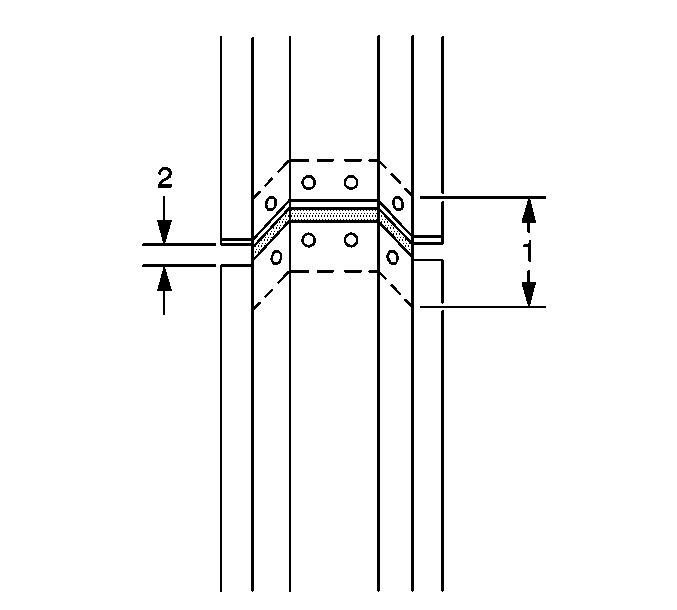
- On the service part, mark a line to leave a gap of one and one-half times the thickness of the metal at the sectioning joint (2).
- Cut the outer door frame opening service part along this line.
- Cut a 100 mm (4 in) piece (1) from the unused portion of the service part for a backing plate when sectioning in the rocker areas of the door frame opening.
- Sectioning in the A, B, or C pillars of the outer door frame opening requires the use of a 50 mm (2 in) backing plate.
- Cut a 50 mm (2 in) piece (1) from the unused portion of the service part for a backing plate, leaving a gap of 1½ times the thickness of the metal (2).
- Drill 8 mm (5/16 in) holes for plug welding in the service part in the locations noted from the original panel.
- Drill holes for plug welding along the sectioning cuts on both the service part and the original panel.
- Prepare the mating surfaces and position the backing plates on the body with 50 percent of the backing plate exposed.
- Plug weld accordingly.
- Position the service part to overlap the exposed 50 percent of the backing plate.
- Check the fit using 3-dimensional measuring equipment.
- Plug weld accordingly.
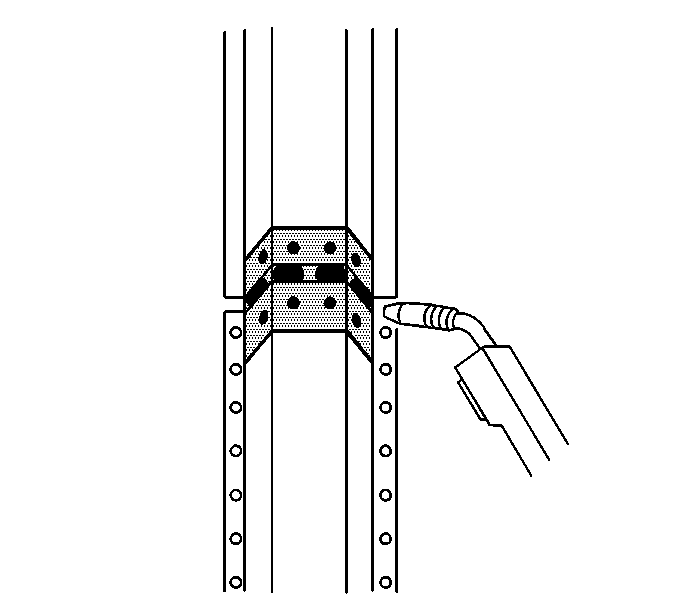
- Stitch weld along the entire sectioning joint.
- Make 25 mm (1 in) welds along the seam with 25 mm (1 in) gaps between.
- Go back and complete the stitch weld. This will create a solid joint with minimal heat distortion.
- Complete all other welds and sectioning procedures as necessary.
- Clean and prepare welded surfaces.
- Prime with 2-part catalyzed primer.
- Apply sealers and anti-corrosion materials as necessary.
- Install all related panels and components.

Important: When sectioning the outer door frame at the lower front hinge pillar of at the center lock pillar, the inner reinforcement panel can be used as a backing plate.
Important: Prior to refinishing, refer to GM 4901MD-99 Refinish Manual for recommended products. Do not combine paint systems. Refer to paint manufacturer's recommendations.
Important: Apply the sound deadening foam in the locations noted from the removal process.
General Door Frame Opening Sectioning Monte Carlo
Removal Procedure
- Visually inspect and restore as much of the damage as possible.
- Remove all related panels and components.
- Remove sealers and anti-corrosion materials as necessary.
- Cut the panel in the areas where the sectioning is to take place. Sectioning should take place in shaded areas only.
- Locate and mark all factory welds. Note the number and location of welds for installation of the service assembly.
- Drill out all factory welds.
- Remove the damaged outer door opening frame.
Important: Use care not to cut the inner reinforcements when cutting the outer door opening frame.
Important: Note the location of the sound deadening foam for installation.
Installation Procedure
Important: Sectioning in the rocker locations requires the use of a 100 mm (4 in) backing plate.
- On the service part, mark a line to leave a gap of 1½ times the thickness of the metal at the sectioning joint (2).
- Cut the outer door frame opening service part along this line.
- Cut a 100 mm (4 in) piece (1) from the unused portion of the service part for a backing plate when sectioning in the rocker areas of the door frame opening.
- Sectioning in the A, B, or C pillars of the outer door frame opening requires the use of a 50 mm (2 in) backing plate.
- Cut a 50 mm (2 in) piece (1) from the unused portion of the service part for a backing plate, leaving a gap of 1½ times the thickness of the metal (2).
- Drill 8 mm (5/16 in) holes for plug welding in the service part in the locations noted from the original panel.
- Drill holes for plug welding along the sectioning cuts on both the service part and the original panel.
- Prepare the mating surfaces and position the backing plates on the body with 50 percent of the backing plate exposed.
- Plug weld accordingly.
- Position the service part to overlap the exposed 50 percent of the backing plate.
- Check the fit using 3-dimensional measuring equipment.
- Plug weld accordingly.
- Stitch weld along the entire sectioning joint.
- Make 25 mm (1 in) welds along the seam with 25 mm (1 in) gaps between.
- Go back and complete the stitch weld. This will create a solid joint with minimal heat distortion.
- Complete all other welds and sectioning procedures as necessary.
- Clean and prepare welded surfaces.
- Prime with 2-part catalyzed primer.
- Apply sealers and anti-corrosion materials as necessary.
- Install all related panels and components.
Important: When sectioning the outer door frame at the lower front hinge pillar of at the center lock pillar, the inner reinforcement panel can be used as a backing plate.
Important: Prior to refinishing, refer to GM 4901MD-99 Refinish Manual for recommended products. Do not combine paint systems. Refer to paint manufacturer's recommendations.
Important: Apply the sound deadening foam in the locations noted from the removal process.
