- Relieve the fuel pressure. Refer to
Fuel Pressure Relief
in Engine Controls.
Caution: Unless directed otherwise, the ignition and start switch must be in the OFF or LOCK position, and all electrical loads must be OFF before servicing
any electrical component. Disconnect the negative battery cable to prevent an electrical spark should a tool or equipment come in contact with an exposed electrical terminal. Failure to follow these precautions may result in personal injury and/or damage to
the vehicle or its components.
- Disconnect the negative battery cable.
- Drain the cooling system. Refer to
Cooling System Draining and Filling
in Engine Cooling.
- Remove the air cleaner hose.
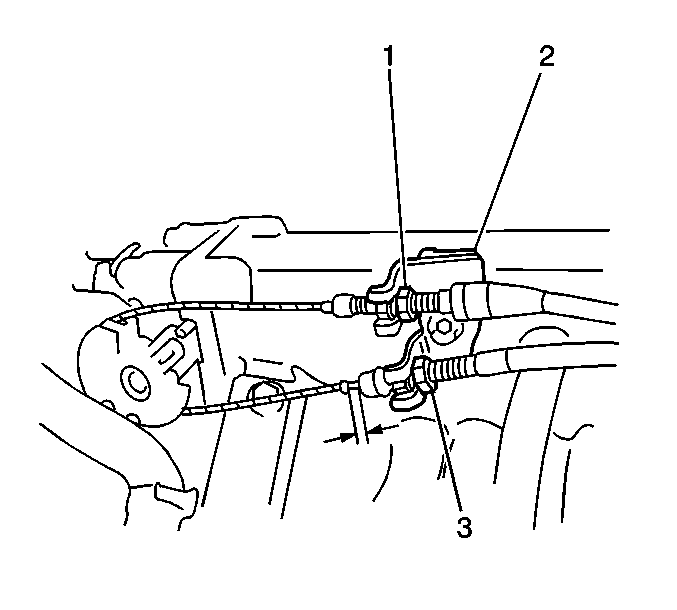
- Remove
the 1 bolt and the throttle cable bracket (2) from the intake manifold.
- Remove the cables from the throttle body bellcrank and position aside.
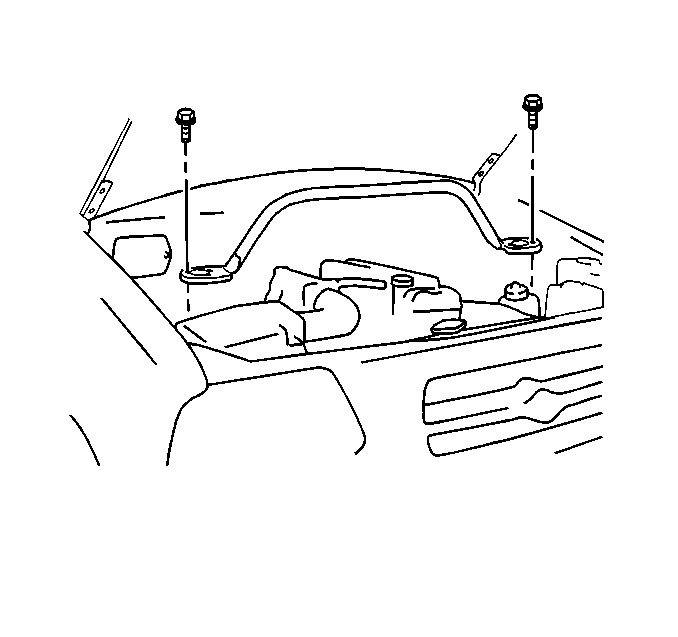
Important: The vehicle should be supported on a hoist
prior to removing the strut tower brace. This will facilitate installation of the
brace.
- Remove the strut tower brace. Refer to
Front Suspension Support Brace Replacement
in Front Suspension.
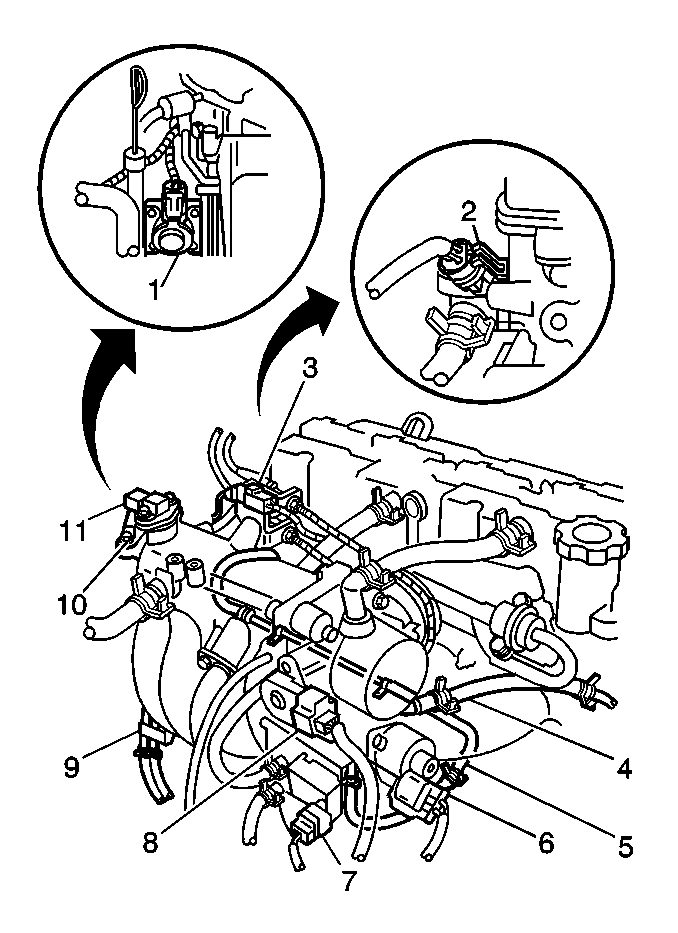
- Disconnect
the following electrical connectors:
| • | The manifold absolute pressure (MAP) sensor (11) |
| • | The throttle position sensor (TPS) (8) |
| • | The idle air control (IAC) valve (6) |
| • | The EVAP canister purge valve (7) |
| • | The engine coolant temperature (ECT) sensor (2) |
| • | The exhaust gas recirculation (EGR) valve (1) |
| • | The fuel injector harness (3) |
- Disconnect the ground wires from the intake manifold (10)
- Remove the EVAP canister purge hose from the intake manifold.
- Remove the EVAP vacuum line from the intake manifold.
- Remove the 1 bolt and the EVAP canister purge valve from the intake manifold
and position aside.
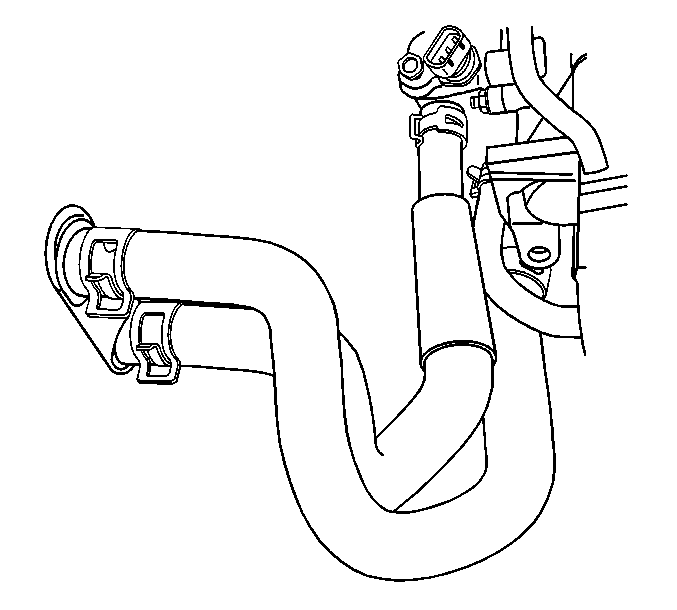
- Remove the coolant hoses (4,5) from the throttle body and intake manifold.
- Remove the 2 bolts and the coolant line (5) from underside of the intake
manifold.
- Remove the brake booster hose from the intake manifold.
- Remove the PCV hose from the intake manifold.
- Remove the breather hose from the intake manifold.
- Remove the fuel hoses from the fuel lines (9). Mark the pressure and
return lines for correct assembly.
- Disconnect the wiring harness from the retaining clamps.
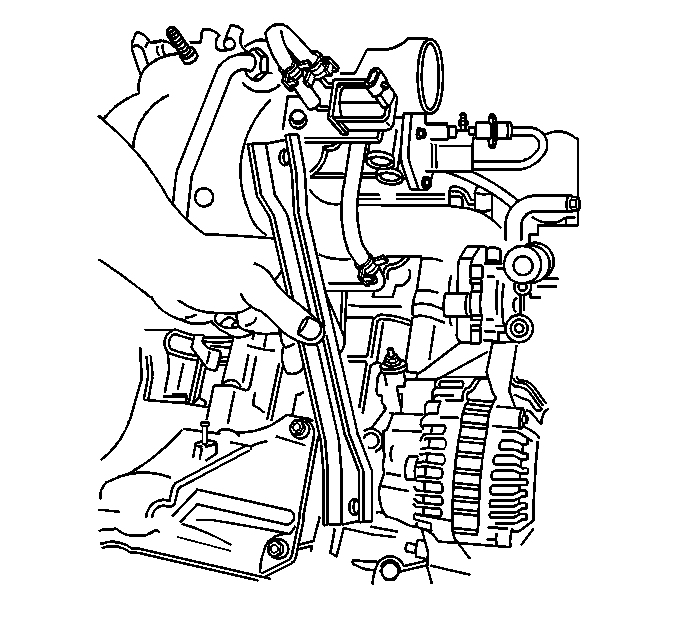
- Remove the 2 bolts and the intake manifold front support bracket.
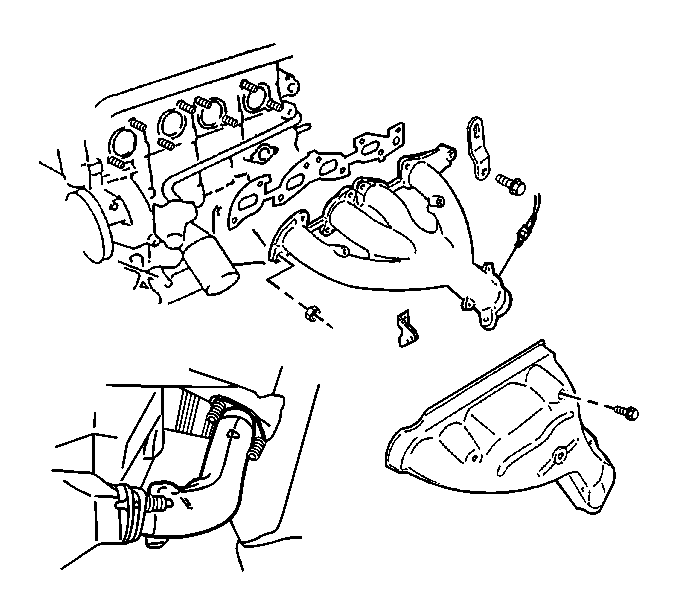
- Remove the oxygen sensor connector from the exhaust manifold bracket. Disconnect
the oxygen sensor.
- Remove the exhaust manifold-to-engine block bracket.
- Remove the 8 nuts and 1 bolt from the exhaust manifold. Detach the exhaust
manifold from the cylinder head and position aside. Refer to
Exhaust Manifold Replacement
.
- Remove
the heater hoses from the heater core. Mark the location of the hoses for correct
installation.
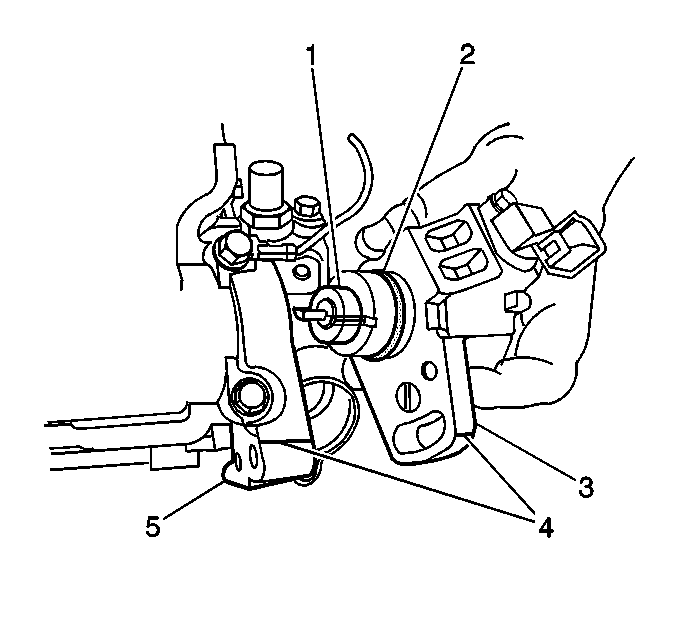
- Apply
matchmarks (4) to the camshaft position sensor and the cylinder head and remove the
camshaft position sensor.
- Remove the spark plugs. Refer to
Spark Plug Replacement
in Engine Electrical.
- Remove the cylinder head cover. Refer to
Cylinder Head Cover Replacement
.
- Remove the timing chain housing. Refer to
Timing Chain Housing Replacement
.
- Remove the camshaft timing chain and sprockets. Refer to
Timing Chain and Sprocket Replacement
.
- Remove the crankshaft timing chain and sprockets. Refer to
Timing Chain and Sprocket Replacement
.
- Remove the intake camshaft and the valve lifters. Keep the valve lifters
in the correct order for assembly. Refer to
Intake Camshaft and Valve Lifter Replacement
.
- Remove the exhaust camshaft and the valve lifters. Keep the valve lifters
in the correct order for assembly. Refer to
Exhaust Camshaft and Valve Lifter Replacement
.
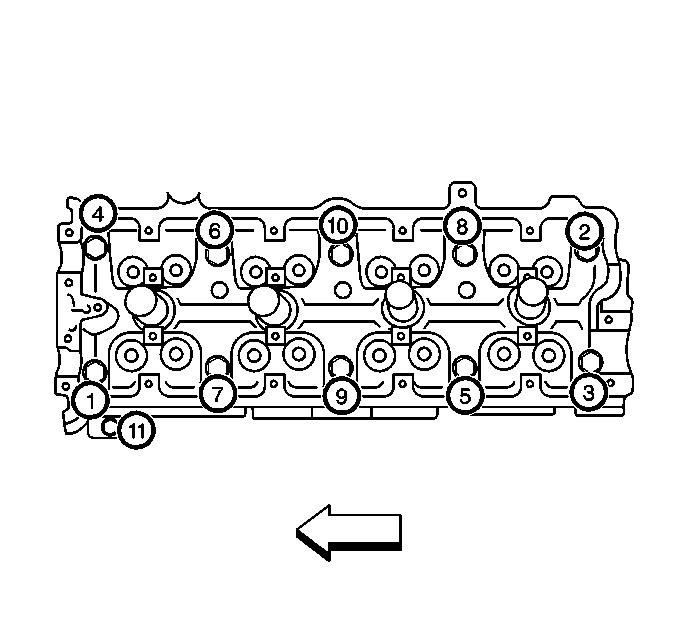
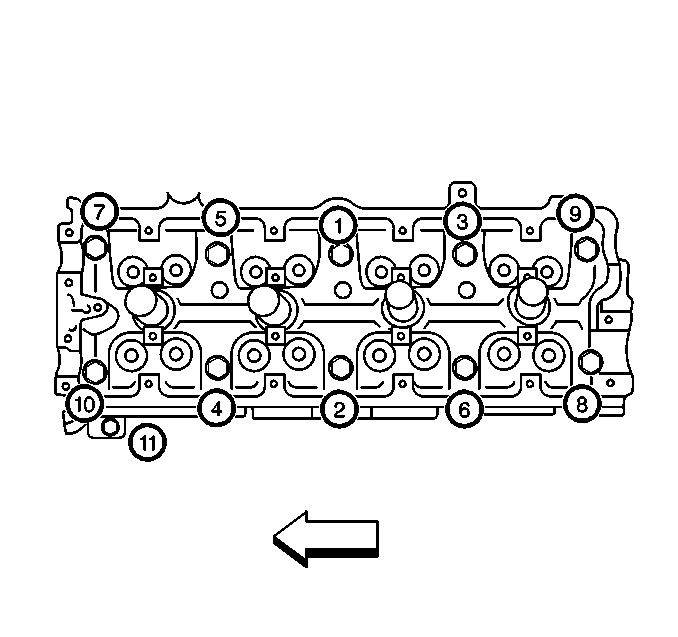
Notice: In order to prevent warpage of the cylinder head, follow the sequence
shown whenever removing or installing the head.
- Remove the 11 cylinder head bolts in the sequence shown.
- Remove the cylinder head with the intake manifold attached.
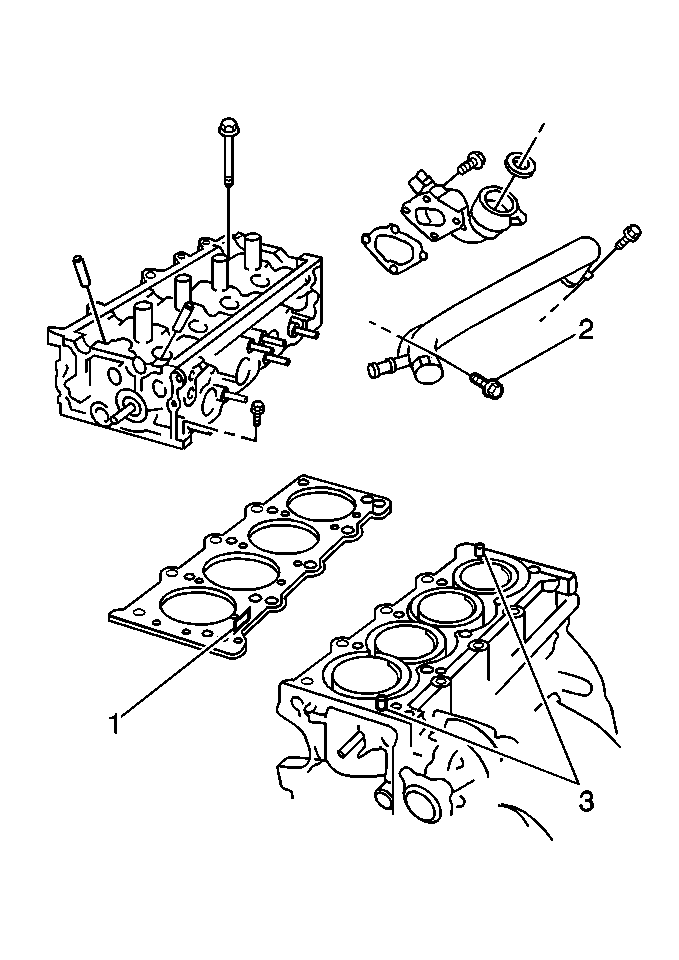
- Remove the cylinder head dowel pins (3).
- Remove the cylinder head gasket (1).
- Remove the following components from the cylinder head and transfer as
necessary:
| • | The cylinder head oil control valve |
| • | The fuel injector and rail assembly |
| • | The coolant outlet pipe |
- Inspect
the cylinder head for cracks, warpage or other damage. Refer to
Cylinder Head Cleaning and Inspection
.
- Replace the cylinder head if the cylinder block mating surface warpage
exceeds 0.05 mm (0.002 in).
- Replace the cylinder head if the manifold mating surface warpage exceeds
0.10 mm (0.004 in).
- Clean the cylinder head mating surface.
- Clean the cylinder block mating surface.
- Clean the cylinder head bolt threads and bolts. Replace any stretched
or damaged bolts.
- Clean the cylinder block bolt holes of all debris, threadlocker, sealant
etc. Installing a bolt to a blocked bolt hole will cause incorrect torque and
may cause cylinder head/block damage.
- Inspect that the oil control valve in the cylinder head is clean and
that the check ball is free.
- Install the following components to the cylinder head as necessary:
| • | The cylinder head oil control valve |
| • | The fuel injector and rail assembly |
| • | The coolant outlet pipe |
- Install the cylinder head dowel pins (3).
- Install the new cylinder head gasket to the cylinder block. The gasket is marked
TOP (1).
- Install the cylinder head with the intake manifold attached to the cylinder
block.
Important: The cylinder head bolts must be torqued in
2 stages, loosened, and then retorqued in 3 stages in order to ensure against compression
and coolant leaks.
Notice: Use the correct fastener in the correct location. Replacement fasteners
must be the correct part number for that application. Fasteners requiring
replacement or fasteners requiring the use of thread locking compound or sealant
are identified in the service procedure. Do not use paints, lubricants, or
corrosion inhibitors on fasteners or fastener joint surfaces unless specified.
These coatings affect fastener torque and joint clamping force and may damage
the fastener. Use the correct tightening sequence and specifications when
installing fasteners in order to avoid damage to parts and systems.
- Apply clean engine oil to the bolt threads and install the cylinder head bolts.
Notice: In order to prevent warpage of the cylinder head, follow the sequence
shown whenever removing or installing the head.
Tighten
Tighten the cylinder head bolts (1-10) in
the sequence shown to 53 N·m (39 lb ft).
- Tighten the cylinder head bolts (1-10).
Tighten
Tighten the cylinder head bolts (1-10) in
the sequence shown to 84 N·m (61 lb ft).
- Loosen the cylinder head bolts in the sequence
shown to 0 torque.
- Tighten the cylinder head bolts (1-10).
Tighten
Tighten the cylinder head bolts (1-10) in
the sequence shown to 53 N·m (39 lb ft).
- Tighten the cylinder head bolts (1-10).
Tighten
Tighten the cylinder head bolts (1-10) in
the sequence shown to 84 N·m (61 lb ft).
- Tighten the cylinder head bolts (1-10).
Tighten
Tighten the cylinder head bolts (1-10) in
the sequence shown to 105 N·m (76 lb ft).
- Tighten the M6 cylinder head bolt (11).
Tighten
Tighten the M6 cylinder head bolt (11) to 11 N·m
(97 lb in).
- Install the valve lifters and the intake camshaft. Refer to
Intake Camshaft and Valve Lifter Replacement
.
- Install the valve lifters and the exhaust camshaft. Refer to
Exhaust Camshaft and Valve Lifter Replacement
.
- Install the crankshaft timing chain. Refer to
Timing Chain and Sprocket Replacement
.
- Install the camshaft timing chain. Refer to
Timing Chain and Sprocket Replacement
.
- Install the timing chain housing. Refer to
Timing Chain Housing Replacement
.
- Install the cylinder head cover. Refer to
Cylinder Head Cover Replacement
.
- Install the spark plugs. Refer to
Spark Plug Replacement
in Engine Electrical.
- Align
the matchmarks (4) and install the camshaft position sensor to the rear end of the
exhaust camshaft. The sensor shaft is offset and can only be installed 1 way.
Refer to
Camshaft Position Sensor Replacement
in Engine Controls.
- Install
the heater hoses to the heater core.
- Install the exhaust manifold to the cylinder head using a new gasket. Refer
to
Exhaust Manifold Replacement
.
- Install the exhaust manifold-to-engine block bracket.
- Install the oxygen sensor connector to the exhaust manifold bracket.
Connect the oxygen sensor.
- Install the intake manifold front support bracket.
- Install
the fuel hoses to the fuel lines (9).
- Install the coolant line (5) to the underside of the intake manifold.
Secure with the 2 bolts.
- Install the coolant hoses (4,5) to the throttle body and the intake
manifold.
- Install the EVAP canister purge valve to the intake manifold. Secure
with the bolt.
- Install the EVAP vacuum line to the intake manifold.
- Install the EVAP canister purge hose to the intake manifold.
- Install the brake booster hose to the intake manifold.
- Install the PCV hose to the intake manifold.
- Install the breather hose to the intake manifold.
- Connect the following electrical connectors:
| • | The fuel injector harness (3) |
| • | The manifold absolute pressure (MAP) sensor (11) |
| • | The throttle position sensor (TPS) (8) |
| • | The idle air control (IAC) valve (6) |
| • | The EVAP canister purge valve (7) |
| • | The exhaust gas recirculation (EGR) valve (1) |
| • | The engine coolant temperature (ECT) sensor (2) |
- Connect the ground wires to the intake manifold (10)
- Connect the wiring harness to the retaining clamps.
- Install
the throttle cables to the throttle body bellcrank.
- Install the throttle cable bracket (2) to the intake manifold. Secure
with the 1 bolt.
- Install the air cleaner hose.
- Install
the strut tower brace. Refer to
Front Suspension Support Brace Replacement
in Front Suspension.
- Fill the cooling system. Refer to
Cooling System Draining and Filling
in Engine Cooling.
- Connect the negative battery cable.
- Adjust the ignition timing as necessary. Refer to
Ignition Timing Adjustment
in Engine Controls.
