Intermittent Operation of Power Roof, Rear Defogger or OnStar (Repair Pinched and/or Chaffed Wire Harnesses Under Jack Assembly)

| Subject: | Intermittent Operation of Power Roof, Rear Defogger or OnStar® (Repair Pinched and/or Chaffed Wire Harnesses Under Jack Assembly) |
| Models: | 2004 GMC Envoy XUV |
| Attention: | The following inspection and repair procedure is to be performed on all vehicles currently in dealer inventory prior to delivery to the customer. See GM Administrative Message dated 12/5/03 on this subject for "involved" VIN's by GMC Dealer Code. |
Condition
Some early production vehicles may exhibit a condition where a wiring harness is chaffing on the jack mounting bracket located under the second row right seat. The chaffing of the wiring harness may result in an inoperative power roof or rear defogger. On vehicles equipped with OnStar®, a second smaller wiring harness may be pinched between the jack mounting bracket and the floorpan.
Correction
The following are instructions for inspecting and repairing the wiring harnesses located under the jack mounting bracket assembly.
- Open the right side rear door and fold the right seat back forward.
- Release the right seat cushion and fold the complete seat assembly forward.
- Release the latch securing the cover to the jack assembly on the floor and remove the cover.
- Loosen and remove the nut securing the tool package to the bracket.
- Remove the tool package.
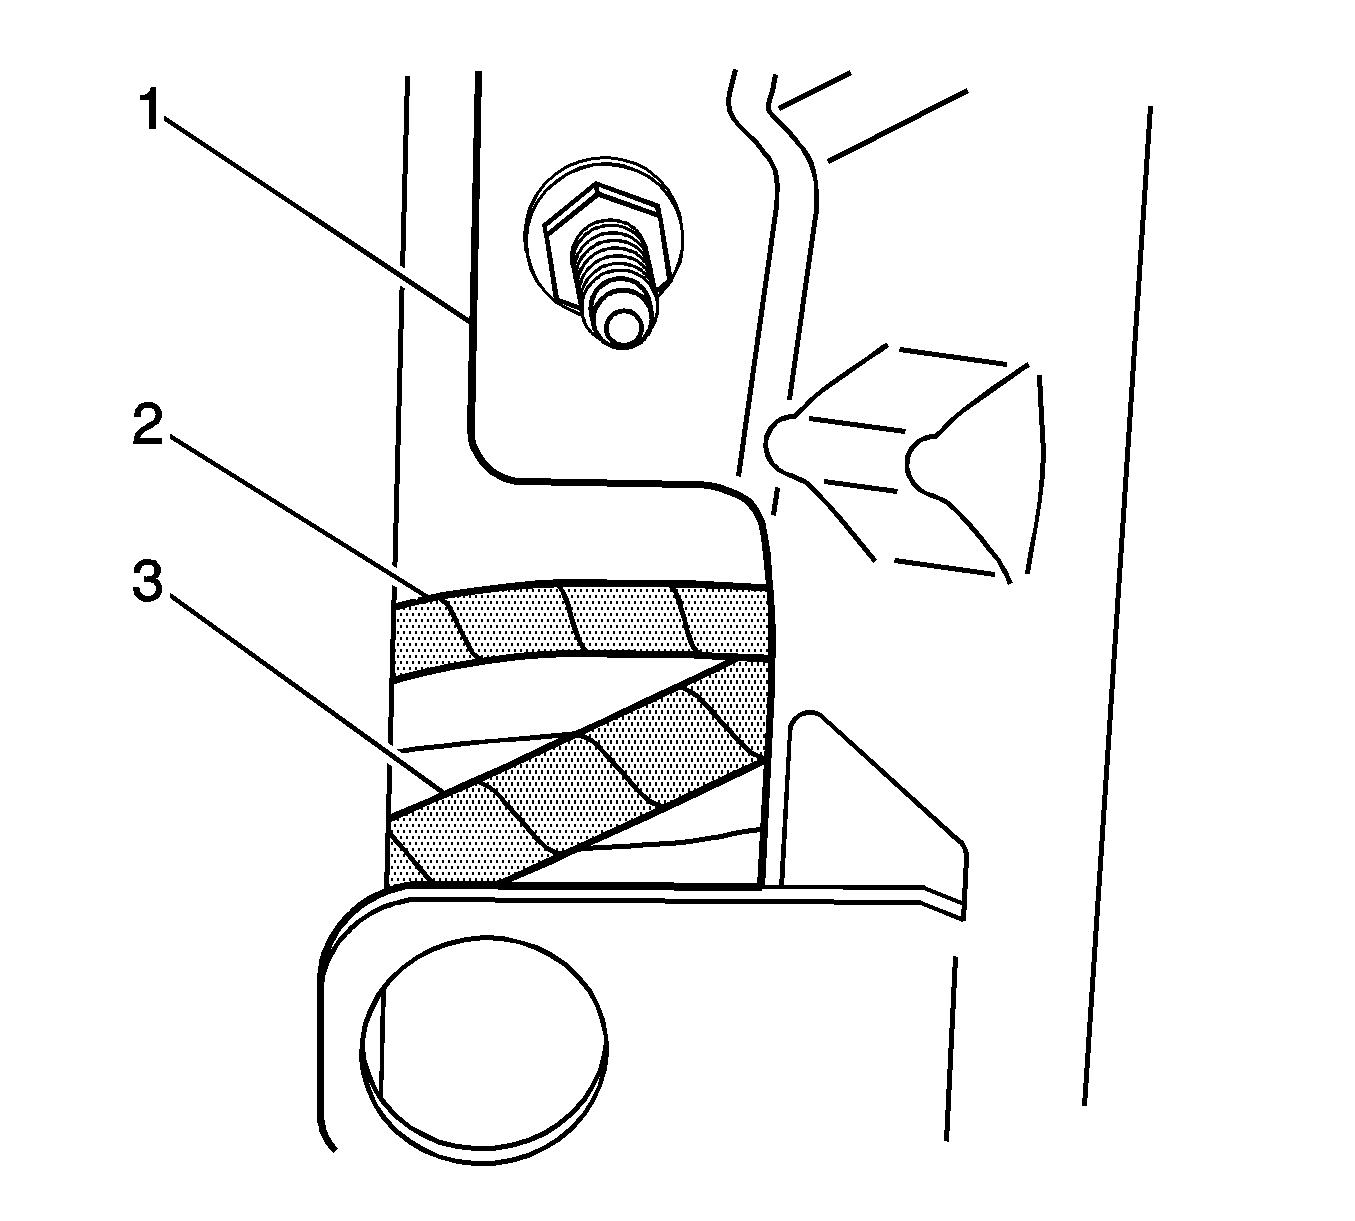
- If the vehicle is equipped with OnStar®, look through the opening in the carpeting just rearward of the jack-mounting bracket (1). Two wiring harnesses should be present. Inspect the smaller wiring harness (2) for signs of being pinched between the jack mounting bracket and the floorpan. If the vehicle is NOT equipped with OnStar®, proceed to the next step.
- On all vehicles, remove the four 10 mm hex head nuts that attach the jack-mounting bracket (1) to the floorpan.
- Remove the jack assembly and mounting bracket.
- If the vehicle has OnStar® and the SMALLER wiring harness WAS pinched between the jack mounting bracket and the floorpan, remove the black tape from the harness at the location of the damage and inspect the wires. If the smaller wiring harness was NOT pinched, or if the vehicle does NOT have OnStar®, proceed to the next step.
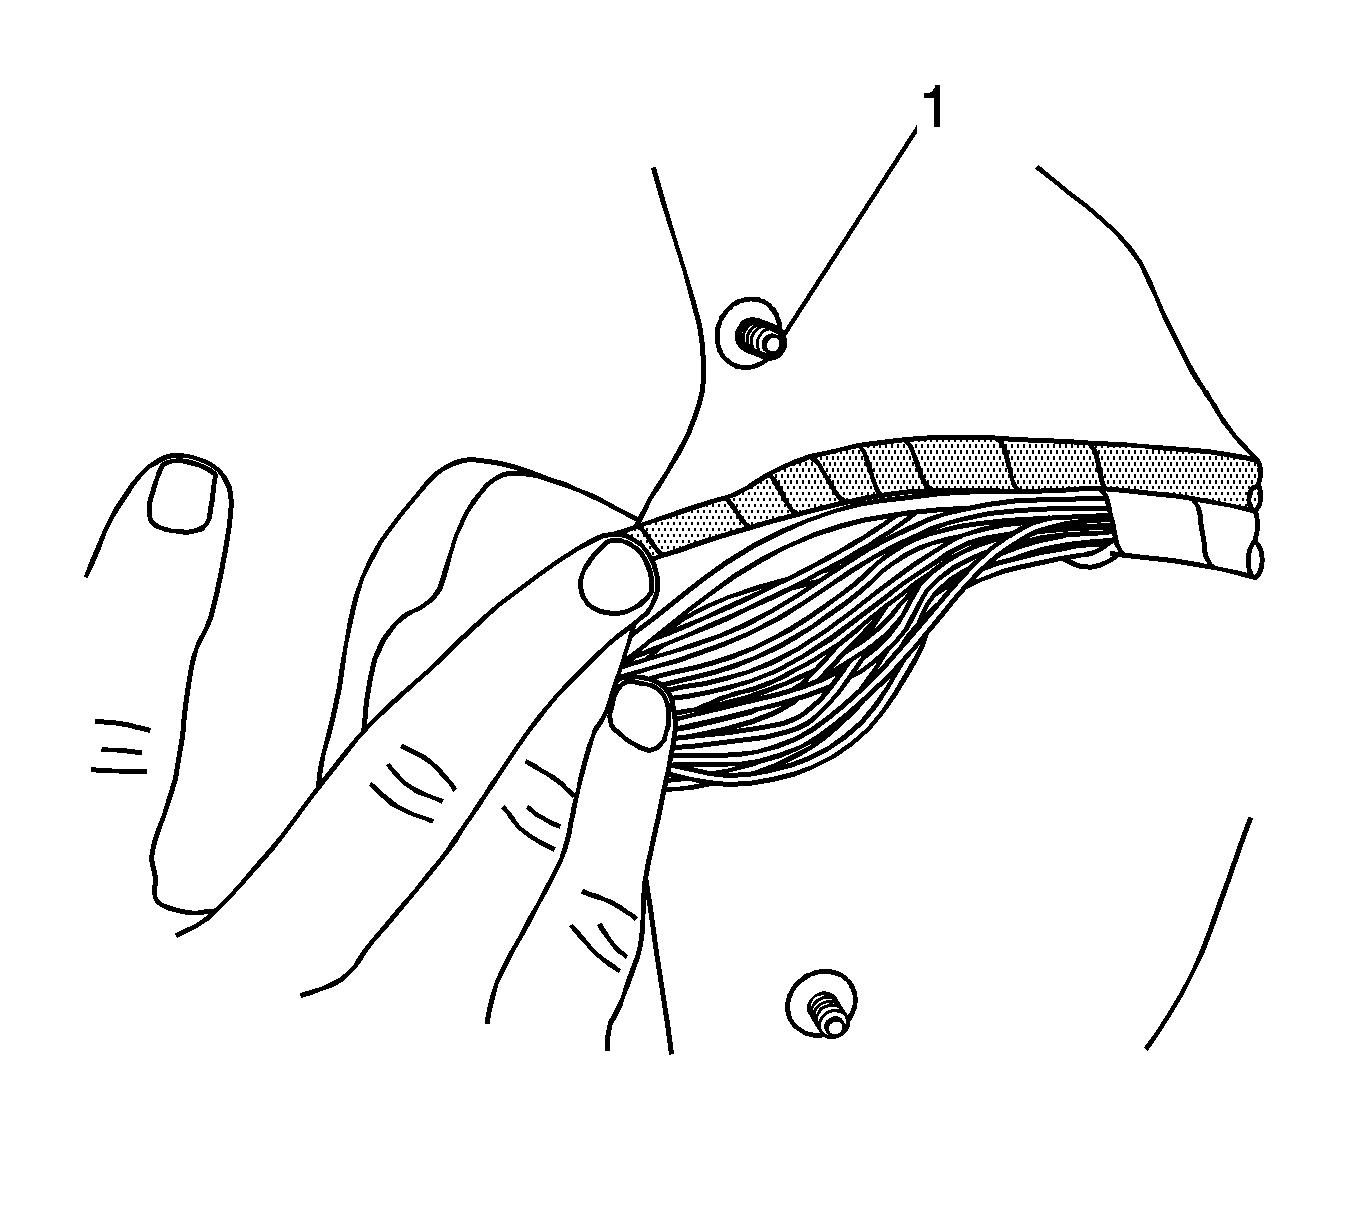
- On all vehicles, carefully remove the black tape from the LARGER wiring harness in the area of the carpet opening. Remove approximately 150 mm (6 inches) of tape (3 inches from each side of the carpet opening).
- With the tape removed from the larger wiring harness, carefully "flatten out" the wires so that they will lay flat on the floorpan when secured in the next steps. The small taped harness in the illustration is the OnStar® harness described earlier.
- Obtain one piece of sound deadening barrier material from P/N 11515174 and using a utility knife or scissors, cut it in half to a size of 115 mm x 95 mm (4 1/2 inches x 3 3/4 inches).
- Using a clean shop cloth, remove any dust from the floorpan.
- Remove the backing paper from the barrier material.
- Position all the wires (including the OnStar® harness) as far away from the jack mounting bracket stud (1) as possible and hold them flat on the floorpan.
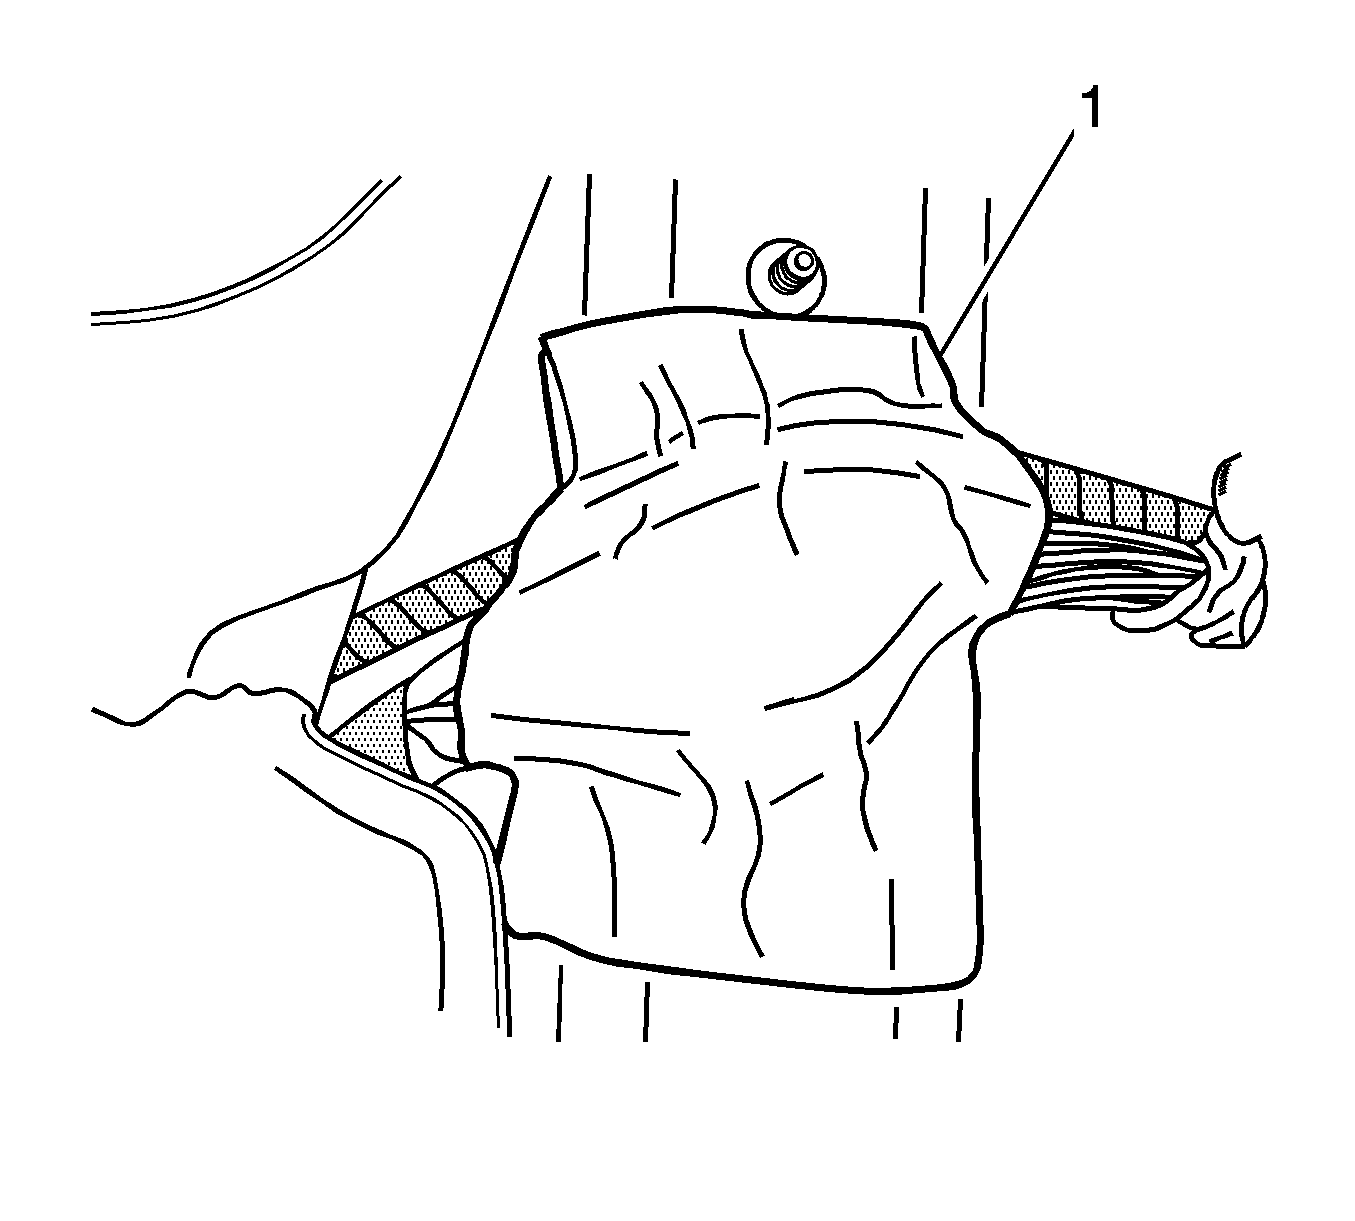
- Apply the barrier material (1) as shown. Press the material down firmly to make the harness as flat as possible. Make sure the material is securely attached to the floorpan sheet metal.
- Position the jack and mounting bracket assembly to the floorpan. Check to see that the mounting bracket is not contacting the wires under the barrier material. It is acceptable if the lower edge of the inboard mounting tab on the bracket is on top of the barrier material.
- Install the four 10 mm hex head nuts on the mounting studs.
- Install the tool package and hand-tighten the retaining nut.
- Install the cover over the jack assembly and secure the latch.
- Reposition the seat to its original position.

Important: On vehicles equipped with OnStar®, there will be two wiring harnesses visible in the next step, one small harness (2) and one larger harness (3). Vehicles without OnStar® only have the one larger harness (3).
| • | If any part of the SMALLER OnStar® wiring harness is pinched between the jack mounting bracket and the floorpan, then the wires inside the harness must be inspected for damage. Inspecting for damaged wires will be covered in the next steps. Proceed to the next step for further instructions. |
| • | If no part of the SMALLER OnStar® wiring harness is pinched between the jack mounting bracket and the floorpan, then no further inspection of the SMALLER wiring harness is required. Proceed to the next step. |
Important: It is NOT necessary to remove the jack from the mounting bracket in the next step.
| • | If no wires are damaged, re-tape the harness with black electrical tape. |
| • | If wires are damaged, repair as necessary and then re-tape with black electrical tape. |

Important: In order to obtain proper adhesion of the barrier material in the next steps, the floorpan sheet metal must be at least 21 C (70 F). If necessary, use a heat gun to warm the sheet metal before installing the barrier material.
Important: Do NOT apply the barrier material over the flange at the base of the mounting stud in the next step.

Tighten
Tighten to 10 N·m (89 lb in).
Parts Information
NOTE: The barrier material listed below comes pre-packaged in three (3) pieces. Each piece will do two (2) vehicles. One package (3 pieces) is enough to do six (6) vehicles.
Part Number | Description |
|---|---|
11515174 | Barrier Sound Deadening Material |
Parts are currently available from GMSPO.
Warranty Information
For vehicles repaired under warranty, use:
Labor Operation | Description | Labor Time |
|---|---|---|
N9501 | Wiring Repair - Power Roof Harness | 0.4 hr |
Add | Repair Pinched OnStar® Wiring and/or Chaffed Power Roof Wiring | 0.1-0.5 hr |
