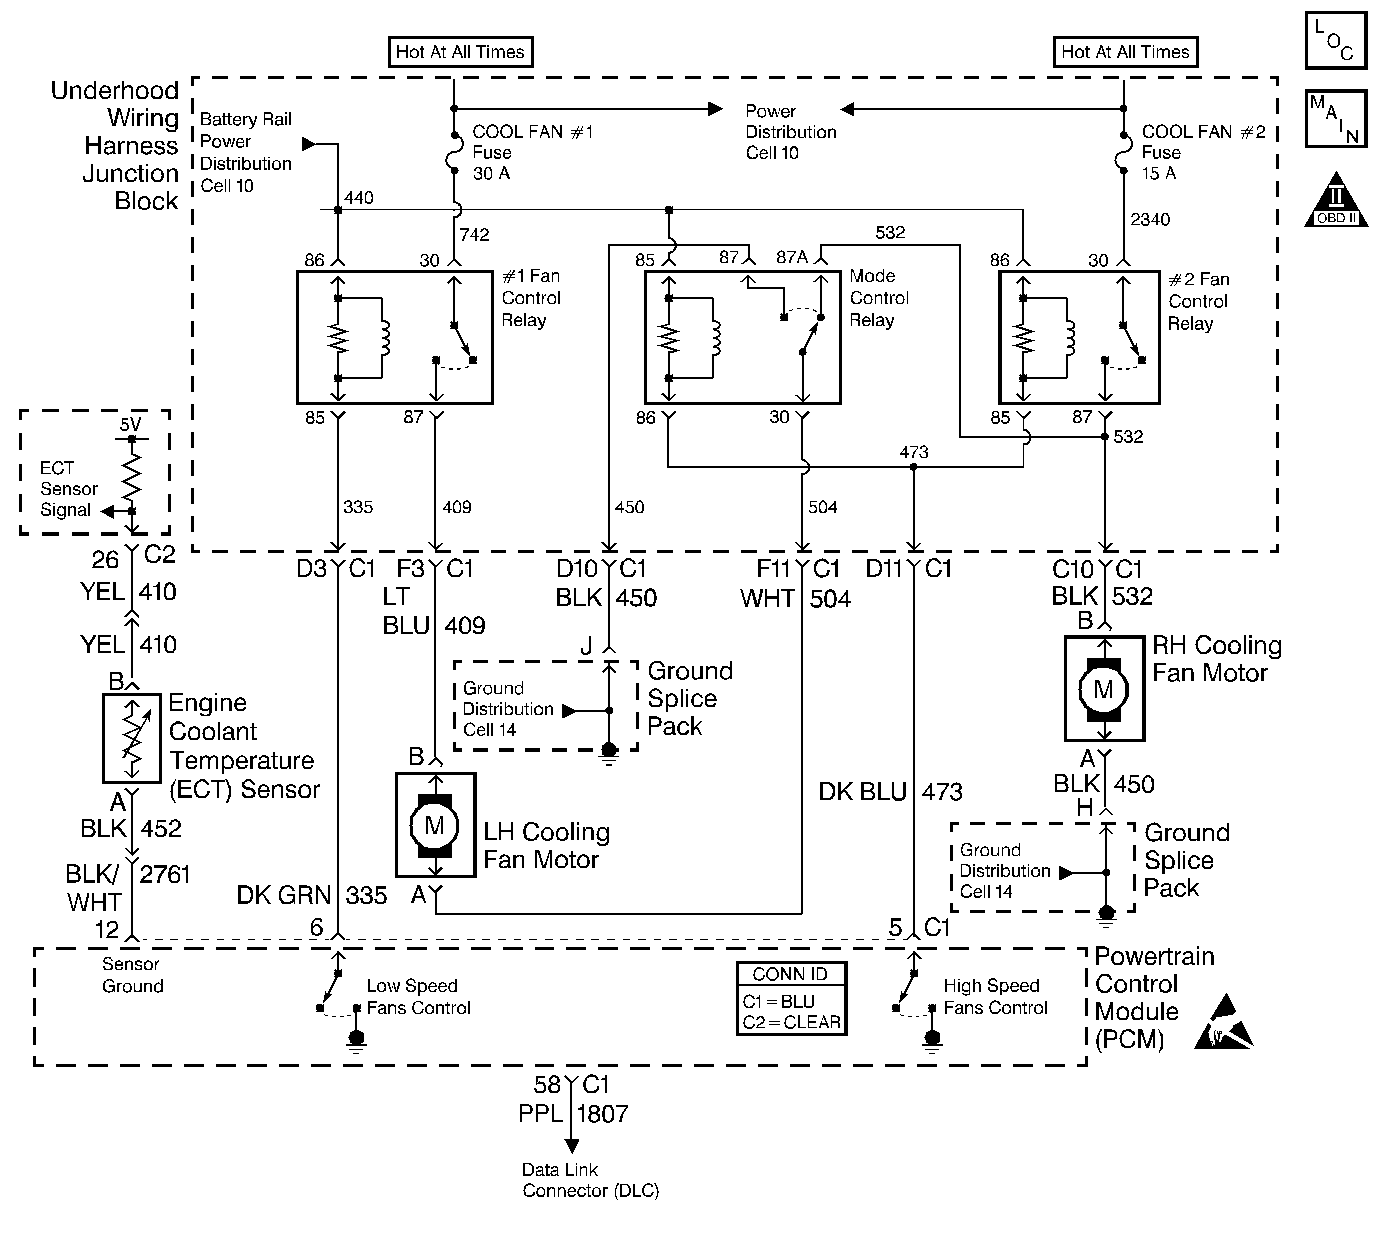
The electric cooling fan(s) are controlled by the Body Control Module
(BCM) which enables the fans through the PCM. The PCM enables the ground path
for the three cooling fan relays. The relay(s) are used to control the
high current flow to power the cooling fan motors. When minimum cooling
is required, the BCM will command the PCM to energize cooling fan relay
#1 and since both fans are connected in series through the Mode Control
relay, both fans will operate at low speed. When maximum cooling is
required, the BCM will command the PCM to energize all three cooling
fan relays. Power is supplied to the left fan through the Mode Control
relay. The right fan is powered directly through cooling fan relay #2
causing both fans to operate at high speed.
Electric Cooling Fan Diagnosis
Step
| Action
| Value(s)
| Yes
| No
|
1
| Was the Powertrain ON Board Diagnostic
(OBD) System Check performed?
| --
|
Go to Step
2
| Go to the
Powertrain On Board Diagnostic (OBD) System Check
|
2
| Are any PCM DTCs stored?
| --
| Go to
Diagnostic Trouble Code (DTC) List
first
|
Go to Step 3
|
3
|
- Ensure that the engine coolant temperature is below 100°C
(212°F).
- Turn the A/C OFF.
- Engine running.
- Observe the cooling fans.
Are the cooling fans running?
| --
|
Go to Step
32
|
Go to Step 4
|
4
|
- Command Low Speed Fans ON using the scan tool output tests function.
- Observe the cooling fans.
Are both cooling fans running at low speed?
| --
|
Go to Step 5
|
Go to Step
8
|
5
|
- Command high speed fans ON using the scan tool output tests function.
- Wait 20 seconds.
- Observe the cooling fans
Are both fans running at high speed?
| --
|
Go to Step 6
|
Go to Step
58
|
6
|
Important: Ambient temperature must be above 9°C (48°F).
- Exit scan tool output tests.
- Engine running.
- Turn the A/C ON
Are the cooling fans ON?
| --
| Go to Diagnostic Aids
|
Go to Step 7
|
7
| View A/C Request on the scan tool.
Does A/C Request on the scan tool display Yes?
| --
|
Go to Step 77
| Go to
Air Conditioning (A/C) Compressor Control Circuit Diagnosis
|
8
| Is either cooling fan running?
| --
|
Go to Step 9
|
Go to Step 16
|
9
| Is the left
cooling fan running?
| --
|
Go to Step 10
|
Go to Step 14
|
10
|
- Turn OFF the ignition switch.
- Disconnect the right engine cooling fan.
- Turn ON the ignition switch.
- Command Low speed fans ON using the scan tool output tests function.
- Observe the cooling fans.
Is the left engine cooling fan running?
| --
|
Go to Step 11
|
Go to Step
80
|
11
| Remove the Mode control relay (cool fan series) from the
U/H BEC.
Is the left engine cooling fan running?
| --
|
Go to Step 12
|
Go to Step
13
|
12
| Locate and repair short to ground in CKT 504. Refer to
Wiring Repairs
.
Is the action complete?
| --
|
Go to Step
81
| --
|
13
|
- Check CKT 532 for a short to ground.
- If a problem is found, repair as necessary. Refer to
Wiring Repairs
.
Was a problem found?
| --
|
Go to Step
81
|
Go to Step 70
|
14
|
- Turn OFF the ignition switch.
- Disconnect the left engine cooling fan.
- Turn ON the ignition switch.
- Command Low speed fans ON using the scan tool output tests function.
- Observe the cooling fans.
Is the right engine cooling fan running?
| --
|
Go to Step 15
|
Go to Step
71
|
15
|
- Locate and repair short to battery positive voltage in circuit
532 and 504.
- If a problem is found repair as necessary. Refer to
Wiring Repairs
.
Was a problem found?
| --
|
Go to Step
81
|
Go to Step 79
|
16
|
- Turn the ignition ON, engine not running.
- Remove the #1 Fan Control Relay from the U/H BEC.
- Probe relay cavity 30 with a test lamp connected to ground.
Is the test lamp ON?
| --
|
Go to Step
18
|
Go to Step 17
|
17
|
- Identify the cause of no ignition voltage to #1 Cooling Fan Relay
cavity 30
| • | Stalled right engine or left engine cooling fan. |
| • | Shorted right engine or left engine cooling fan motor windings. |
| • | Short to ground in CKT 342, CKT 532, or CKT 409. |
- Repair the cause of no ignition voltage to #1 Fan Control Relay
in Repair Refer to
Wiring Repairs
.
Is the action complete?
| --
|
Go to Step
81
| --
|
18
| Probe #1 Fan Control Relay cavity 86 with a test lamp connected to ground.
Is the test lamp ON?
| --
|
Go to Step
20
|
Go to Step 19
|
19
|
- Identify the cause of no battery positive voltage to #1 Fan Control
Relay cavity 86
| • | CKT 440 open or shorted to ground. |
| • | Shorted #1 Fan Control Relay coil. |
| • | Shorted Fan control relay #2 relay coil. |
| • | Shorted Mode control relay (cool fan series). |
| • | Circuit unrelated to cooling fans. Refer to Fuse Block Details
in Electrical Diagnosis. |
- Repair cause of no battery positive voltage to #1 Fan Control
Relay cavity 86. Refer to
Wiring Repairs
.
Is the action complete?
| --
|
Go to Step
81
| --
|
20
|
- Turn OFF the ignition switch.
- Disconnect both cooling fans.
- Connect terminals A and B together at both cooling fan connectors
using fused jumpers.
- Turn ON the ignition switch.
- Connect a test lamp between #1 Fan Control Relay cavities 87
and 30.
Is the test lamp ON?
| --
|
Go to Step
21
|
Go to Step 27
|
21
|
- Connect a test lamp between #1 Fan Control Relay cavities 85 and
86.
- Turn ON the ignition switch.
- Command Low speed fans ON using the scan tool output tests function.
- Observe the test lamp.
Is the test lamp ON?
| --
|
Go to Step
22
|
Go to Step 25
|
22
|
- Turn OFF the ignition switch.
- Remove the jumpers from the engine cooling fan connectors and
reconnect the cooling fans.
- Install a fused jumper between #1 Fan Control Relay cavities
87 and 30.
- Turn ON the ignition switch.
- Observe the cooling fans.
Are both cooling fans running?
| --
|
Go to Step
23
|
Go to Step 24
|
23
|
- Check for poor #1 Fan Control Relay connections at the U/H BEC.
- If a problem is found, repair as necessary. Refer to
Wiring Repairs
.
Was a problem found?
| --
|
Go to Step
81
|
Go to Step 37
|
24
|
- Check for poor connections at the coolant fan motors.
- If a problem is found, repair as necessary. Refer to
Wiring Repairs
.
Was a problem found?
| --
|
Go to Step
81
|
Go to Step 63
|
25
|
- Turn OFF the ignition switch.
- Disconnect the PCM blue connector C1.
- Install a fused jumper between #1 Fan Control Relay cavities
86 and 85.
- Turn ON the ignition switch.
- Probe #1 Fan Control Relay control circuit at the PCM harness
connector with a test lamp to ground.
Is the test lamp ON?
| --
|
Go to Step
77
|
Go to Step 26
|
26
| Locate and repair open in the relay control circuit between the PCM
and #1 Fan Control Relay cavity 86.
Is the action complete?
| --
|
Go to Step
81
| --
|
27
|
- Turn OFF the ignition switch.
- Remove the jumpers from the cooling fan connectors.
- Reconnect the cooling fans.
- Install a fused jumper between #1 Fan Control Relay cavities
87 and 30.
- Remove the Mode control relay (cool fan series) from the U/H
BEC.
- Probe Mode control relay (cool fan series) cavity 30 with a test
lamp connected to ground.
Is the test lamp ON?
| --
|
Go to Step
28
|
Go to Step 31
|
28
| Connect a test lamp between Mode control relay (cool fan series) in
U/H BEC cavities 30 and 87A.
Is the test lamp ON?
| --
|
Go to Step
30
|
Go to Step 29
|
29
|
- Check for an open in CKT 504 between Mode control relay (cool
fan series) cavity 30 and LH Engine Cooling Fan Motor terminal B.
- If a problem is found, repair as necessary. Refer to
Wiring Repairs
.
Was a problem found?
| --
|
Go to Step
81
|
Go to Step 57
|
30
|
- Check for a poor connection at Mode control relay (cool fan series)
in U/H BEC cavities 30 or 87A.
- If a problem is found, repair as necessary. Refer to
Wiring Repairs
.
Was a problem found?
| --
|
Go to Step
81
|
Go to Step 70
|
31
|
- Check for an open in #1 Fan Control Relay cavity 87 and left engine
cooling fan harness connector terminal B.
- If a problem is found, repair as necessary. Refer to
Wiring Repairs
.
Was a problem found?
| --
|
Go to Step
81
|
Go to Step 56
|
32
| Using scan tool, view A/C Request.
Does the scan tool display Yes?
| --
| Go to
Air Conditioning (A/C) Compressor Control Circuit Diagnosis
|
Go to Step
33
|
33
| Are both cooling fans running at low speed?
| --
|
Go to Step 34
|
Go to Step 40
|
34
| Remove #1 Fan Control Relay from the U/H BEC.
Are the cooling fans running?
| --
|
Go to Step
35
|
Go to Step 36
|
35
| Locate and repair short to voltage in CKT 409. Refer to
Wiring Repairs
.
Is the action complete?
| --
|
Go to Step
81
| --
|
36
| Using a test lamp connected to battery positive voltage, probe #1 Fan
Control Relay cavity 85.
Is the test lamp ON?
| --
|
Go to Step
38
|
Go to Step 37
|
37
| Replace #1 Fan Control Relay.
Is the action complete?
| --
|
Go to Step
81
| --
|
38
|
- Turn OFF the ignition switch.
- Disconnect the blue PCM connector.
- Probe #1 Fan Control Relay cavity 85 with a test lamp connected
to battery positive voltage.
Is the test lamp ON?
| --
|
Go to Step
39
|
Go to Step 77
|
39
| Locate and repair short to ground in the #1 Fan Control Relay control
circuit. Refer to
Wiring Repairs
.
Is the action complete?
| --
|
Go to Step
81
| --
|
40
| Are both cooling fans running at high speed?
| --
|
Go to Step 41
|
Go to Step
42
|
41
| View A/C Pressure on the scan tool.
Does the scan tool display voltage less than the specified value?
| 1.2V
|
Go to Step 77
|
Go to Step 44
|
42
|
- Turn OFF the ignition switch.
- Disconnect the PCM.
- Turn ON the ignition switch.
- Observe the cooling fans.
Is the right engine cooling fan running at high speed?
| --
|
Go to Step 43
|
Go to Step 77
|
43
|
- Check for a short to ground in the Mode control relay (cool fan
series) Cool and #2 Fan Control Relay control circuit.
- If a problem is found, repair as necessary. Refer to
Wiring Repairs
.
Was a problem found?
| --
|
Go to Step
81
|
Go to Step 52
|
44
|
- Turn OFF the ignition switch.
- Disconnect the A/C refrigerant pressure sensor electrical connector.
- Turn ON the ignition switch.
- View A/C Pressure on the scan tool.
Does the scan tool display voltage near the specified value?
| 0.0V
|
Go to Step 46
|
Go to Step 45
|
45
| Probe the A/C refrigerant pressure signal circuit with
a J 39200
.
Does the digital multimeter display voltage near the specified value?
| 0.0V
|
Go to Step 77
|
Go to Step 51
|
46
| Probe the
A/C refrigerant pressure sensor ground with a test lamp to battery positive
voltage.
Is the test lamp ON?
| --
|
Go to Step
47
|
Go to Step 49
|
47
| Probe the A/C refrigerant pressure sensor 5 volt reference circuit with
a J 39200
.
Does the digital multimeter display voltage near the specified value?
| 5.0V
|
Go to Step 48
|
Go to Step 50
|
48
| Replace the
A/C refrigerant pressure sensor. Refer to
Air Conditioning (A/C) Refrigerant Pressure Sensor Replacement
.
Is the action complete?
| --
|
Go to Step
81
| --
|
49
| Locate and repair open or short to voltage in the A/C refrigerant pressure
sensor ground circuit. Refer to
Wiring Repairs
.
Is the action complete?
| --
|
Go to Step
81
| --
|
50
| Locate and repair open or short to ground in the A/C refrigerant pressure
sensor 5 volt reference circuit. Refer to
Wiring Repairs
.
Is the action complete?
| --
|
Go to Step
81
| --
|
51
| Locate and repair short to voltage in the A/C refrigerant pressure signal
circuit. Refer to
Wiring Repairs
.
Is the action complete?
| --
|
Go to Step
81
| --
|
52
|
- Remove the Mode control relay (cool fan series) from the Underhood
Bussed Electrical Center (U/H BEC).
- Observe the cooling fans.
Is the right engine cooling fan running at high speed?
| --
|
Go to Step 53
|
Go to Step 70
|
53
| Remove the #2 Fan Control Relay from the U/H BEC.
Is the right engine cooling fan running at high speed?
| --
|
Go to Step 54
|
Go to Step 55
|
54
| Locate and repair short to battery positive voltage in
CKT 532. Refer to
Wiring Repairs
.
Is the action complete?
| --
|
Go to Step
81
| --
|
55
|
- Locate and repair short to battery positive voltage in CKT 473.
- Refer to
Wiring Repairs
.
- If a problem is found repair as necessary.
Was a problem found?
| --
|
Go to Step
81
|
Go to Step 76
|
56
|
- Check for an open in CKT 504 between #2 Fan Control Relay cavity
30 and left engine cooling fan terminal A.
- If a problem is found, repair as necessary. Refer to
Wiring Repairs
.
Was a problem found?
| --
|
Go to Step
81
|
Go to Step 79
|
57
|
- Check for an open in CKT 450 between right engine cooling fan
terminal A and ground, or open in CKT 532 from Mode control relay (cool fan
series) cavity 87A and RH Cooling Fan Motor cavity B.
- If a problem is found, repair as necessary. Refer to
Wiring Repairs
.
Was a problem found?
| --
|
Go to Step
81
|
Go to Step 80
|
58
|
- Turn the ignition ON, engine not running.
- Remove the Mode control relay (cool fan series) from the U/H
BEC.
- Install a test lamp between Mode control relay (cool fan series)
cavity 86 and battery positive voltage.
- Command High speed fans on using the scan tool output controls
function.
- Wait about 5-6 seconds.
- Observe the test lamp.
Is the test lamp ON?
| --
|
Go to Step
61
|
Go to Step 59
|
59
|
- Remove the #2 Fan Control Relay from the U/H BEC.
- Install a test lamp between #2 Fan Control Relay cavity 85 and
battery positive voltage.
- Command high speed fans on using the scan tool output controls
function.
- Wait 10 seconds.
- Observe the test lamp.
Is the test lamp ON?
| --
|
Go to Step
78
|
Go to Step 60
|
60
|
- Turn OFF the ignition switch.
- Disconnect the PCM.
- Turn ON the ignition switch.
- Check the Mode control relay (cool fan series) and #2 Fan Control
Relay control circuit for an open or a short to voltage.
- If a problem is found, repair as necessary. Refer to
Wiring Repairs
.
Was a problem found?
| --
|
Go to Step
81
|
Go to Step 77
|
61
|
- Turn OFF the ignition switch.
- Reinstall the Mode control relay (cool fan series).
- Disconnect both coolant fan electrical connectors.
- Turn ON the ignition switch.
- Command High speed fans ON using the scan tool output controls
function.
- Wait about 10 seconds.
- Probe terminal B at the right engine cooling fan connector with
a test lamp to ground.
Is the test lamp ON?
| --
|
Go to Step
62
|
Go to Step 64
|
62
| Probe terminal A at the left engine cooling fan connector with a test
lamp to battery positive voltage.
Is the test lamp ON?
| --
|
Go to Step
63
|
Go to Step 71
|
63
|
- Identify cause of inoperative cooling fan.
| • | Open right engine cooling fan motor windings. |
| • | Open left engine cooling fan motor windings. |
| • | Stalled cooling fan(s). |
- Replace the affected cooling fan motor. Refer to
Engine Cooling Fan Replacement
.
Is the action complete?
| --
|
Go to Step
81
| --
|
64
|
- Remove the Mode control relay (cool fan series) from the U/H BEC.
- Turn ON the ignition switch.
- Probe Mode control relay (cool fan series) cavity 85 with a test
lamp connected to ground.
Is the test lamp ON?
| --
|
Go to Step
66
|
Go to Step 65
|
65
| Locate and repair open in the battery positive voltage circuit to Mode
control relay (cool fan series). Refer to
Wiring Repairs
.
Is the action complete?
| --
|
Go to Step
81
| --
|
66
| Probe Mode control relay (cool fan series) cavity 30 with a test lamp
connected to ground.
Is the test lamp ON?
| --
|
Go to Step
68
|
Go to Step 67
|
67
| Locate and repair open in battery positive voltage circuit to Mode control
relay (cool fan series) cavity 30. Refer to
Wiring Repairs
.
Is the action complete?
| --
|
Go to Step
81
| --
|
68
|
- Check LH Engine Coolant Fan Motor circuit for an open between
Right Engine Coolant Fan terminal B and Mode control relay (cool fan series)
cavity 87A.
- If a problem is found, repair as necessary. Refer to
Wiring Repairs
.
Was a problem found?
| --
|
Go to Step
81
|
Go to Step 69
|
69
|
- Check for a poor Mode control relay (cool fan series) terminal
connections at the U/H BEC.
- If a problem is found, repair as necessary. Refer to
Wiring Repairs
.
Was a problem found?
| --
|
Go to Step
81
|
Go to Step 70
|
70
| Replace Mode control relay (cool fan series).
Is the action complete?
| --
|
Go to Step
81
| --
|
71
|
- Remove the #2 Fan Control Relay from the U/H BEC.
- Turn ON the ignition switch.
- Probe #2 Fan Control Relay cavity 86 with a test lamp connected
to ground.
Is the test lamp ON?
| --
|
Go to Step
73
|
Go to Step 72
|
72
| Locate and repair open in battery positive voltage circuit to #2 Fan
Control Relay cavity 86. Refer to
Wiring Repairs
.
Is the action complete?
| --
|
Go to Step
81
| --
|
73
| Probe #2 Fan Control Relay cavity 87 in the U/H BEC with a test lamp
to battery positive voltage.
Is the test lamp ON?
| --
|
Go to Step
75
|
Go to Step 74
|
74
| Locate and repair open in circuit between #2 Fan Control Relay cavity
87 and Mode control relay (cool fan series) cavity 87A in the U/H BEC and
ground. Refer to
Wiring Repairs
.
Is the action complete?
| --
|
Go to Step
81
| --
|
75
|
- Check for poor #2 Fan Control Relay engine terminal connections
at the U/H BEC.
- If a problem is found, repair as necessary. Refer to
Wiring Repairs
.
Was a problem found?
| --
|
Go to Step
81
|
Go to Step 76
|
76
| Replace the #2 Fan Control Relay in the U/H BEC.
Is the action complete?
| --
|
Go to Step
81
| --
|
77
|
Important: The replacement PCM must be programmed. Refer to
Powertrain Control Module Replacement/Programming
Replace the PCM.
Is the action complete?
| --
|
Go to Step
81
| --
|
78
| Repair open in the Mode control relay (cool fan series) cavity 85 and
#2 Fan Control Relay cavity 86 control circuit to PCM. Refer to
Wiring Repairs
.
Is the action complete?
| --
|
Go to Step
81
| --
|
79
| Replace the Left Hand Engine Cooling Fan motor. Refer to
Engine Cooling Fan Replacement
.
Is the action complete?
| --
|
Go to Step
81
| --
|
80
| Replace the Right Hand Engine Cooling Fan motor. Refer to
Engine Cooling Fan Replacement
.
Is the action complete?
| --
|
Go to Step
81
| --
|
81
|
- Engine coolant below 100°C (212°F).
- A/C OFF
- Engine running.
Observe the cooling fans.
Are the cooling fans running?
| --
|
Go to Step
32
|
Go to Step 82
|
82
|
- Command Low speed fans ON using the scan tool output tests function.
- Observe the cooling fans.
Are both cooling fans running at low speed?
| --
|
Go to Step 83
|
Go to Step
8
|
83
|
- Command High speed fans ON using the scan tool output tests function.
- Wait 6 seconds.
- Observe the cooling fans.
Are both cooling fans running at high speed?
| --
| System OK
|
Go to Step 58
|
