Step
| Action
| Value(s)
| Yes
| No
|
1
| Is any aftermarket equipment installed
on the vehicle that could affect the ALC system?
| --
| Go to
Step 2
| Go to
Step 4
|
2
| Inspect the aftermarket equipment to ensure that it is not affecting
ALC performance.
Is the aftermarket equipment affecting the ALC performance?
| --
| Go to
Step 3
| Go to
Step
4
|
3
| Correct the condition.
Is the condition corrected?
| --
| Go to
Automatic Level Control System Operation Check
| --
|
4
| Inspect the ELC fuse and the HVAC CONT fuse for an open fuse.
Is the fuse open?
| --
| Go to
Step 5
| Go to
Step 6
|
5
|
Important: If the fuse is open repeatedly, check CKT 41 (BRN) or CKT 340 (ORN)
for a short to ground.
Replace the fuse.
Is the replacement complete?
| --
| Go to
Automatic Level Control System Operation Check
| --
|
6
| Inspect the height sensor and link for proper connection or damage.
Are the height sensor and the link properly connected and in good condition?
| --
| Go to
Step 8
| Go to
Step 7
|
7
| Repair or replace the height sensor or the link. Refer
to
Automatic Level Control Sensor and Bracket Replacement
.
Is the repair or replacement complete?
| --
| Go to
Automatic Level Control System Operation Check
| --
|
8
| Does the vehicle leak down when not used for an extended period of time
(overnight), but then come up to normal trim height with vehicle use?
| --
| Go to
Step 28
| Go to
Step 9
|
9
|
- Turn the ignition ON.
- Add approximately 300 lbs of weight to the rear of the vehicle.
Does the rear of the vehicle rise and not leak down? NOTE: Allow 27
seconds for the air compressor to start and then additional time for the shock
absorbers to inflate.
| --
| Go to
Step 10
| Go to
Step 12
|
10
| Measure the
trim height at the rear underbody points. Refer to
Trim Height
.
Is the trim height correct?
| --
| Go to
Automatic Level Control System Operation Check
| Go to
Step 11
|
11
| Adjust the
height sensor. Refer to
Automatic Level Control Sensor Adjustment
.
Is the adjustment complete?
| --
| Go to
Automatic Level Control System Operation Check
| --
|
12
| Did the air compressor operate when weight was added?
| --
| Go to
Step 28
| Go to
Step
13
|
13
|
- Disconnect the height sensor electrical connector.
- Turn the ignition ON.
- Connect a fused jumper from the height sensor connector (vehicle
side) terminal B to ground.
Did the air compressor operate?
| --
| Go to
Height Sensor Operational Check
| Go to
Step 14
|
14
|
- Turn the ignition OFF.
- Connect the height sensor electrical connector.
- Remove the ALC relay from the LH rear fuse block.
- Turn the ignition ON.
- Measure the voltage from the terminal where relay pin 85 was removed,
to ground, with a DMM.
Is the measurement within the specified values?
| 10.5-15 V
| Go to
Step 16
| Go to
Step 15
|
15
| Repair the open in CKT 41.
Is the repair complete?
| --
| Go to
Automatic Level Control System Operation Check
| --
|
16
| Measure the voltage from the terminal where relay pin 30 was removed,
to ground, with a DMM (this terminal is hot at all times).
Is the measurement within the specified values?
| 10.5-15 V
| Go to
Step 18
| Go to
Step 17
|
17
| Repair the open in CKT 340 between the RH and LH
rear fuse blocks.
Is the repair complete?
| --
| Go to
Automatic Level Control System Operation Check
| --
|
18
|
- Turn the ignition OFF.
- Connect a DMM between the terminals where relay pins 85 and 86
were removed.
- Turn the ignition ON.
Is the measurement within the specified values after 17 to 27 seconds
(17 to 27 seconds is the height sensor delay period).
| 10.5-15 V
| Go to
Step 20
| Go to
Step 19
|
19
| Inspect for a poor connection at the height sensor connector,
terminal B, or an open in CKT 321.
Was a poor connection or an open found and repaired?
| --
| Go to
Automatic Level Control System Operation Check
| Go to
Height Sensor Operational Check
|
20
| Connect
a 30-amp fused jumper between the terminals where relay pins 30 and 87 were
removed.
Did the air compressor operate?
| --
| Go to
Step
21
| Go to
Step 22
|
21
| Replace the ALC relay.
Is the replacement complete?
| --
| Go to
Automatic Level Control System Operation Check
| --
|
22
|
- Leave the jumper from the previous step in place.
- Disconnect the air compressor electrical connector.
- Measure the voltage from the air compressor electrical connector
(vehicle side), terminal B to ground, with a DMM.
Is the measurement within the specified values?
| 10.5-15 V
| Go to
Step 24
| Go to
Step 23
|
23
| Repair the poor connection or the open in CKT 322.
Is the repair complete?
| --
| Go to
Automatic Level Control System Operation Check
| --
|
24
|
- Leave the jumper from the previous step in place.
- Measure the voltage from the air compressor connector (vehicle
side), terminal B to terminal D, with a DMM.
Is the measurement within the specified values?
| 10.5-15 V
| Go to
Step 26
| Go to
Step 25
|
25
| Repair the open in :
Is the repair complete?
| --
| Go to
Automatic Level Control System Operation Check
| --
|
26
|
- Disconnect the jumper.
- Install the ALC relay.
- Connect a jumper from the air compressor connector (compressor
side), terminal D to ground.
- Connect a 30-amp fused jumper from the air compressor connector
(compressor side), terminal B to B+.
Did the air compressor operate?
| --
| Go to
Step 13
| Go to
Step 27
|
27
| Replace the air compressor. Refer to
Air Compressor Replacement
.
Is the replacement complete?
| --
| Go to
Automatic Level Control System Operation Check
| --
|
28
| Inspect the following:
| • | Rear shock absorbers for a leaking air sleeve. NOTE: If the air
sleeve is worn through, perform the residual air pressure check. Refer to
Residual Air Pressure Check
. |
| • | Air tube for kinks or pinched tubes. |
| • | Air tubes for loose connections at the shock absorbers or at the
air dryer. |
| • | All air tube connections for leaks using a soap and water solution. |
Was a leak or damage found and corrected?
| --
| Go to
Automatic Level Control System Operation Check
| Go to
Step 29
|
29
|
- Disconnect the air tube from the air dryer.
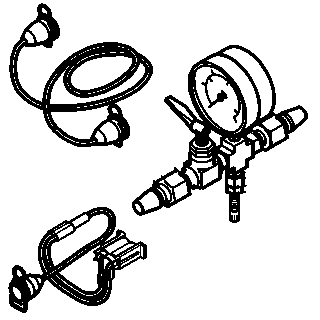
- Connect the J 22124-91
to the air dryer.
- Connect the J 22124-B
to the J 22124-91
with the toggle
valve on the opposite side (away from the air compressor) and closed.
- Disconnect the air compressor electrical connector.
- Connect a jumper from the air compressor electrical connector
(compressor side), terminal D to ground.
- Connect a 30-amp fused jumper from the air compressor electrical
connector (compressor side), terminal B, to B+.
- Allow the air compressor to operate until the pressure reaches
the specified value.
- Disconnect the jumper from terminal D.
Did the pressure reach the specified value?
| 690 kPa (100 psi)
| Go to
Step 31
| Go to
Step 30
|
30
| Replace the air compressor. Refer to
Air Compressor Replacement
.
Is the replacement complete?
| --
| Go to
Automatic Level Control System Operation Check
| --
|
31
| Does the air pressure reading on the J 22124-B
remain steady at the specified value?
| 690 kPa (100 psi)
| Go to
Step 32
| Go to
Air Compressor Leak Test
|
32
|
- Open the J 22124-B
toggle valve.
- Disconnect the vehicle air tube from the LH rear shock absorber.
- Connect the J 22124-B
adapter tube to the LH rear shock absorber and to the J 22124-B
.
- Connect a jumper from the air compressor connector, terminal D,
to ground (terminal B should still be connected to B+).
- Allow the air compressor to operate until the pressure reaches
the specified value.
- Disconnect the jumper from terminal D.
Did the pressure reach the specified value?
| 690 kPa (100 psi)
| Go to
Step 34
| Go to
Step 33
|
33
| Replace the LH rear shock absorber. Refer to
Shock Absorber Replacement
.
| --
| Go to
Automatic Level Control System Operation Check
| --
|
34
|
- Disconnect the adapter tube from the LH rear shock absorber.
- Connect the vehicle air tube to the LH rear shock absorber.
- Disconnect the vehicle air tube from the RH rear shock absorber.
- Connect the adapter tube to the RH rear shock absorber.
- Connect a jumper from the air compressor connector, terminal D,
to ground (terminal B should still be connected to B+).
- Allow the air compressor to operate until the pressure reaches
the specified value.
- Disconnect the jumper from terminal D.
Did the pressure reach the specified value?
| 690 kPa (100 psi)
| Go to
Step 36
| Go to
Step 35
|
35
| Replace the RH rear shock absorber. Refer to
Shock Absorber Replacement
.
Is the replacement complete?
| --
| Go to
Automatic Level Control System Operation Check
| --
|
36
|
- Disconnect the adapter tube from the RH rear shock absorber and
the J 22124-B
. Do not connect the
vehicle air tube.
- Disconnect the J 22124-91
from the air dryer and the J 22124-B
.
- Connect the vehicle air tube to the air dryer.
- Connect the J 22124-B
to the vehicle air tube at the RH rear shock absorber. The J 22124-B
toggle valve must be on the side of the gage
away from the air tube.
- Close the J 22124-B
toggle valve.
- Connect a jumper from the air compressor connector, terminal D,
to ground (terminal B should still be connected to B+).
- Allow the air compressor to operate until the pressure reaches
the specified value.
- Disconnect the jumper from terminal D.
Did the pressure reach and maintain the specified value?
| 690 kPa (100 psi)
| Go to
Step 38
| Go to
Step 37
|
37
| Replace the air tube. Refer to
Air Tube Replacement
.
Is the replacement complete?
| --
| Go to
Automatic Level Control System Operation Check
| --
|
38
| Inspect the rear shock absorbers for binding or damage.
Was a binding or damaged shock absorber found?
| --
| Go to
Step 39
| System OK
|
39
| Replace the binding or damaged shock absorber. Refer to
Shock Absorber Replacement
.
Is the replacement complete?
| --
| Go
to
Automatic Level Control System Operation Check
| --
|
