Rocker Panel Molding Replacement TrailBlazer, Envoy, Bravada
Tools Required
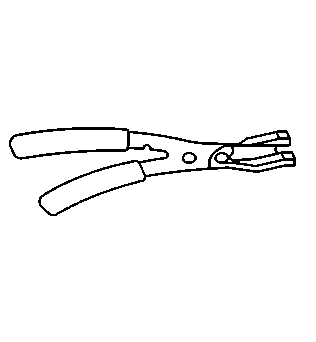
J 36796 Clip Removal Tool
Removal Procedure
- Remove the front rocker molding scuff plate. Refer to Front Rocker Molding Scuff Plate Replacement .
- Remove the rear rocker molding scuff plate. Refer to Rear Rocker Molding Scuff Plate Replacement .
- Remove the assist step. Refer to Assist Step Replacement in Frame and Underbody.
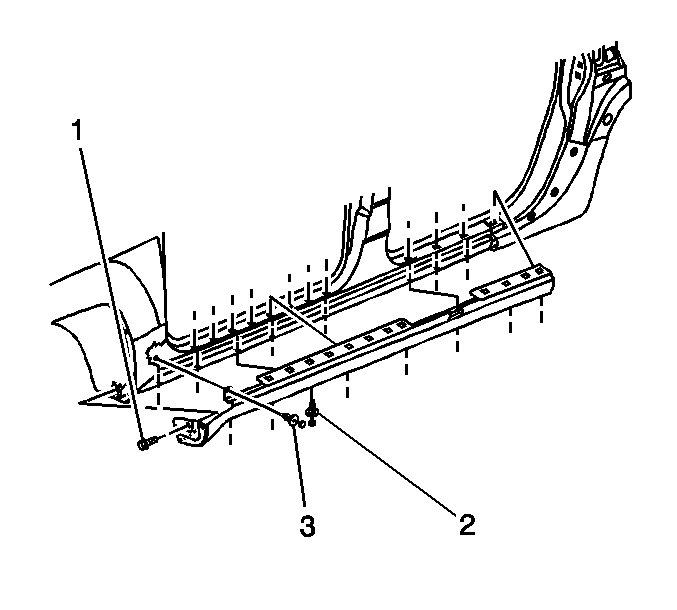
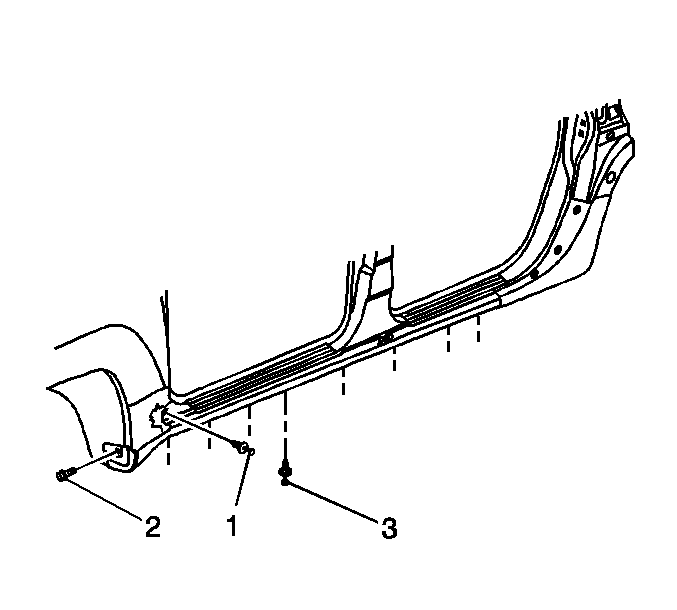
- Remove the rocker panel molding bolts located at each end of the rocker panel molding.
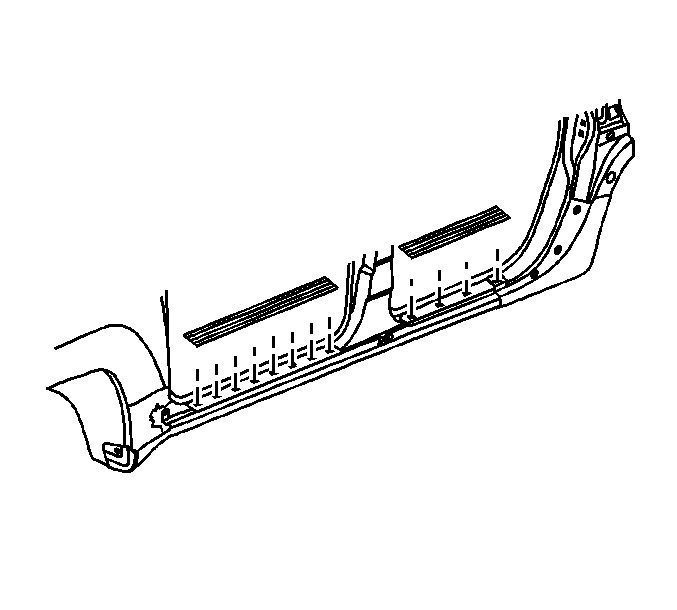
- Use the J 36796 in order to remove the 7 push-pins that retain the bottom of the rocker panel molding to the body.
- Remove the rocker panel molding from the vehicle.

Installation Procedure
- Position the rocker panel molding to the body.
- Install the 7 push-pins that retain the bottom of the rocker panel molding to the body.
- Install the rocker panel molding bolts located at each end of the rocker panel molding.
- Install the assist step. Refer to Assist Step Replacement in Frame and Underbody.
- Install the front rocker molding scuff plate. Refer to Front Rocker Molding Scuff Plate Replacement .
- Install the rear rocker molding scuff plate. Refer to Rear Rocker Molding Scuff Plate Replacement .
Notice: Use the correct fastener in the correct location. Replacement fasteners must be the correct part number for that application. Fasteners requiring replacement or fasteners requiring the use of thread locking compound or sealant are identified in the service procedure. Do not use paints, lubricants, or corrosion inhibitors on fasteners or fastener joint surfaces unless specified. These coatings affect fastener torque and joint clamping force and may damage the fastener. Use the correct tightening sequence and specifications when installing fasteners in order to avoid damage to parts and systems.
Tighten
Tighten the rocker panel molding bolts to 7 N·m (62 lb ft).
Rocker Panel Molding Replacement TrailBlazer EXT, Envoy XL
Removal Procedure
- Use a flat-bladed tool to remove door sill plates from top of rocker molding.
- Remove screw (1) from front of rocker panel molding.
- Release the push-in retainers (2) from the lower rocker panel molding using a trim removal tool.
- Remove upper push in retainer (3).
- Remove the rocker panel molding from the rocker panel.
Notice: Use a plastic, flat-bladed tool to prevent paint damage when removing an emblem/name plate.
Installation Procedure
- Position rocker molding to the holes in the rocker panel.
- Install door sill plates on top of rocker molding, ensuring that the retaining tabs are thoroughly engaged.
- Install upper push-in retainer (1), pressing into place until fully seated.
- Install the push-in retainers (3) in the bottom of the rocker molding.
- Install the rocker molding screw (2) to the rocker molding.
Notice: Use the correct fastener in the correct location. Replacement fasteners must be the correct part number for that application. Fasteners requiring replacement or fasteners requiring the use of thread locking compound or sealant are identified in the service procedure. Do not use paints, lubricants, or corrosion inhibitors on fasteners or fastener joint surfaces unless specified. These coatings affect fastener torque and joint clamping force and may damage the fastener. Use the correct tightening sequence and specifications when installing fasteners in order to avoid damage to parts and systems.
Tighten
Tighten the screw to 6 N·m (53 lb in).
