
| Subject: | Revised Case Side Cover Replacement Procedure |
| Models: | 2005 Buick Terraza |
| 2002-2005 Chevrolet Venture |
| 2002-2004 Oldsmobile Silhouette |
| 2002-2005 Pontiac Montana |
| without All-Wheel Drive (AWD) |
This bulletin is being revised to add a step for installing the engine support
fixture. Please discard Corporate Bulletin Number 04-07-30-038A (Section 07 -
Transmission/Transaxle).
This bulletin is being issued to revise the Case Side Cover Replacement procedure
in the Automatic Transmission sub-section of the Service Manual. Please replace the
current information in the Service Manual with the following information.
The following information has been updated within SI. If you are using a paper
version of this Service Manual, please make a reference to this bulletin on the affected
page.
Case Side Cover Replacement
Removal Procedure
- Remove the throttle body air inlet duct. Refer to Air Cleaner Element
in Engine Controls.
- Remove the engine mount struts. Refer to Engine Mount Strut Replacement --
Left and Engine Mount Strut Replacement -- Right in Engine Mechanical.
- Remove the wiper cover.
- Disconnect the 20-way electrical connector at the transmission.
- Remove the shift cable bracket from the transmission.
- Install the engine support fixture and support the engine/transaxle assembly.
Refer to Engine Support Fixture in Engine Mechanical.
- Raise and support the vehicle. Refer to Lifting and Jacking the Vehicle
in General Information.
- Remove the left front tire and wheel. Refer to Tire and Wheel Removal
and Installation in Tires and Wheels.
- Remove the left wheel speed sensor harness connector (1).
- Remove the left engine splash shield. Refer to Splash Shield Replacement --
Engine in Body Front End.
- Remove both stabilizer shaft links from the lower control arms. Refer
to Stabilizer Shaft Link Replacement in Front Suspension.
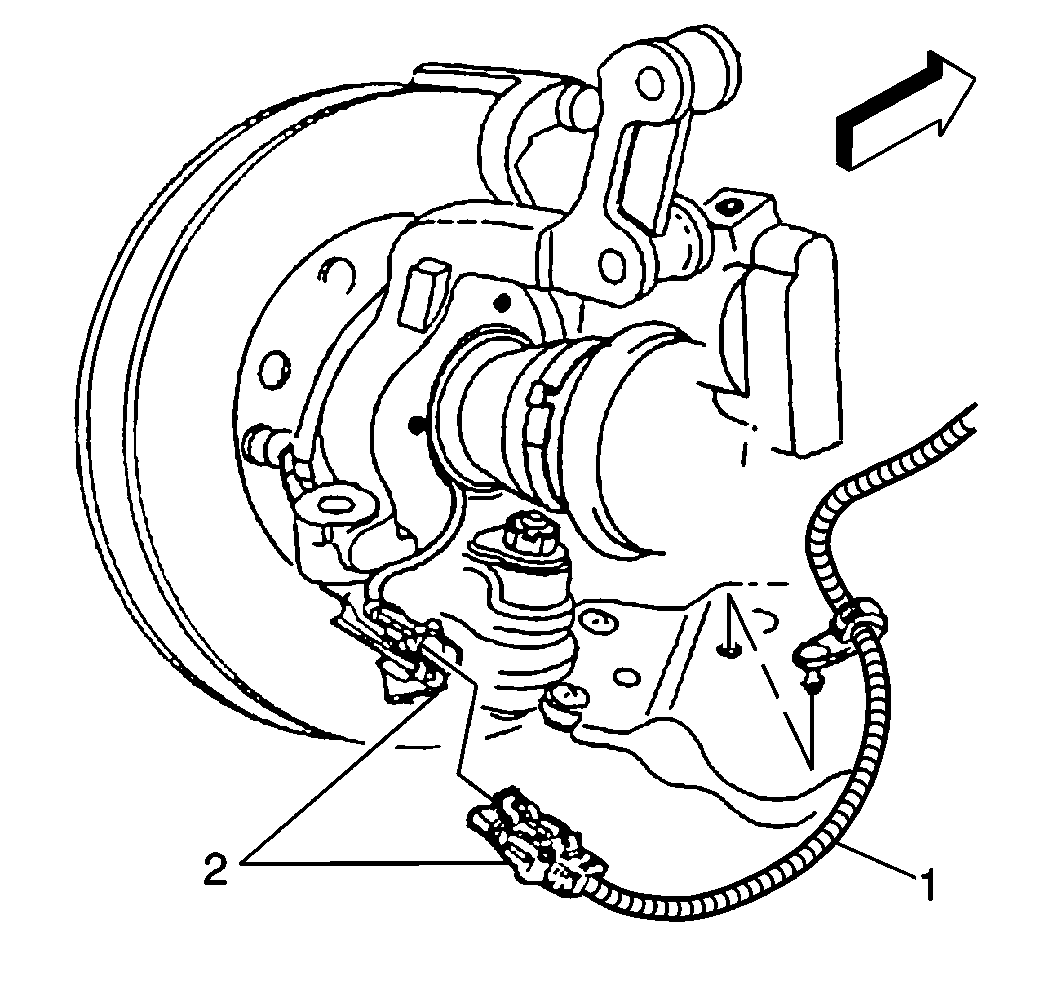
- Remove the wheel speed sensor harness connector (2).
- Remove the left lower ball joint from the left steering knuckle. Refer
to Steering Knuckle Replacement in Front Suspension.
- Disconnect the left drive axle from the transaxle. Refer to Wheel Drive
Shaft Replacement - Front in Wheel Drive Shafts.
- Reposition and secure the drive axle.
- Remove the heat shield bolts from the frame (2).
- Remove the steering gear-to-frame bolts (2).
- Support the left side of the frame with a utility stand.
- Remove the transaxle mount lower nuts only. Refer to Automatic Transmission
Mount Replacement.
- Loosen the engine mount lower nuts. Refer to Engine Mount Replacement
in Engine Mechanical.
- Remove the air deflector.
- Remove the left side frame bolts. Refer to Frame Replacement -
Front in Frame and Underbody.
- Use the utility stand in order to lower left side of the frame.
- Position the drain pan under the transaxle.
- Remove the left axle.
- Remove the utility stand and lower the vehicle.
- Loosen the motor support bolts.
- Raise the vehicle.
- Remove the motor mount bracket.
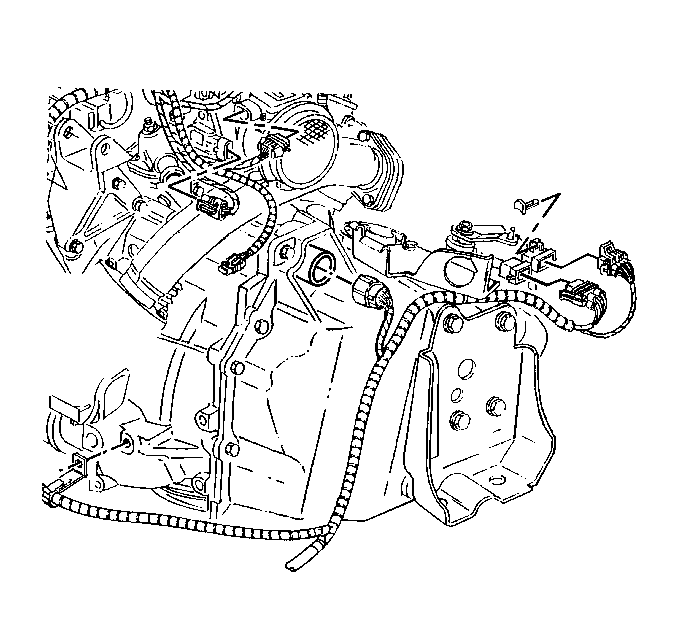
- Remove the wiring harness connectors.
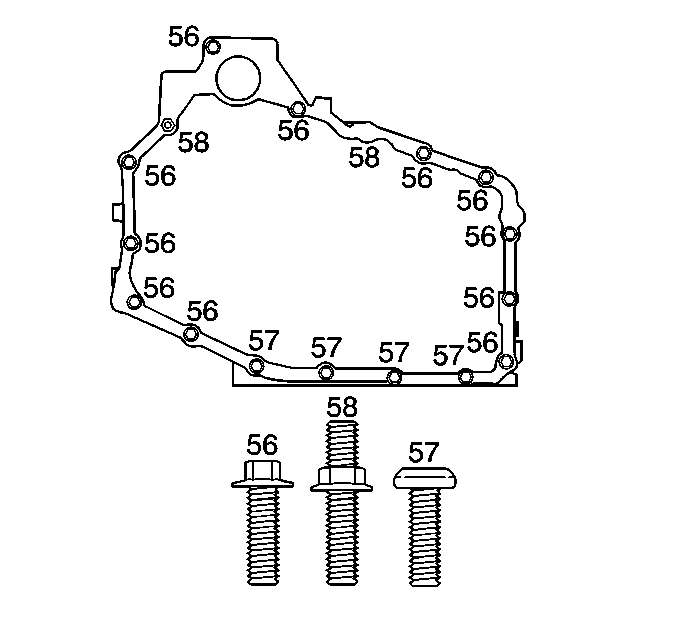
- Remove the case side cover bolts (56-58).
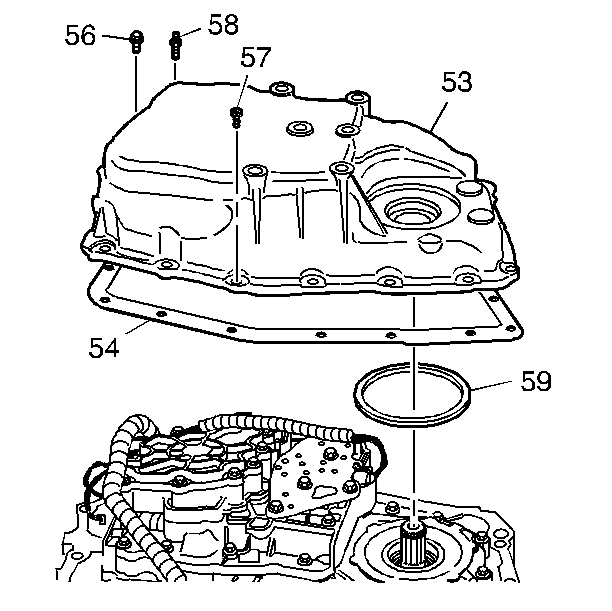
- Remove the case side cover pan (53).
- Remove the case side cover gasket (54).
- Remove the case side cover inner gasket (59).
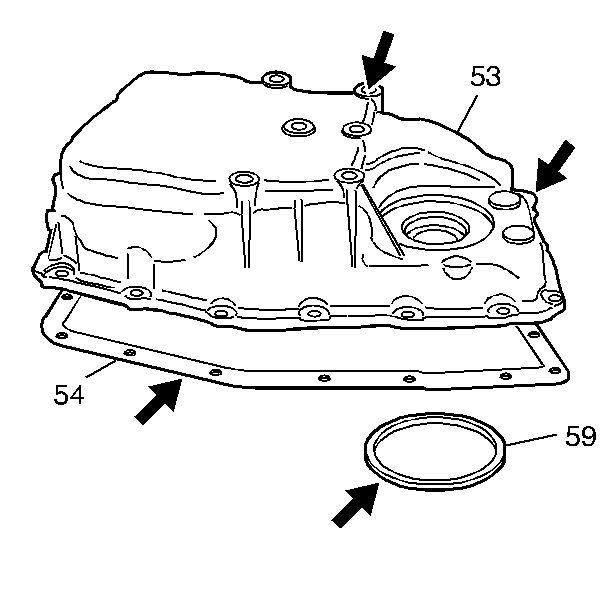
- Inspect the case side cover (53) for the following
conditions:
| • | Damaged or porous gasket sealing surfaces |
| • | Damaged or porous casting surfaces |
| • | Damaged or stripped bolt holes |
- Inspect the case side cover gasket (54) and case side cover inner
gasket (59) for damage. The gaskets are reusable if they are NOT damaged.
- Clean the case side cover.
- Clean the case side cover gasket surfaces.
Installation Procedure
- Install the case side cover inner gasket (59).
- Install the case side cover gasket (54).
- Install the case side cover pan (53).
Notice: Refer to Fastener Notice
in Cautions and Notices.
- Install the case side cover bolts (56-58).
Tighten
Tighten the bolts (56-58) to 25 N·m
(18 lb ft).
- Install the motor mount bracket.
Tighten
Tighten to 95 N·m (70 lb ft).
- Remove the drain pan from under the transaxle.
- Install the wiring harness connectors.
- Use the utility stand in order to raise the left side of the frame.
- Install the left side frame bolts. Refer to Frame Replacement -
Front in Frame and Underbody.
Tighten
Tighten the bolts to 165 N·m (122 lb ft).
- Install the transaxle mount. Refer to Automatic Transmission Mount Replacement.
- Remove the utility stand support from the left side of the frame.
- Install the air deflector (4 bolts).
- Install the left drive axle to the transaxle. Refer to Wheel Drive Shaft
Replacement - Front in Wheel Drive Shafts.
- Install the left lower ball joint to the left steering knuckle. Refer
to Steering Knuckle Replacement in Front Suspension.
- Install two steering gear bolts.
Tighten
Tighten the bolts to 80 N·m (59 lb ft).
- Install the heat shield.
- Install the lower ball joint nut and tighten.
- Install the wheel speed sensor harness connector (1).
- Install the transmission mount lower nuts.
- Install the stabilizer shaft links to the lower control arms. Refer to
Stabilizer Shaft Link Replacement in Front Suspension.
Tighten
Tighten to 23 N·m (17 lb ft).
- Install the left engine splash shield. Refer to Splash Shield Replacement -
Engine in Body Front End.
- Install the left front tire and wheel. Refer to Tire and Wheel Removal
and Installation in Tires and Wheels.
- Lower the vehicle.
- Remove the engine support fixture from the engine/transaxle assembly.
Refer to Engine Support Fixture in Engine Mechanical.
- Install the shift cable bracket.
- Connect the 20-way transmission electrical connector.
- Install the engine mount struts. Refer to Engine Mount Strut Replacement -
Left and Engine Mount Strut Replacement - Right in Engine Mechanical.
- Install the throttle body air inlet duct. Refer to Air Cleaner Element
Replacement in Engine Controls.
- Install the engine mount struts.
- Install the wiper cover.
Notice: Do NOT overfill the transaxle. The overfilling
of the transaxle causes foaming, loss of fluid, shift complaints, and possible damage
to the transaxle.
- Adjust the fluid level. Refer to the following
information.
| • | Line Pressure Check Procedure |
| • | Fluid and Lubricant Recommendations in Maintenance and Lubrication |
| • | Capacities - Approximate Fluid in Maintenance and Lubrication |
- Inspect for proper completion of the repairs.
- Inspect for fluid leaks.
