Cylinder Head Assemble F Car
Tools Required
| • | J 8062 Valve Spring Compressor |
| • | J 42078 Valve Stem Oil Seal Installer |
- Clean the cylinder head valve spring shim area.
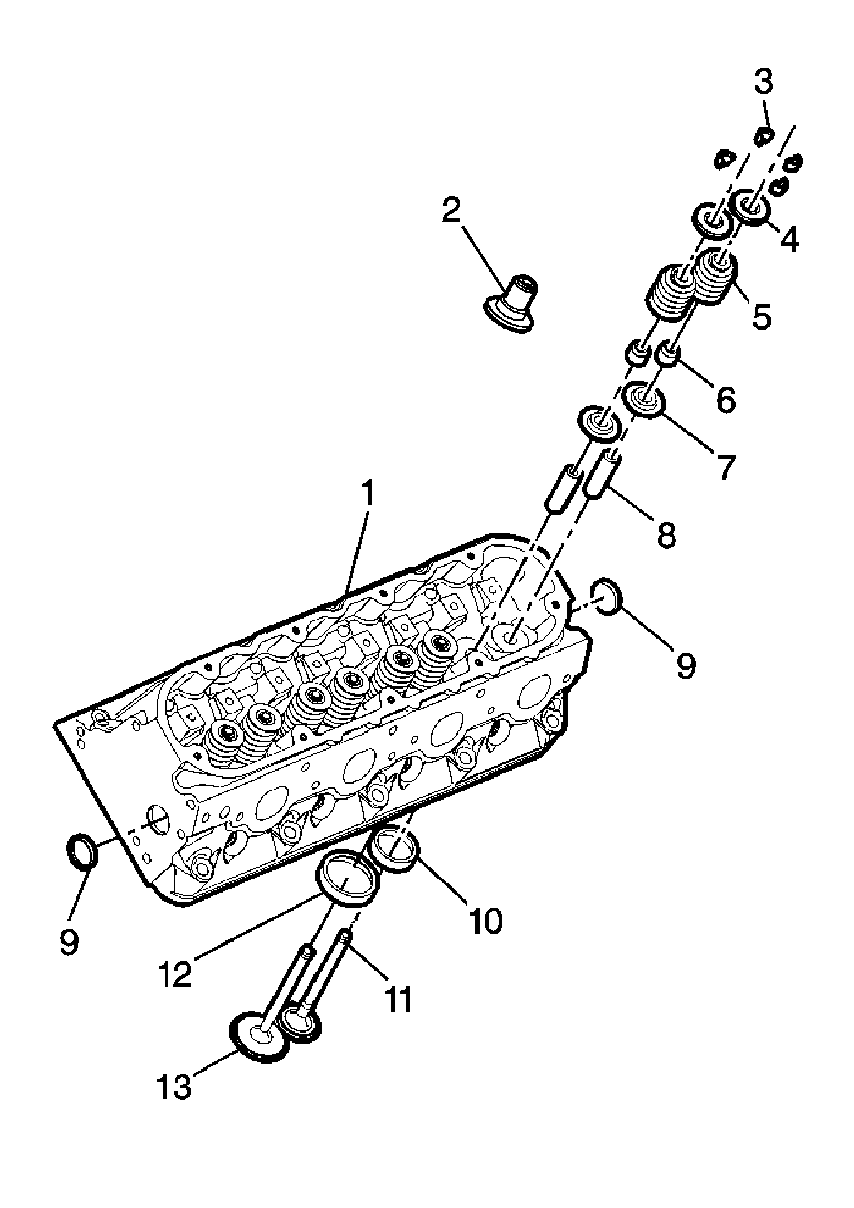
- Install the valves (11 and 13) into the proper port. Refer to Separating Parts .
- Install the first design valve spring shim (7).
- Install the second design valve stem oil seal and shim assembly (2).
- Install the first design valve stem oil seal onto the guide.
- Measure the first design valve stem oil seal for the properly installed height.
- Install the valve spring (5).
- Install the valve spring cap (4).
- Compress the valve spring using the J 8062 .
- Install the valve stem keys.
- Measure the valve spring installed height using a ruler.
- Install the remaining valves, springs, and other components.
- Install sealant GM P/N United States 12346004, GM P/N Canada 10953480 or equivalent to the threads of the coolant sensor.
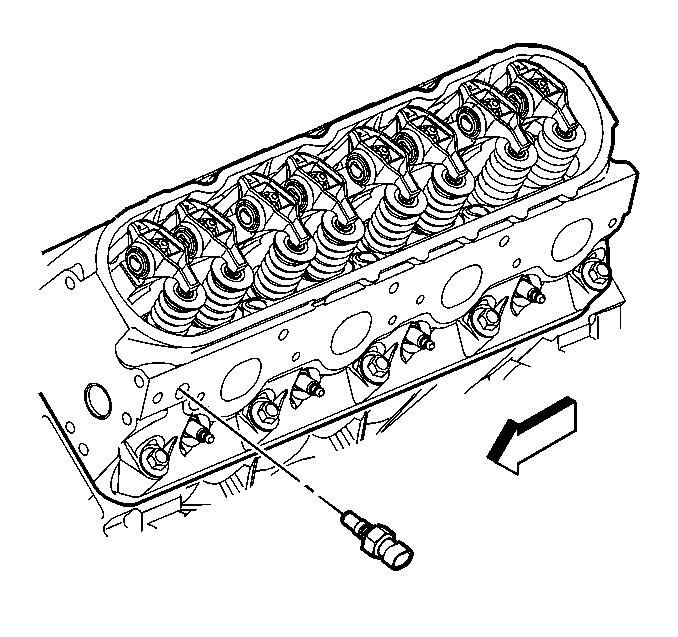
- Install the coolant sensor into the left cylinder head.
- Install the coolant plug to the right cylinder head.
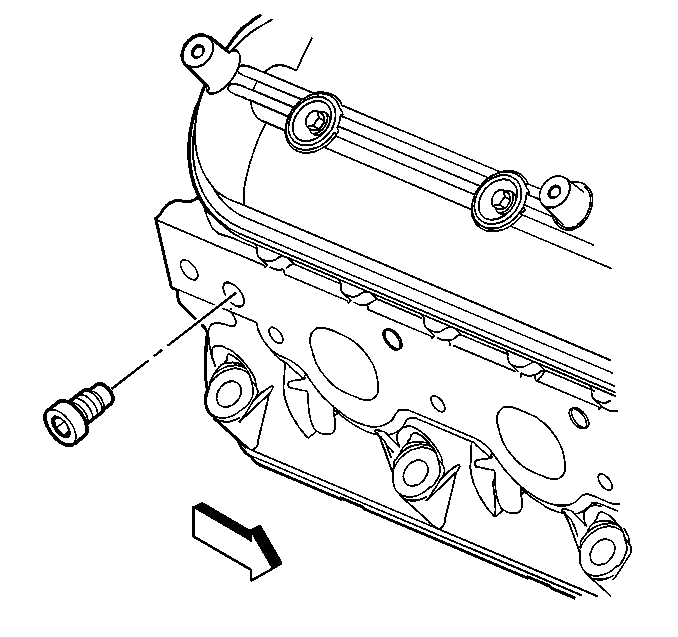
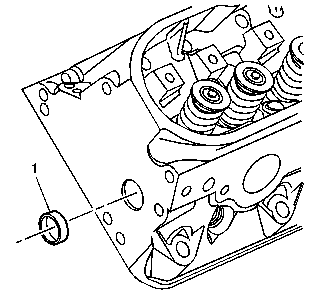
- Apply threadlock GM P/N United States 12345382, GM P/N Canada 10953489 or equivalent to the sides of the cylinder head expansion plugs (1).
- Install the expansion plugs into the cylinder head.
Important: When reusing the valves and related components, install the parts to their original location.
J 42078 is not required for installation of the second design seal and shim assembly.A separate spring shim is not required with the second design seal and shim assembly.
Important: The valve stem oil seal alignment and position on the valve guide is critical.
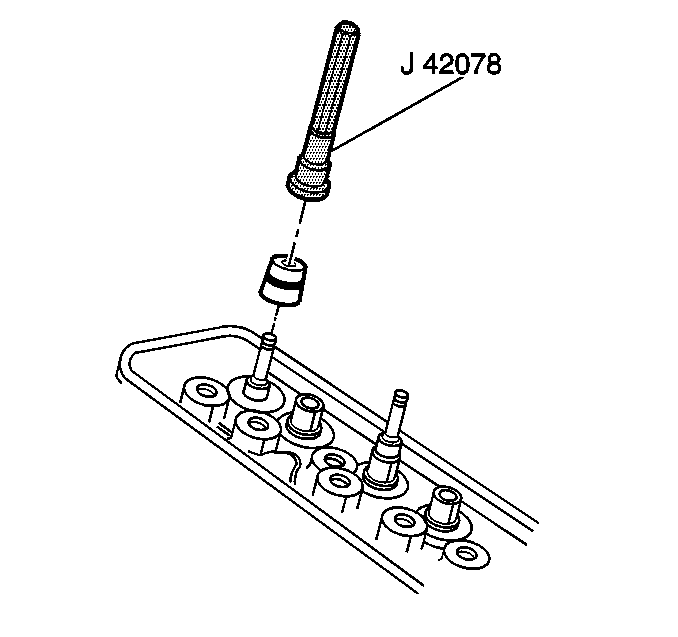
An improperly installed valve stem oil seal may lead to excessive oil consumption, increased vehicle emissions, or component damage.| 5.1. | Lubricate the valve guide and valve stem oil seal with clean engine oil. |
| 5.2. | Install the first design valve stem oil seal onto the valve stem. Push the seal down until the seal contacts the valve guide. |
| 5.3. | Use the J 42078 in order to install the valve stem oil seal. |
Push or lightly tap the tool until the tool bottoms against the valve spring shim.
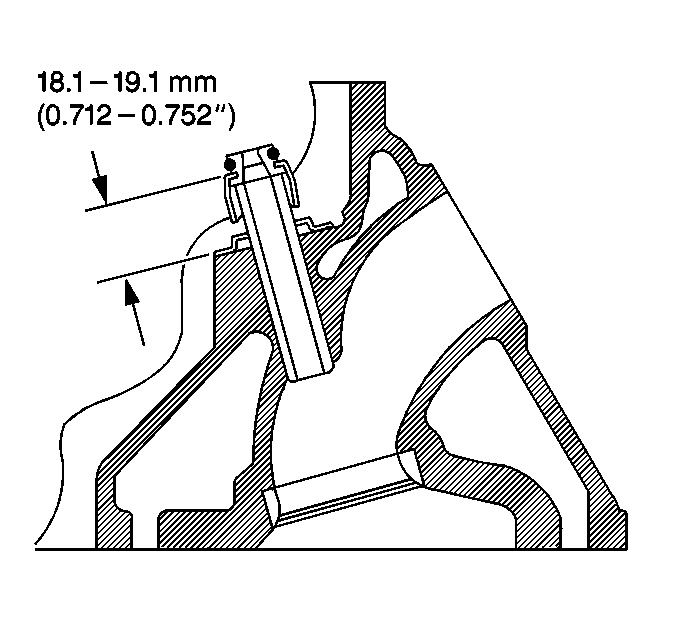
Specification
There should be a 18.1-19.1 mm
(0.712-0.752 in) gap between the top edge of the oil seal body and the
valve spring shim surface.
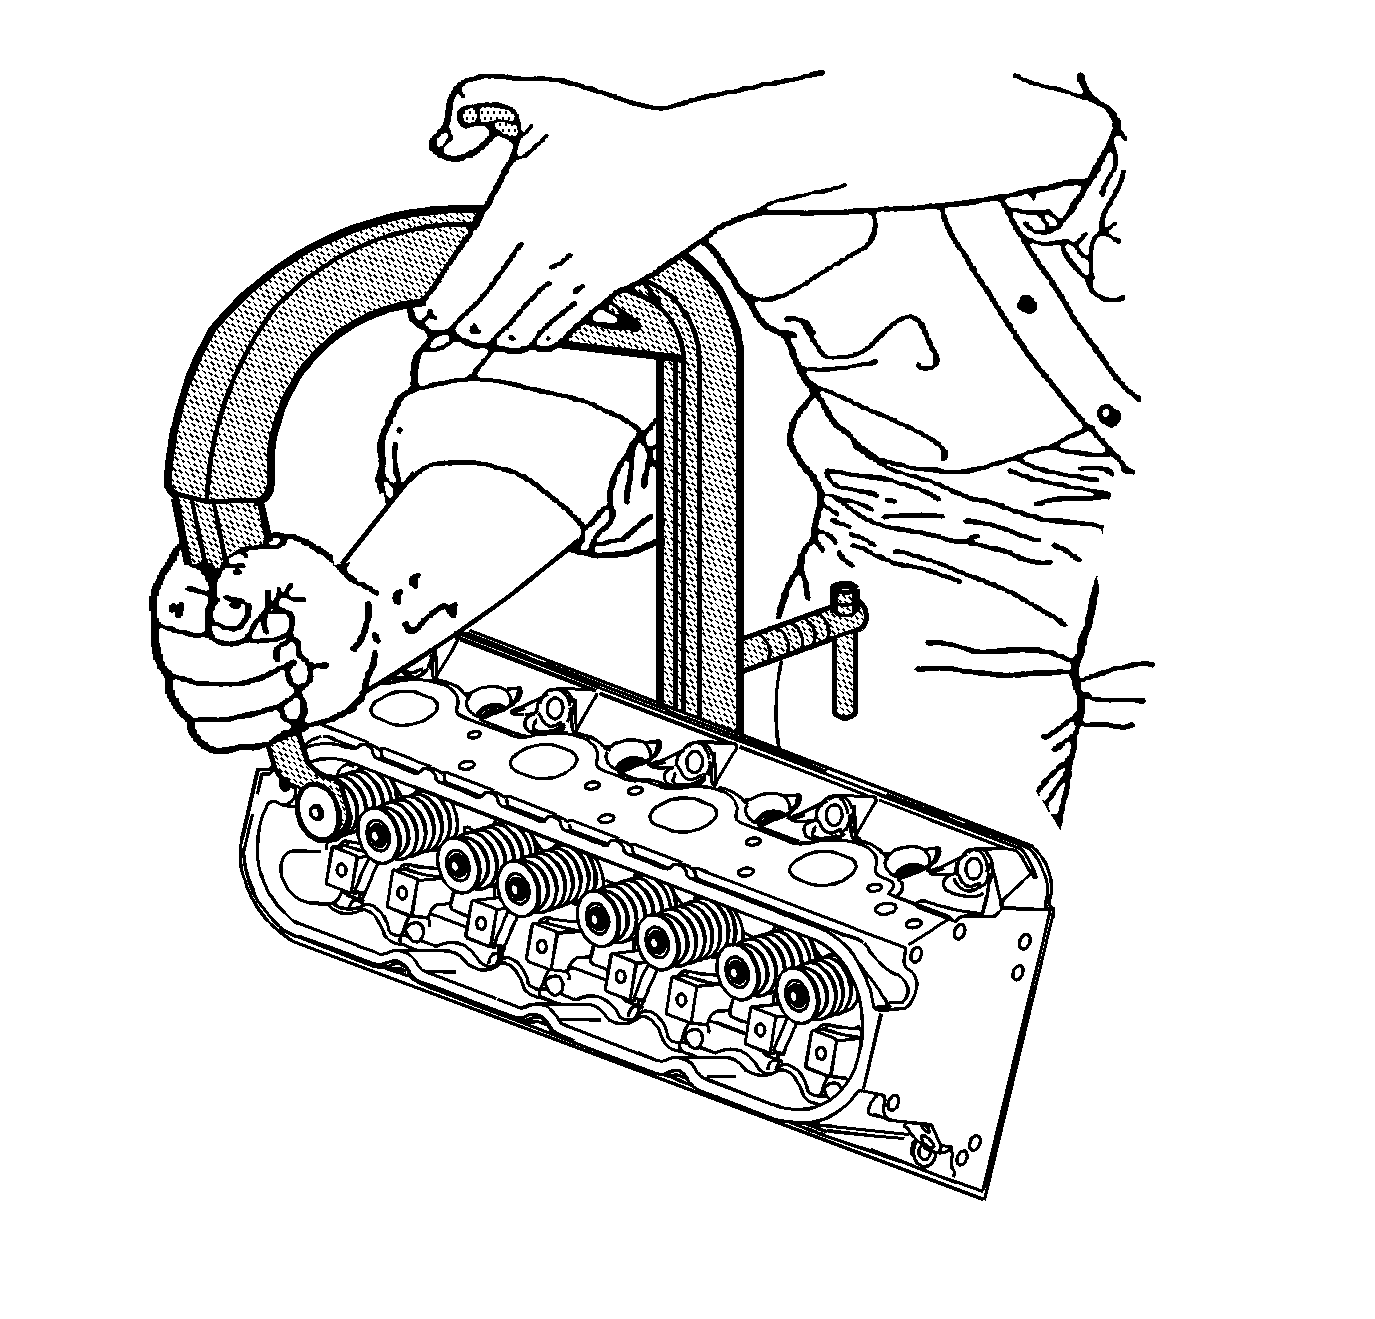
| 10.1. | Use grease to hold the keys in place and remove the J 8062 . |
| 10.2. | Make sure the keys seat properly in the groove of the valve stem. |
| 10.3. | Tap the end to the valve stem with a plastic faced hammer to seat the keys, if necessary. |
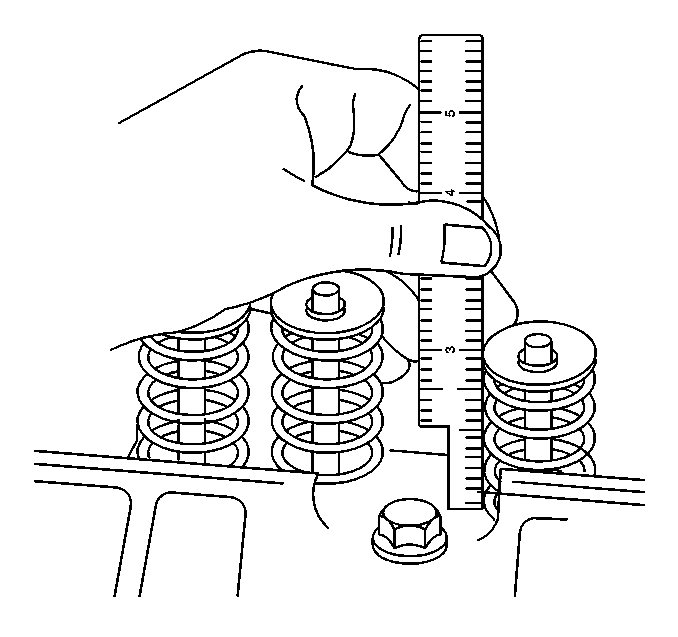
Measure from the base of the valve spring to the top of the valve spring.
Specification
| • | If the installed height exceeds 46.25 mm (1.82 in), install a valve spring shim of approximately 0.5 mm (0.02 in) thick. |
| • | Do not shim the valve spring to obtain less than the specified height. |
| Do not assemble the components without a spring shim on the cylinder head. |
Notice: Use the correct fastener in the correct location. Replacement fasteners must be the correct part number for that application. Fasteners requiring replacement or fasteners requiring the use of thread locking compound or sealant are identified in the service procedure. Do not use paints, lubricants, or corrosion inhibitors on fasteners or fastener joint surfaces unless specified. These coatings affect fastener torque and joint clamping force and may damage the fastener. Use the correct tightening sequence and specifications when installing fasteners in order to avoid damage to parts and systems.
Tighten
Tighten the coolant sensor to 20 N·m
(15 lb ft).
Tighten
Tighten the coolant plug to 20 N·m
(15 lb ft).
A properly installed plug should be installed 2.5 mm (0.1 in) below the end face of the head.
Cylinder Head Assemble Y Car
Tools Required
| • | J 8062 Valve Spring Compressor |
| • | J 42078 Valve Stem Oil Seal Installer |
- Clean the cylinder head valve spring shim area.
- Install the valves (11 and 13) into the proper port.
- Install the first design valve spring shim (7).
- Install the second design valve stem oil seal and shim assembly (2).
- Install the first design valve stem oil seal onto the guide.
- Measure the first design valve stem oil seal for the properly installed height.
- Install the valve spring (5).
- Install the valve spring cap (4).
- Compress the valve spring using the J 8062 .
- Install the valve stem keys.
- Measure the valve spring installed height using a ruler.
- Install the remaining valves, springs, and other components.
- Install sealant GM P/N United States 12346004, GM P/N Canada 10953480 or equivalent to the threads of the coolant sensor.
- Install the coolant sensor into the left cylinder head.
- Install the coolant plug to the right cylinder head.
- Apply threadlock GM P/N United States 12345382, GM P/N Canada 10953489 or equivalent to the sides of the cylinder head expansion plugs (1).
- Install the expansion plugs into the cylinder head.
Important:
• When reusing the valves and related components, install the parts to
their original location. • J 42078 is not required
for installation of the second design seal and shim assembly. • The first design LS6 application uses a separate copper plated spring
shim. A shim of the same design must be installed. A second design seal and shim
assembly may be used on later engines. A separate spring shim is not required with
the second design seal and shim assembly.
Refer to Separating Parts .
Important: The valve stem oil seal alignment and position on the valve guide is critical.
An improperly installed valve stem oil seal may lead to excessive oil consumption, increased vehicle emissions, or component damage.| 5.1. | Lubricate the valve guide and valve stem oil seal with clean engine oil. |
| 5.2. | Install the first design valve stem oil seal onto the valve stem. Push the seal down until the seal contacts the valve guide. |
| 5.3. | Use the J 42078 in order to install the valve stem oil seal. |
Push or lightly tap the tool until the tool bottoms against the valve spring shim.
Specification
There should be a 18.1-19.1 mm
(0.712-0.752 in) gap between the top edge of the oil seal body and the
valve spring shim surface.
| 10.1. | Use grease to hold the keys in place and remove the J 8062 . |
| 10.2. | Make sure the keys seat properly in the groove of the valve stem. |
| 10.3. | Tap the end to the valve stem with a plastic faced hammer to seat the keys, if necessary. |
Measure from the base of the valve spring to the top of the valve spring.
Specification
| • | If the installed height exceeds 46.25 mm (1.82 in), install a valve spring shim of approximately 0.5 mm (0.02 in) thick. |
| • | Do not shim the valve spring to obtain less than the specified height. |
| Do not assemble the components without a spring shim on the cylinder head. |
Notice: Use the correct fastener in the correct location. Replacement fasteners must be the correct part number for that application. Fasteners requiring replacement or fasteners requiring the use of thread locking compound or sealant are identified in the service procedure. Do not use paints, lubricants, or corrosion inhibitors on fasteners or fastener joint surfaces unless specified. These coatings affect fastener torque and joint clamping force and may damage the fastener. Use the correct tightening sequence and specifications when installing fasteners in order to avoid damage to parts and systems.
Tighten
Tighten the coolant sensor to 20 N·m
(15 lb ft).
Tighten
Tighten the coolant plug to 20 N·m
(15 lb ft).
A properly installed plug should be installed 2.5 mm (0.1 in) below the end face of the head.
