Removal Procedure
- Remove the engine assembly with transaxle. Refer to Engine Replacement.
- Install the engine stand.
- Remove the intake manifold.
- Disconnect the fuel tube assembly.
- Remove the fuel delivery pipe assembly.
- Remove the fuel injector assembly.
- Remove the ignition coil assembly.
- Remove the oil level dipstick assembly. Refer to Oil Level Indicator and Tube Removal.
- Remove the exhaust manifold. Refer to Exhaust Manifold Removal.
- Remove the ventilation hose.
- Remove the water by-pass hoses.
- Remove the water by-pass pipe.
- Remove the inlet water hose.
- Remove the thermostat.
- Remove the radio setting condenser.
- Remove the cylinder head cover assembly. Refer to Camshaft Cover Removal.
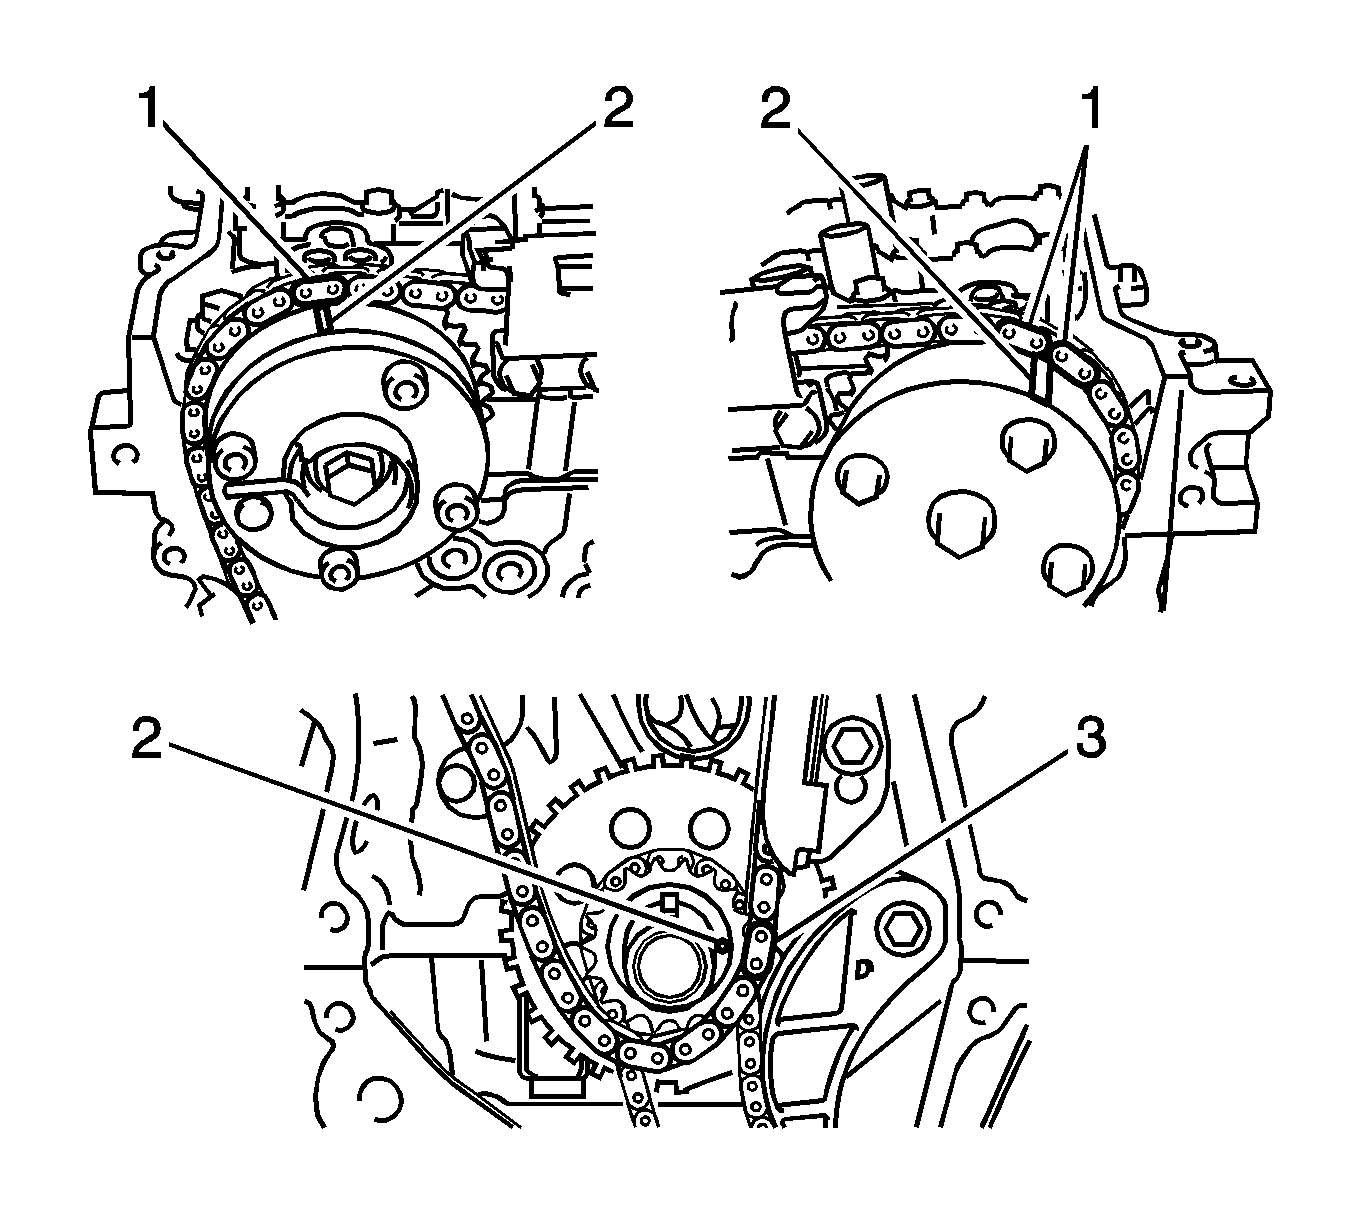
- Set the No. 1 cylinder to TDC/compression.
- Remove the crankshaft pulley.
- Remove the chain tensioner assembly. Refer to Timing Chain Tensioner Removal.
- Remove the timing chain cover assembly. Refer to Timing Chain Housing Removal.
- Remove the timing chain cover oil seal.
- Remove the chain tensioner slipper.
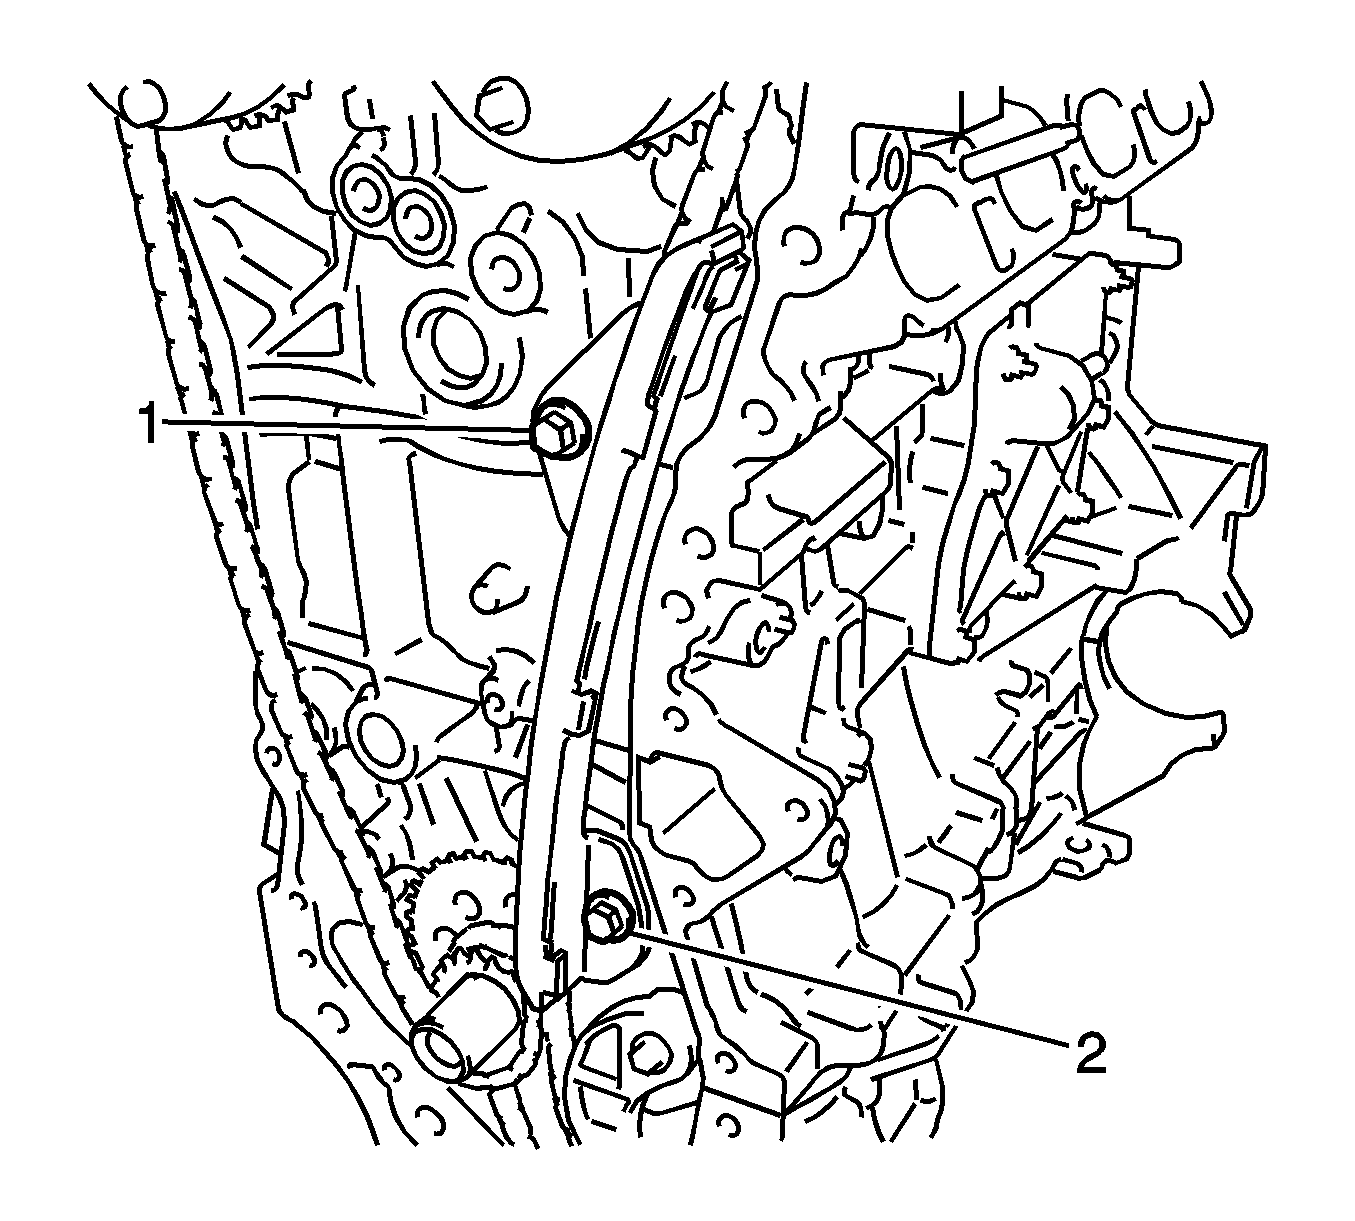
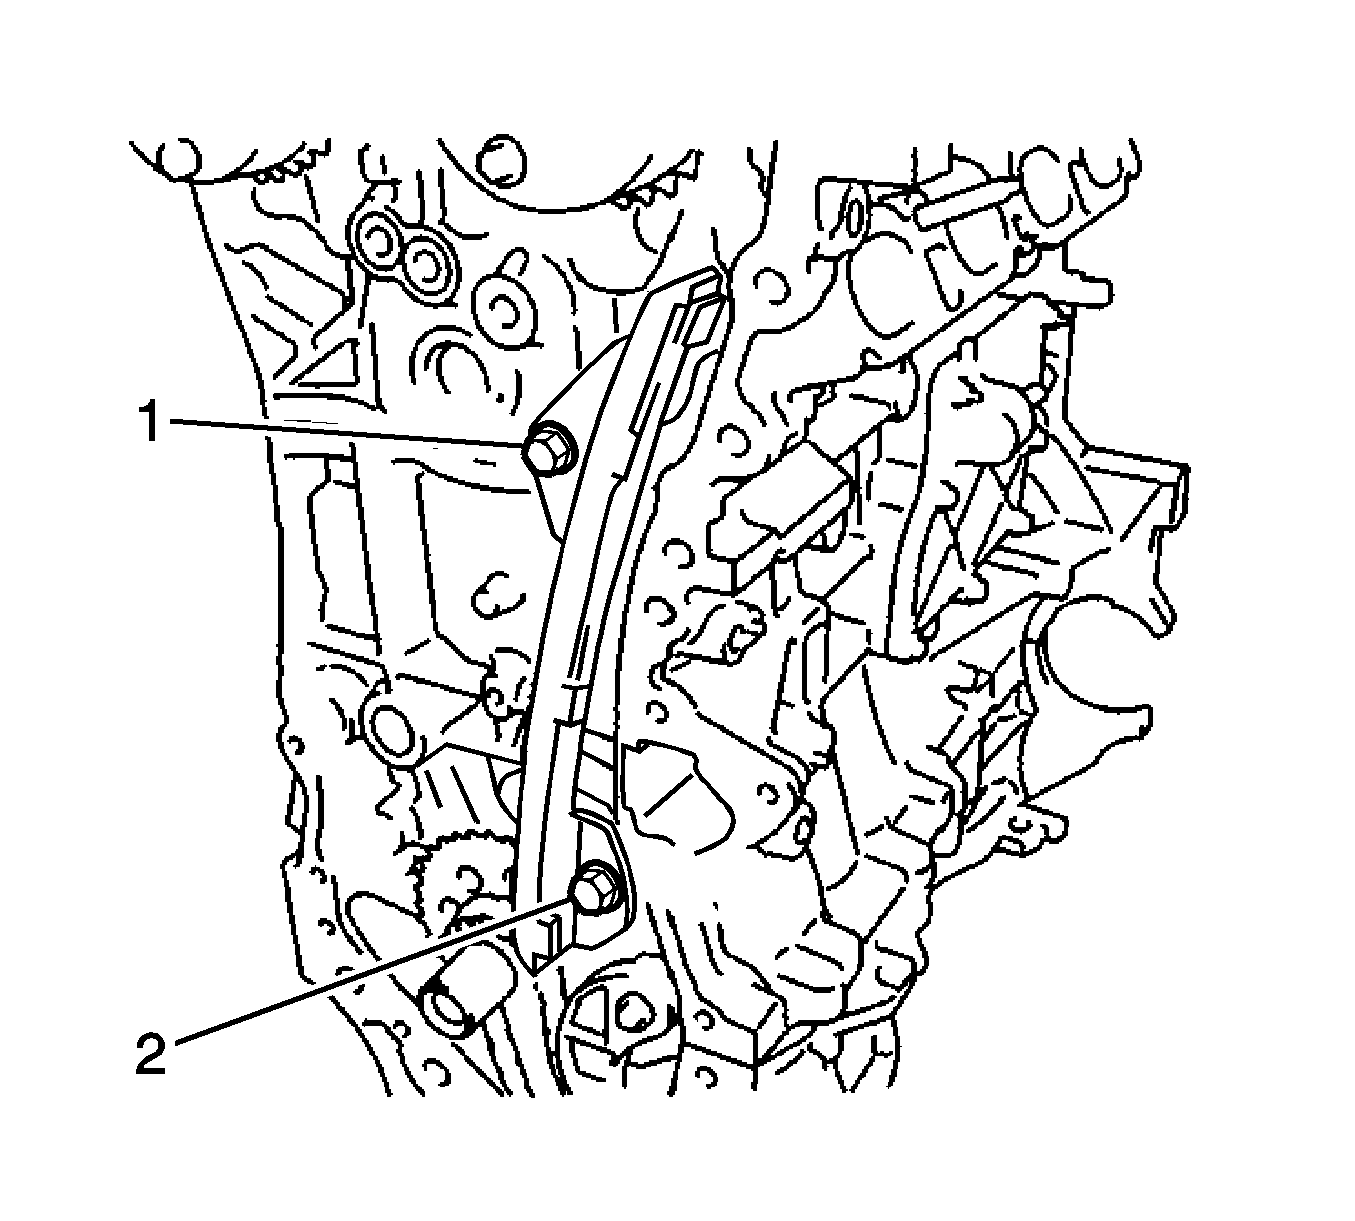
- Remove the 2 bolts (1, 2) and chain vibration damper.
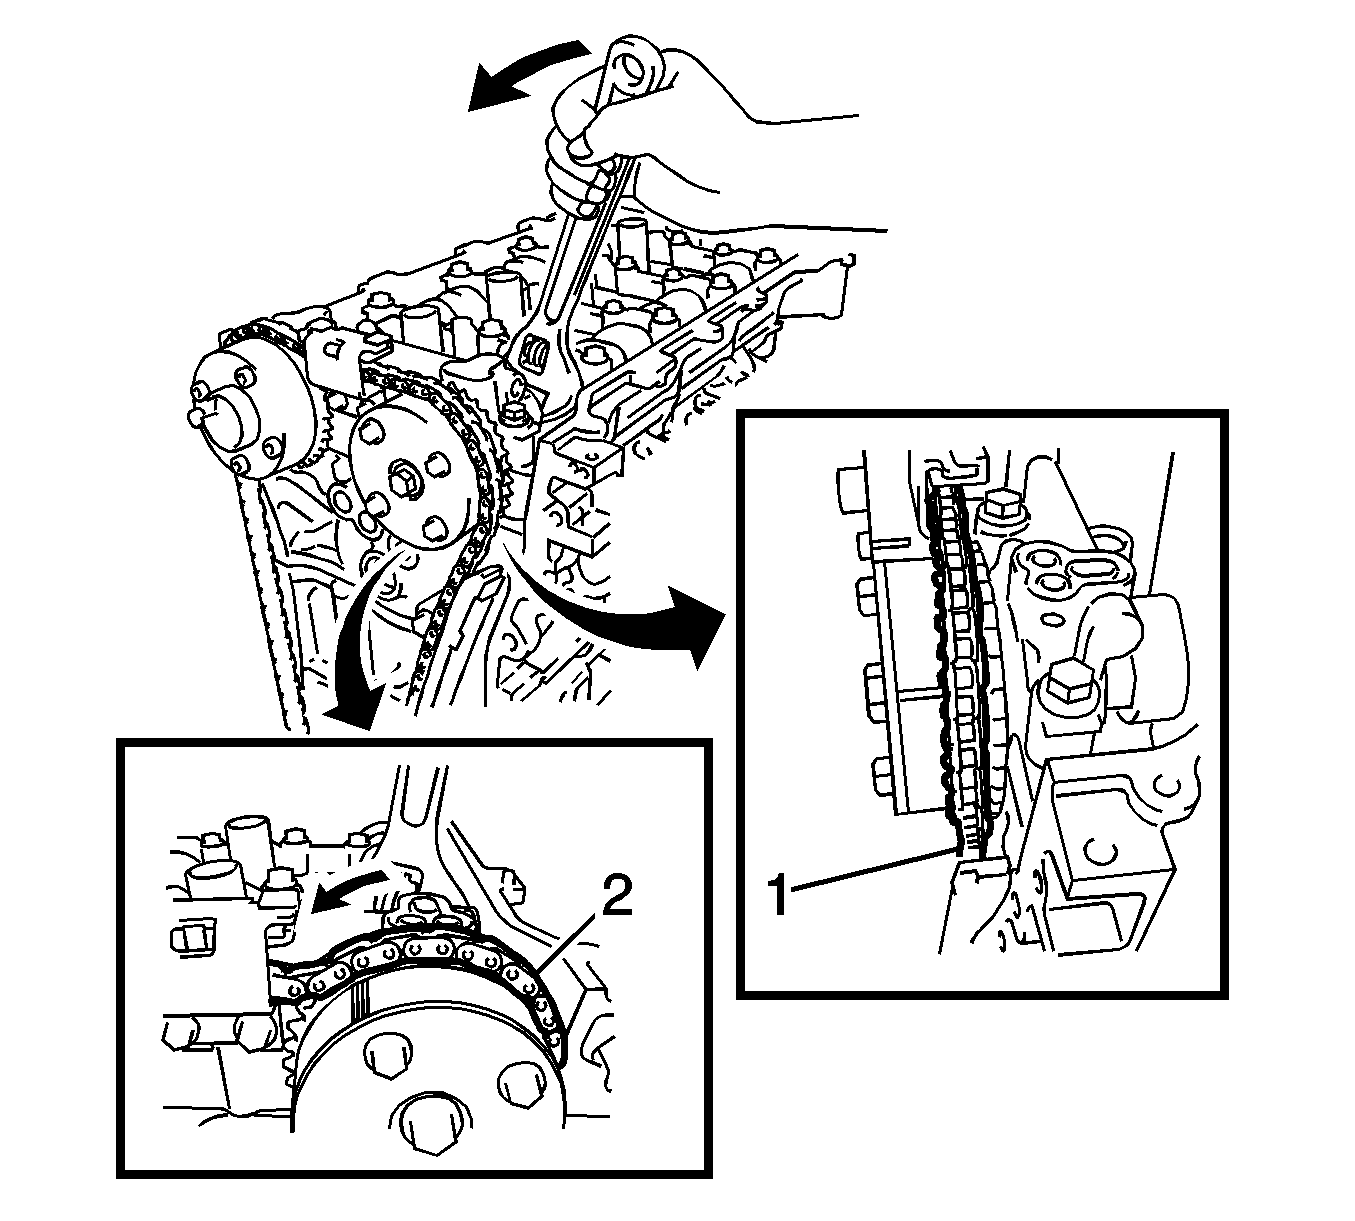
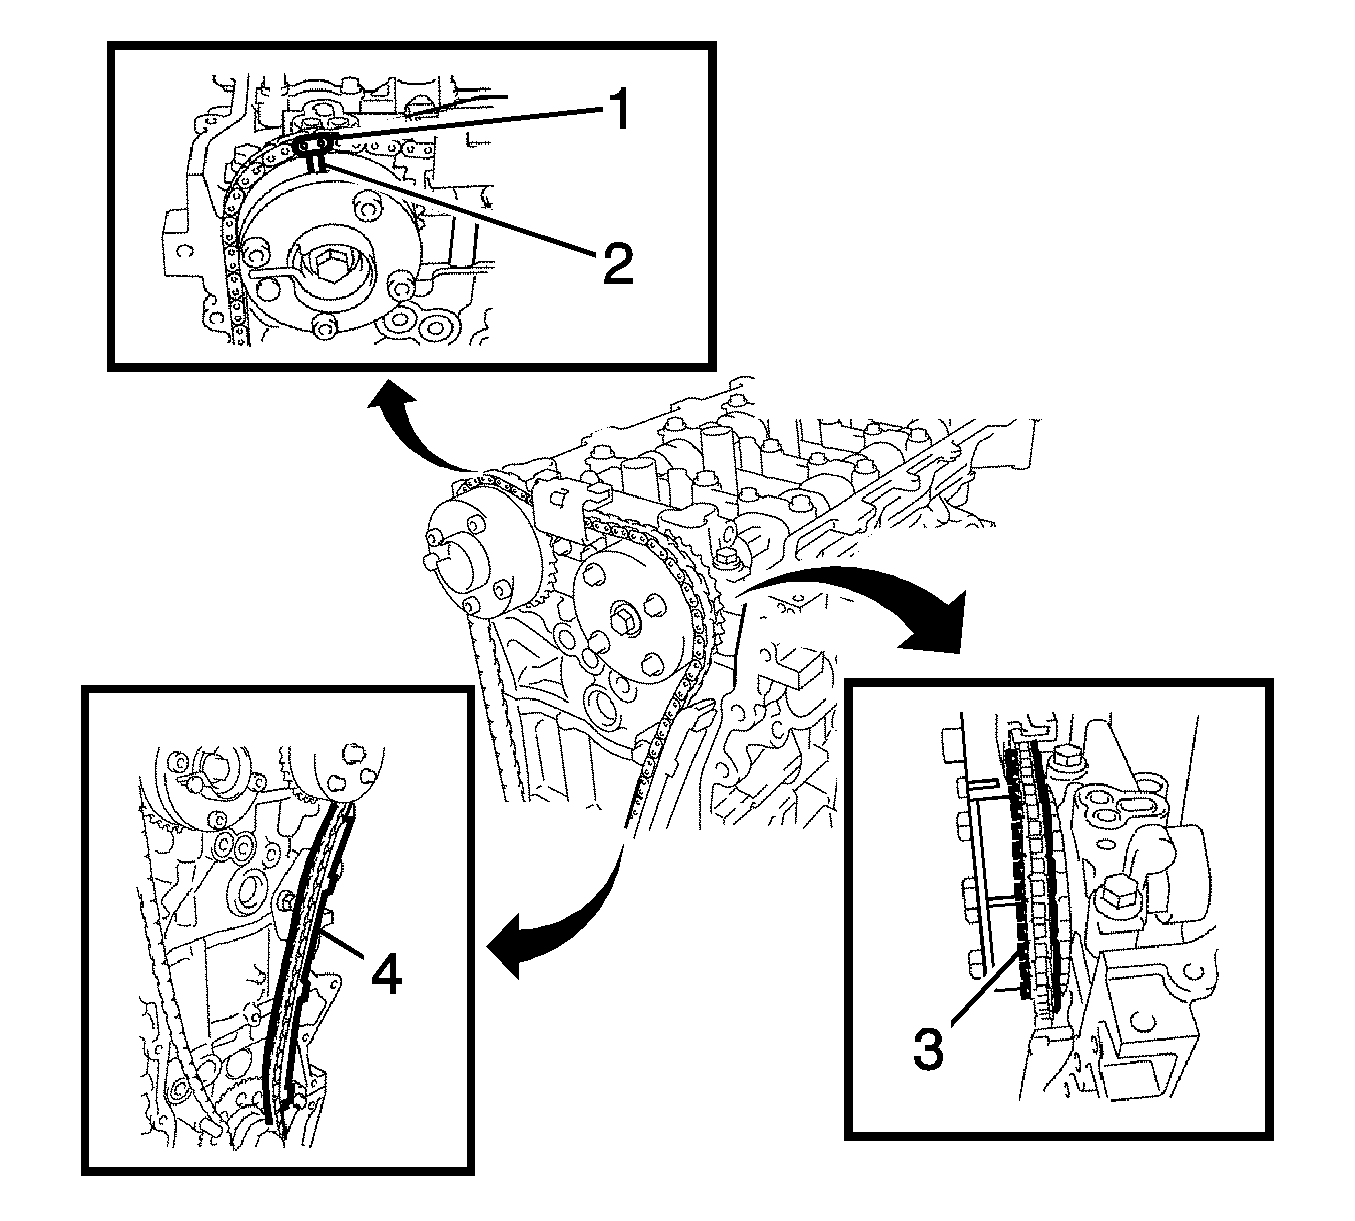
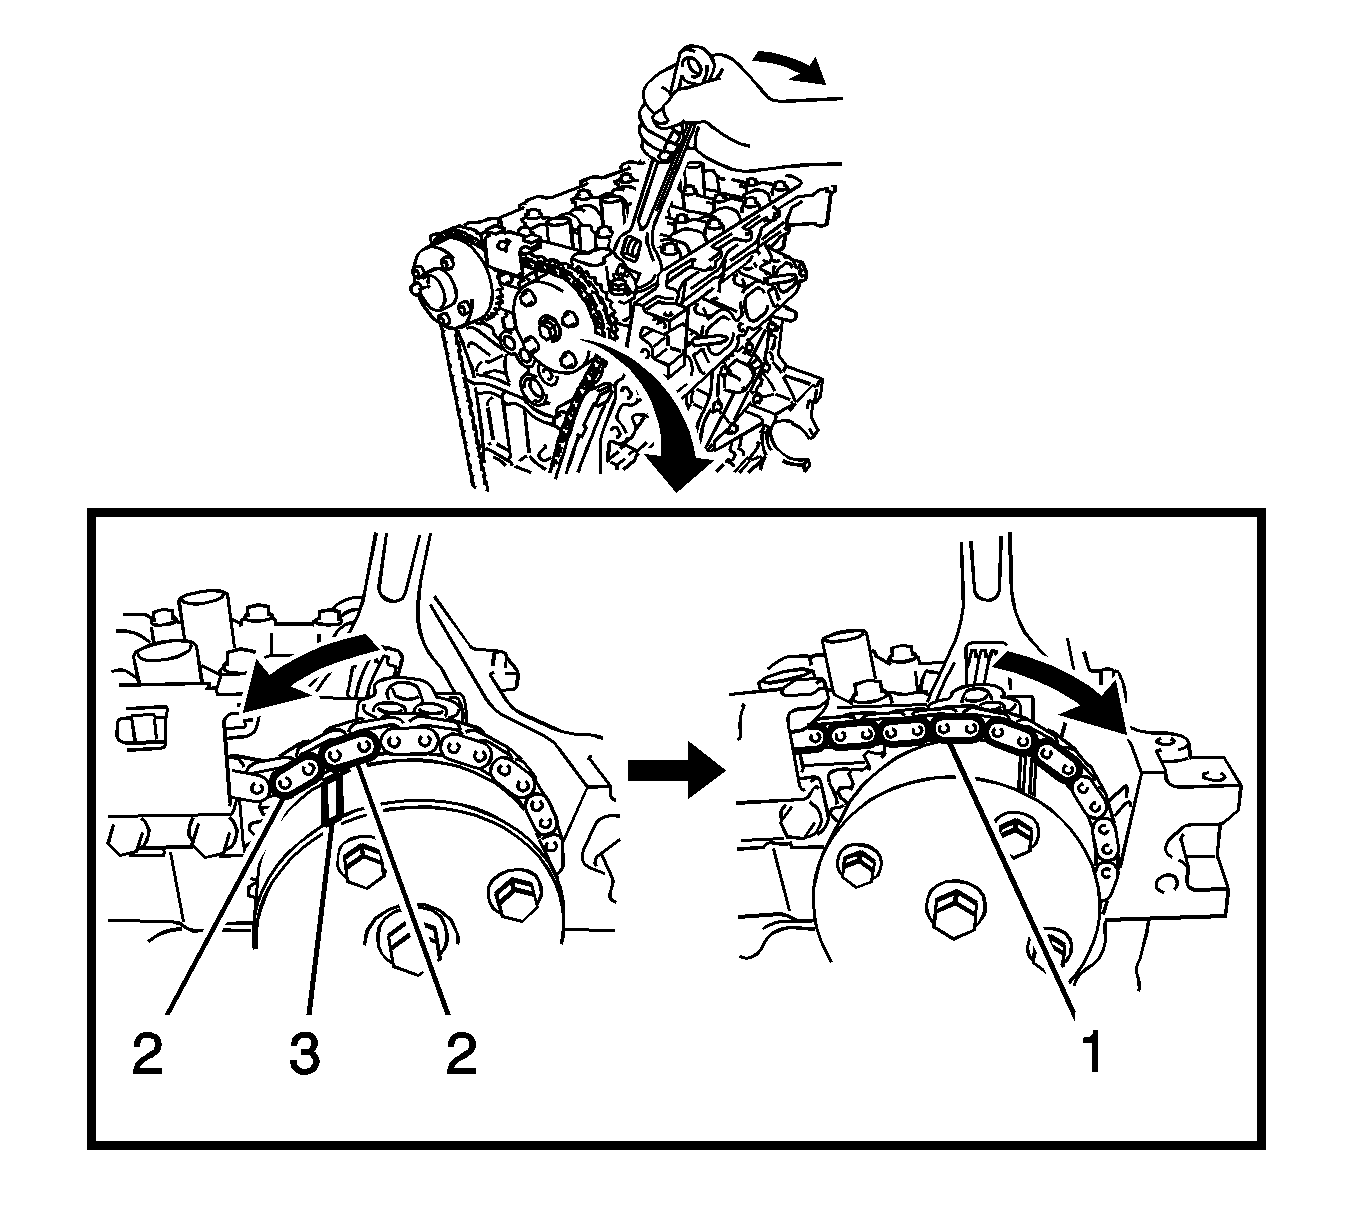
- Hold the hexagonal portion of the camshaft with a wrench and turn the camshaft timing gear assembly counterclockwise to loosen the chain (1) between the camshaft timing gears.
- With the chain loosened, release the chain from the camshaft timing gear assembly and place it on the camshaft timing gear assembly (2).
- Turn the camshaft clockwise to return it to the original position and remove the chain.
- Remove the chain vibration damper.
- Remove the intake camshaft. Refer to Intake Camshaft and Valve Lifter Removal.
- Remove the exhaust camshaft. Refer to Exhaust Camshaft and Valve Lifter Removal.
- Using several steps, uniformly loosen and remove the 10 cylinder head bolts and 10 plate washers with a 10 mm bi-hexagon wrench in the sequence shown.
- Using a screwdriver with its tip wrapped with tape, pry between the cylinder head and cylinder block, and remove the cylinder head.
- Remove the cylinder head gasket.
- Inspect the cylinder head set bolt.

| 17.1. | Turn the crankshaft pulley until its groove and the timing mark 0 of the timing chain cover (2) are aligned. |
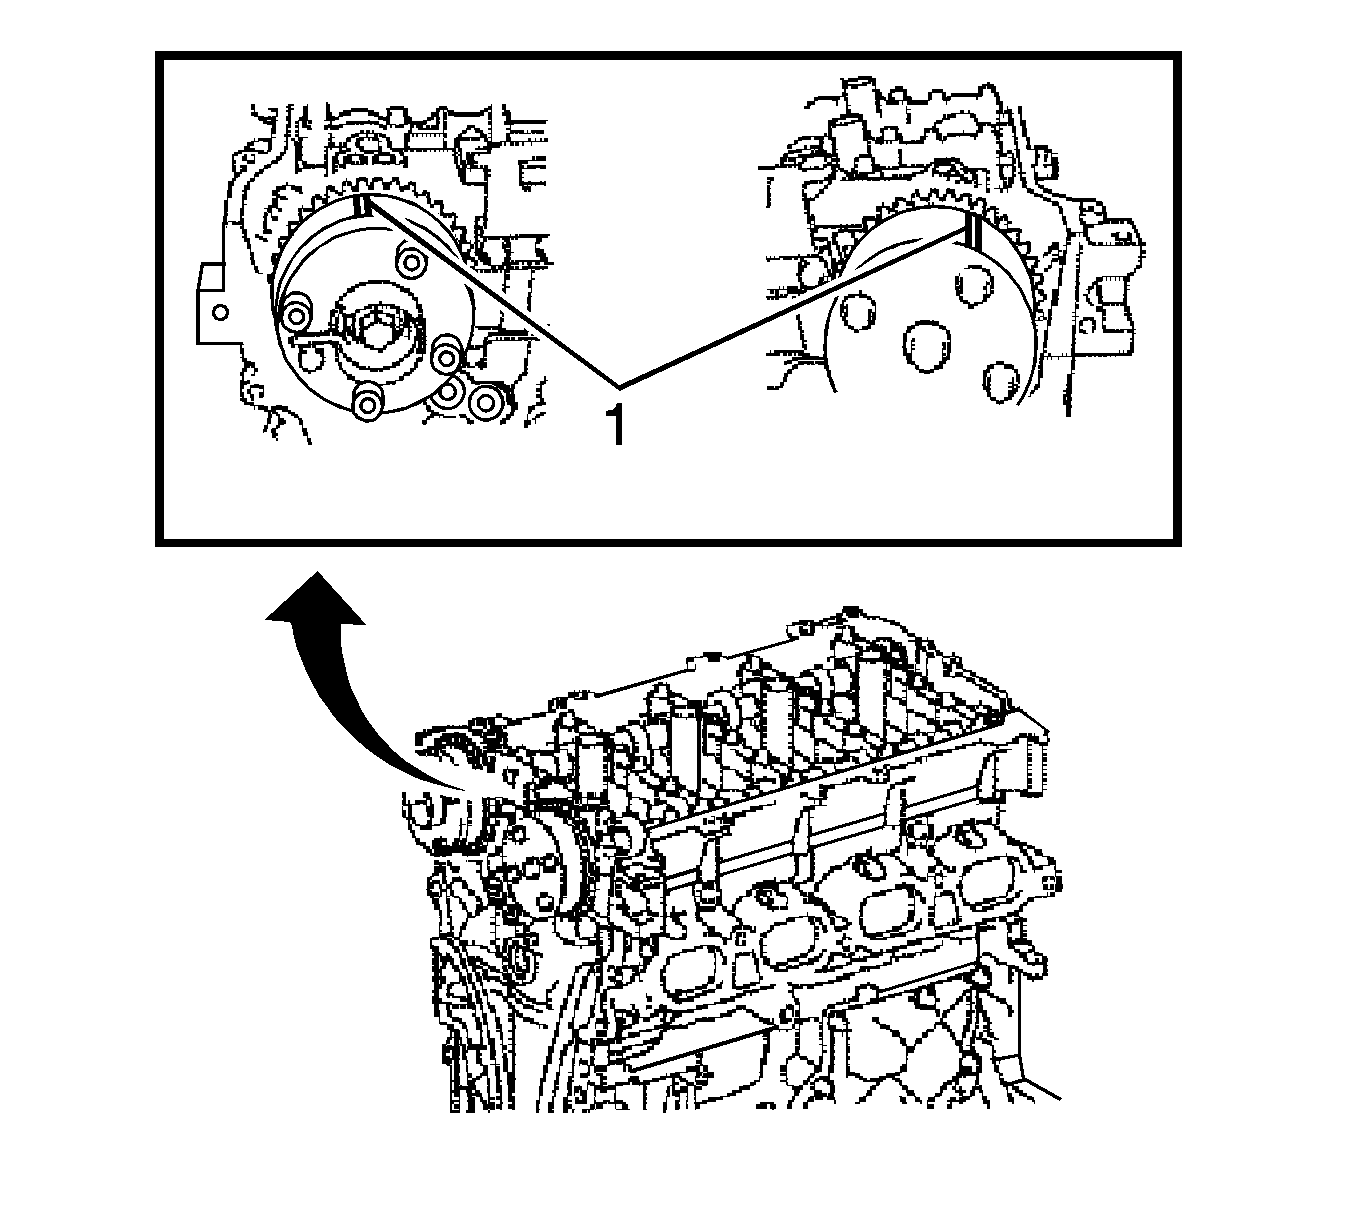
| 17.2. | Check that each timing mark of the camshaft timing gear (1) and sprocket are aligned with each timing mark located on the bearing caps as shown in the illustration. If not, turn the crankshaft by 1 revolution, 360 degrees, to align the timing marks as above. |
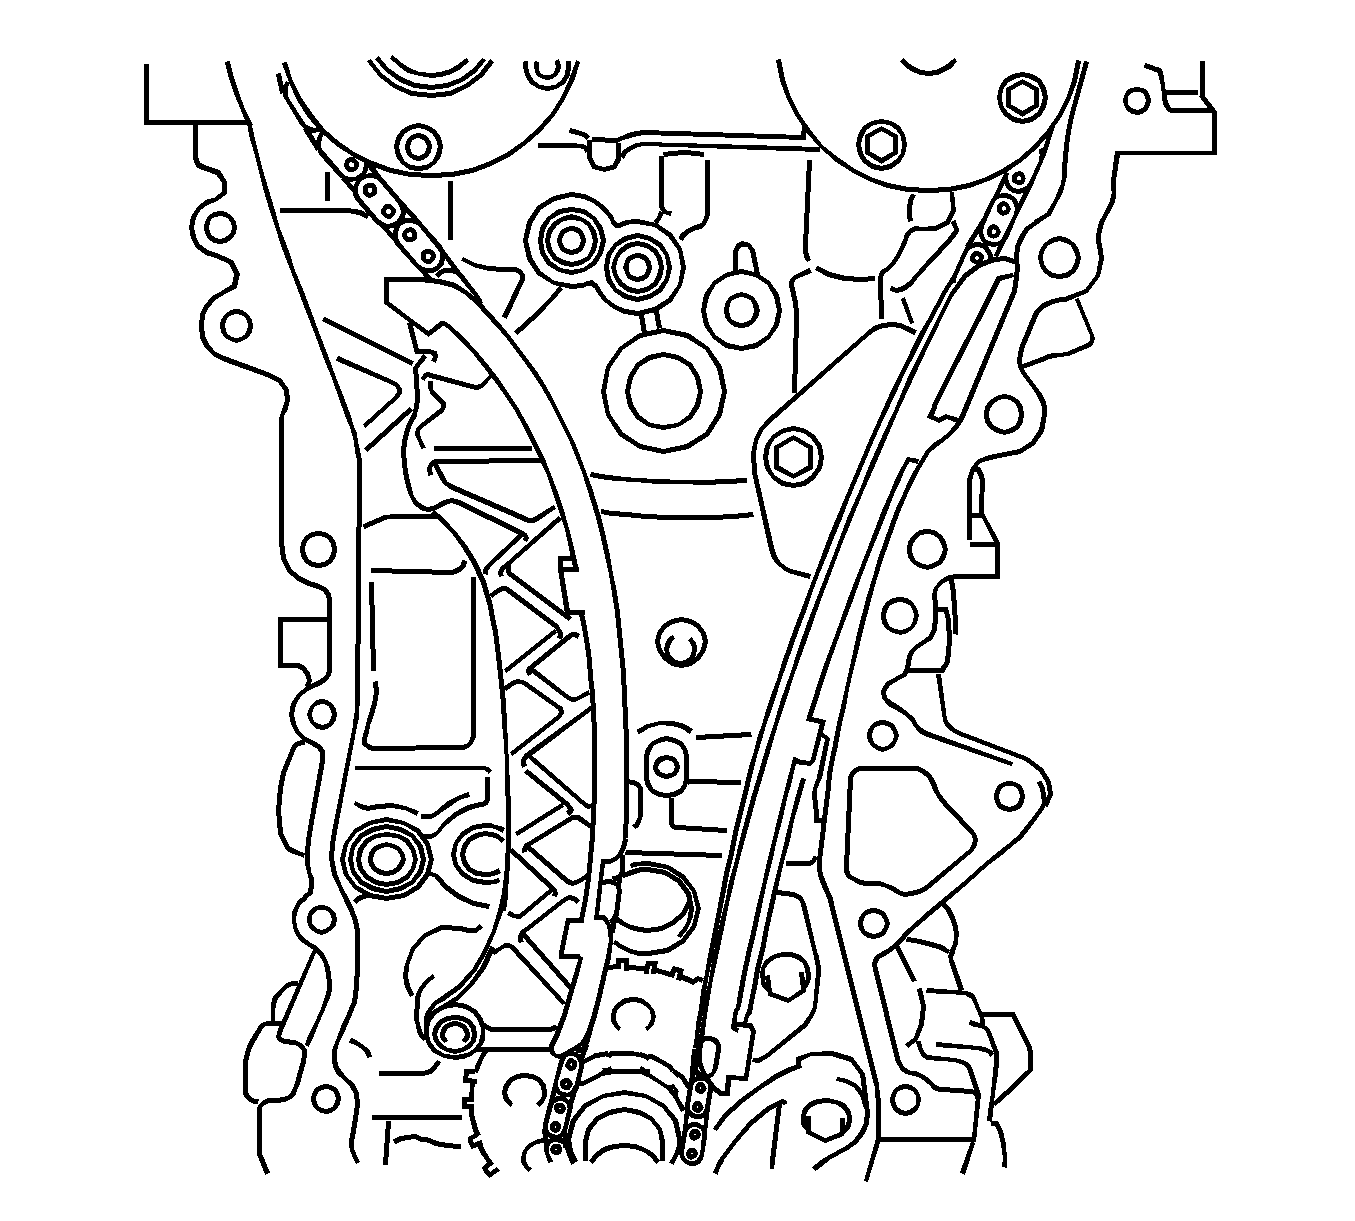
Note: Be sure to release the chain from the sprocket completely.
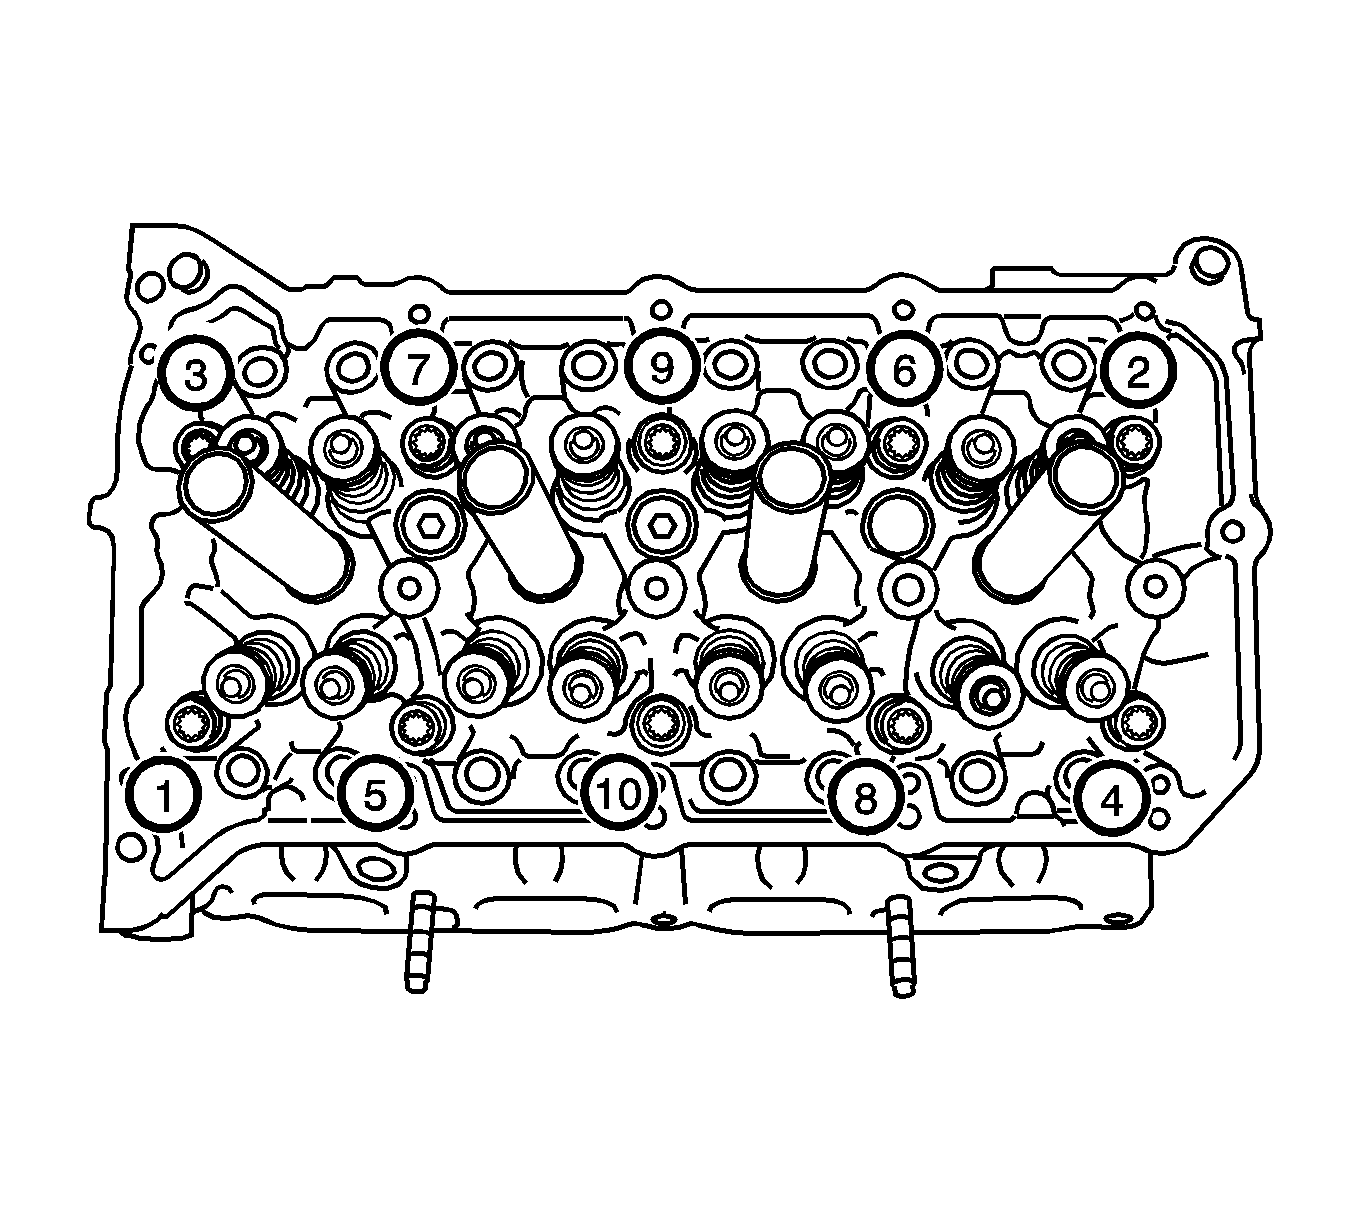
Note: Head warpage or cracking could result from removing the bolts in the wrong order.
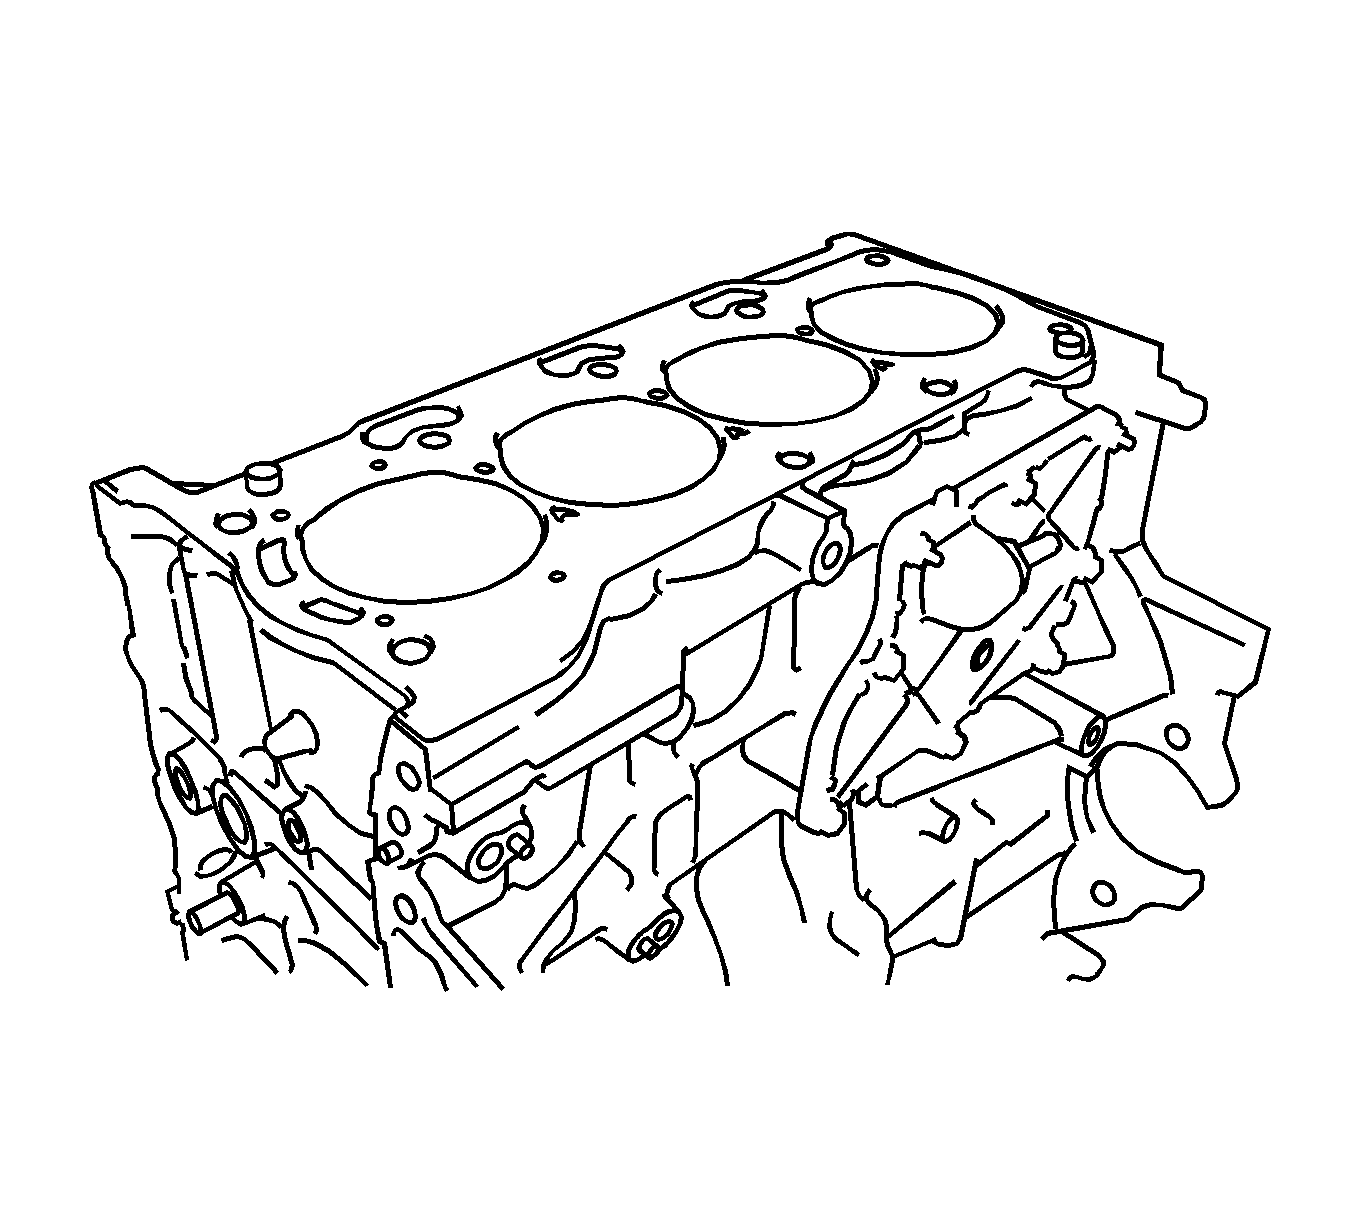
Installation Procedure
- Install cylinder head gasket.
- Place a new gasket on the cylinder block surface with the Lot No. stamp (1) facing upward.
- Install the cylinder head assembly.
- Apply a light coat of engine oil to the bolt threads and the area beneath the bolt heads that come in contact with the washers.
- Install the bolts and plate washers to the cylinder head.
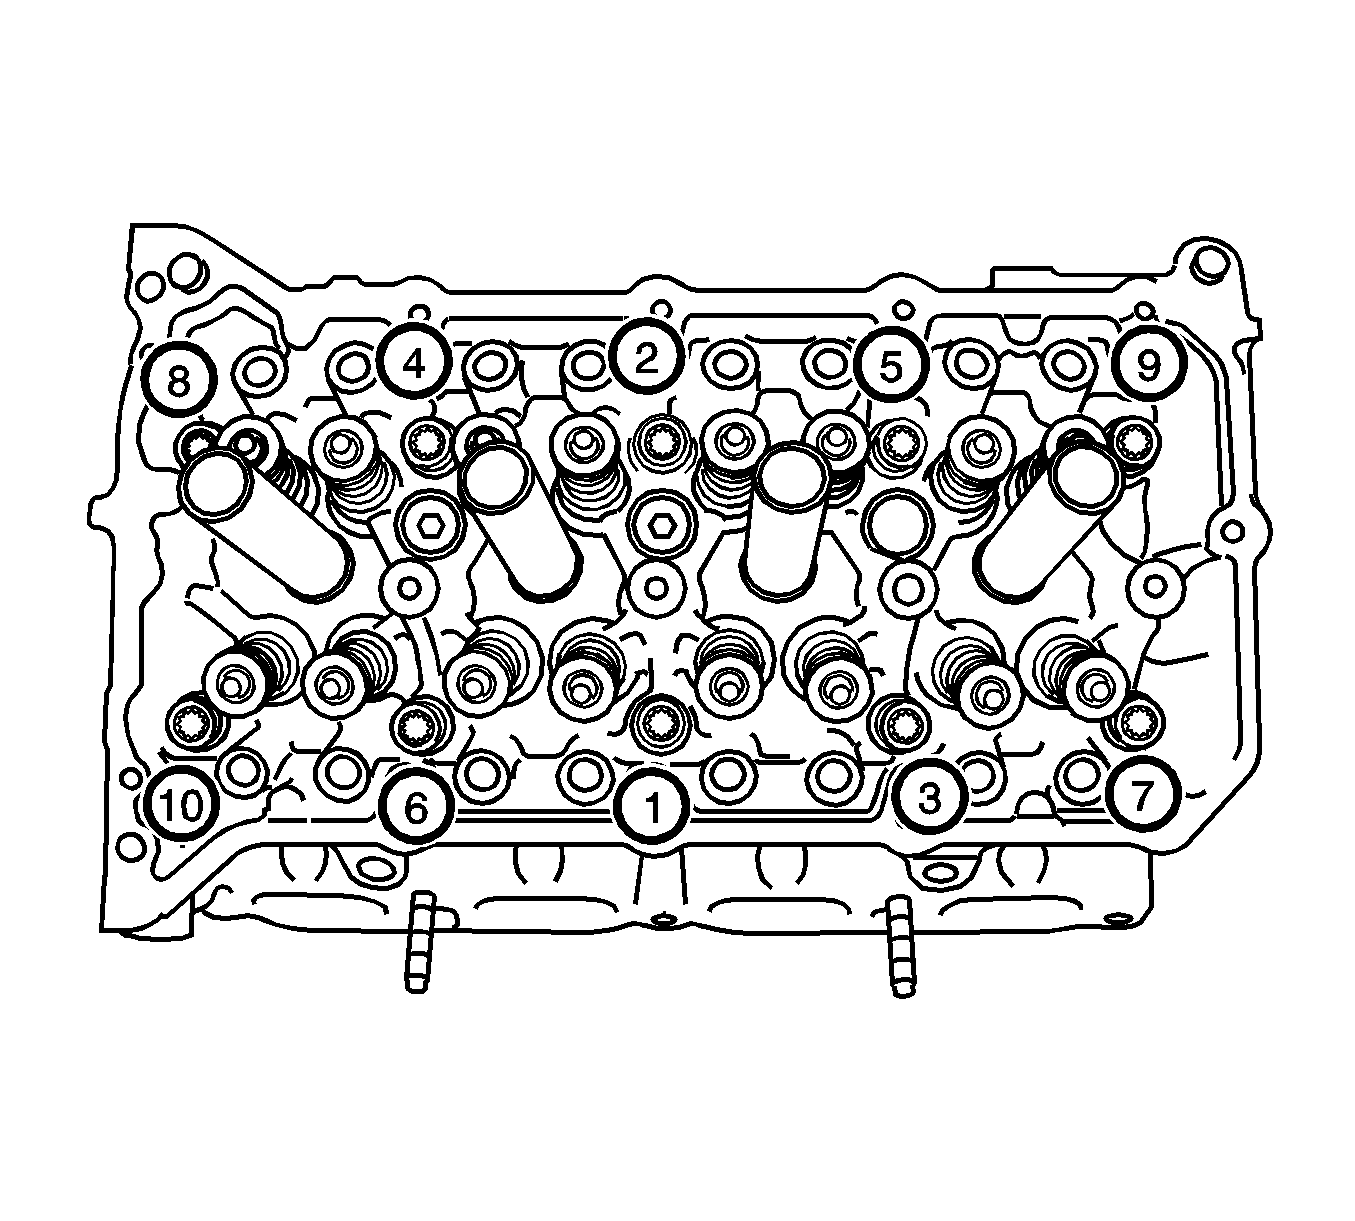
- Using several passes, with a 10 mm bi-hexagon wrench, uniformly install and tighten the 10 cylinder head set bolts and plate washers in the order shown and tighten to 49 N·m (36 lb ft).
- Mark the front side of the cylinder head bolts with paint (1).
- Retighten the cylinder head bolts an additional 90 degrees (a), then once more 45 degrees (b) as shown in the illustration.
- Check that the paint mark is now at a 135 degrees angle to the front.
- Install the exhaust camshaft. Refer to Exhaust Camshaft and Valve Lifter Installation.
- Install the intake camshaft. Refer to Intake Camshaft and Valve Lifter Installation.
- Install the No 1 chain vibration damper with the 2 bolts (1, 2) and tighten to 21 N·m (16 lb ft).
- Install the chain vibration damper.
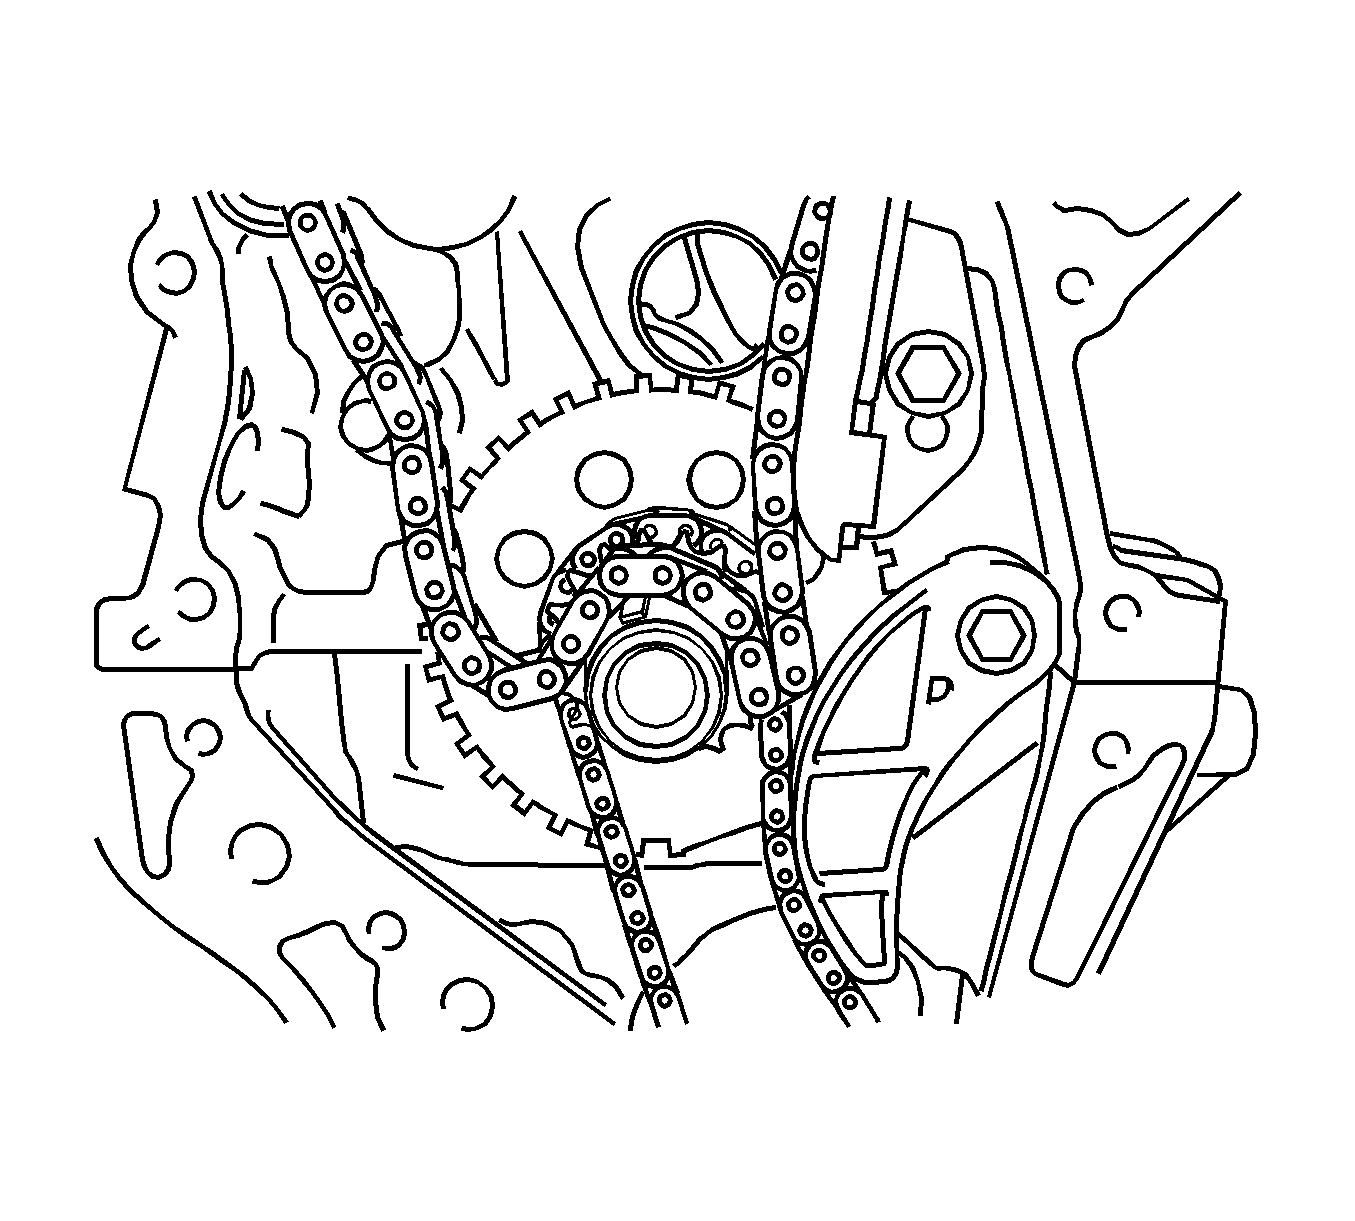
- Install the chain assembly.
- Check the No. 1 cylinder TDC/compression.
- Hand tighten the crankshaft pulley bolt.
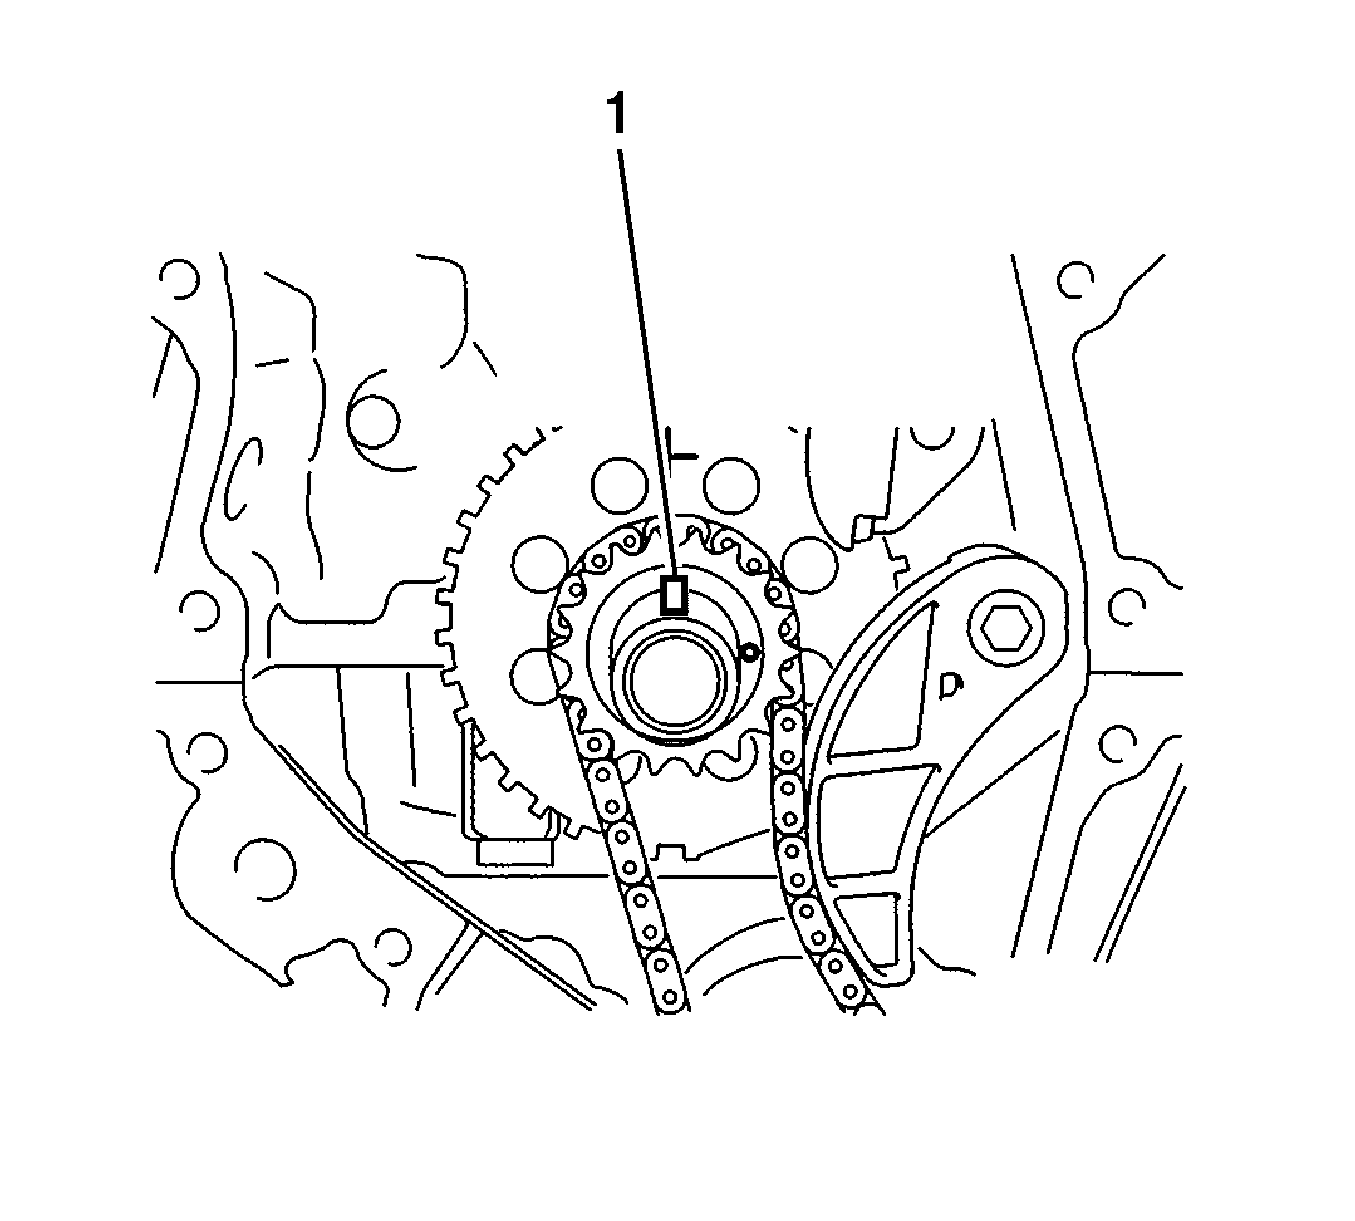
- Turn the crankshaft counterclockwise to position the timing gear key (1) to the top.
- Remove the crankshaft pulley bolt.
- Check the timing marks (1) on each camshaft timing gear.
- Align the mark plate (1), orange, with the timing mark as shown in the illustration and install the chain.
- Place the chain on the crankshaft without passing it around the shaft.
- Hold the hexagonal portion of the camshaft with a wrench and turn the camshaft timing gear assembly counterclockwise to align the mark plate, orange (2), and timing mark (3).
- Hold the hexagonal portion of the camshaft with a wrench and turn the camshaft timing gear assembly clockwise.
- Align the mark plate (2), yellow, and timing mark (1) and install the chain to the crankshaft timing gear.
- Recheck each timing mark (1, 2, 3) at TDC/compression.
- Install the chain tensioner slipper.
- Install the timing chain cover assembly. Refer to Timing Chain Housing Installation.
- Install the crankshaft pulley.
- Install the chain tensioner assembly. Refer to Timing Chain Tensioner Installation.
- Install the cylinder head cover assembly. Refer to Camshaft Cover Installation.
- Install the radio setting condenser.
- Install the thermostat.
- Install the inlet water.
- Install the inlet water hose.
- Install the water by-pass hoses.
- Install the water by-pass pipe.
- Install the ventilation hose.
- Install the exhaust manifold. Refer to Engine Flywheel Installation.
- Install the oil level dipstick assembly. Refer to Oil Level Indicator and Tube Installation.
- Install the ignition coil assembly.
- Install the fuel injector assembly.
- Install the delivery pipe spacer.
- Install the fuel delivery pipe assembly.
- Install the fuel tube assembly.
- Install the intake manifold. Refer to Intake Manifold Installation.
- Remove the engine stand.
- Install the engine assembly with transaxle. Refer to Engine Replacement.
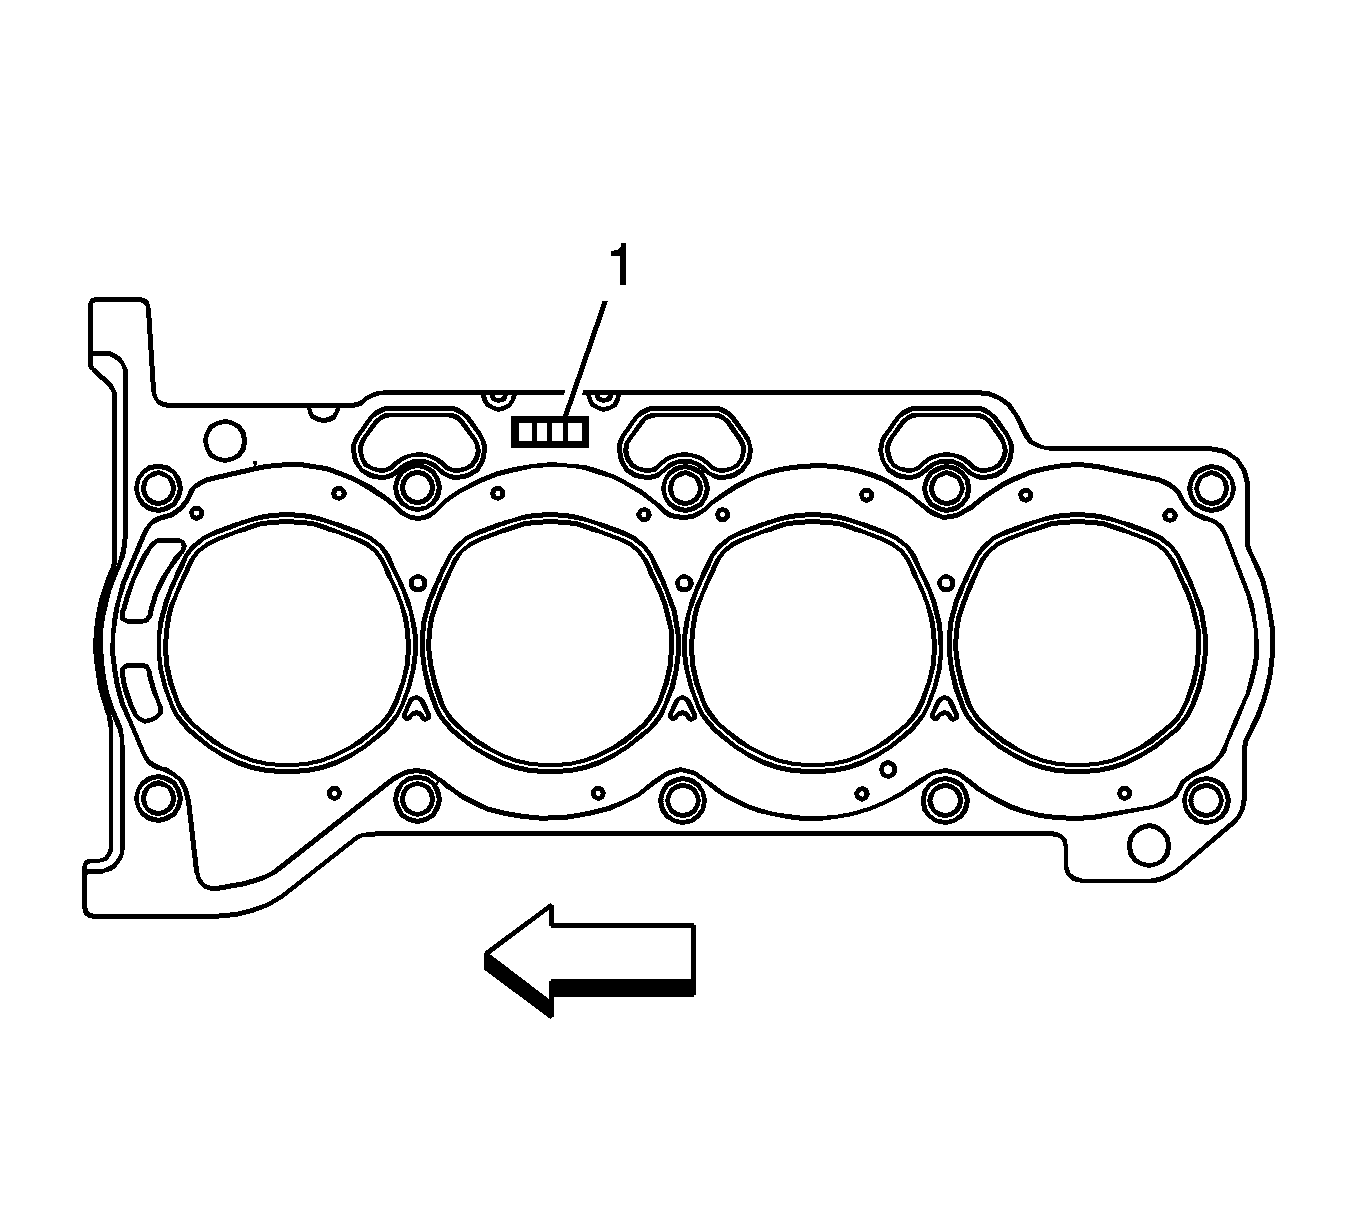
Note:
• Remove any oil from the contact surface. • Make sure that the gasket is installed in the correct direction.
Note: The cylinder head bolts are tightened in 2 progressive steps.
Caution: Refer to Fastener Caution in the Preface section.

Note:
• Be sure to position the mark plate at the front of the engine. • The mark plate on the camshaft side is colored orange. • Do not pass the chain around the sprocket of the camshaft timing gear assembly. Only place it on the sprocket. • Pass the chain through the vibration damper (4)
Note:
• Be sure to position the mark plate at the front of the engine. • The mark plate on the camshaft side is colored orange.
Note: To tension the chain, slowly turn the camshaft timing gear assembly clockwise to prevent the chain from being misaligned.
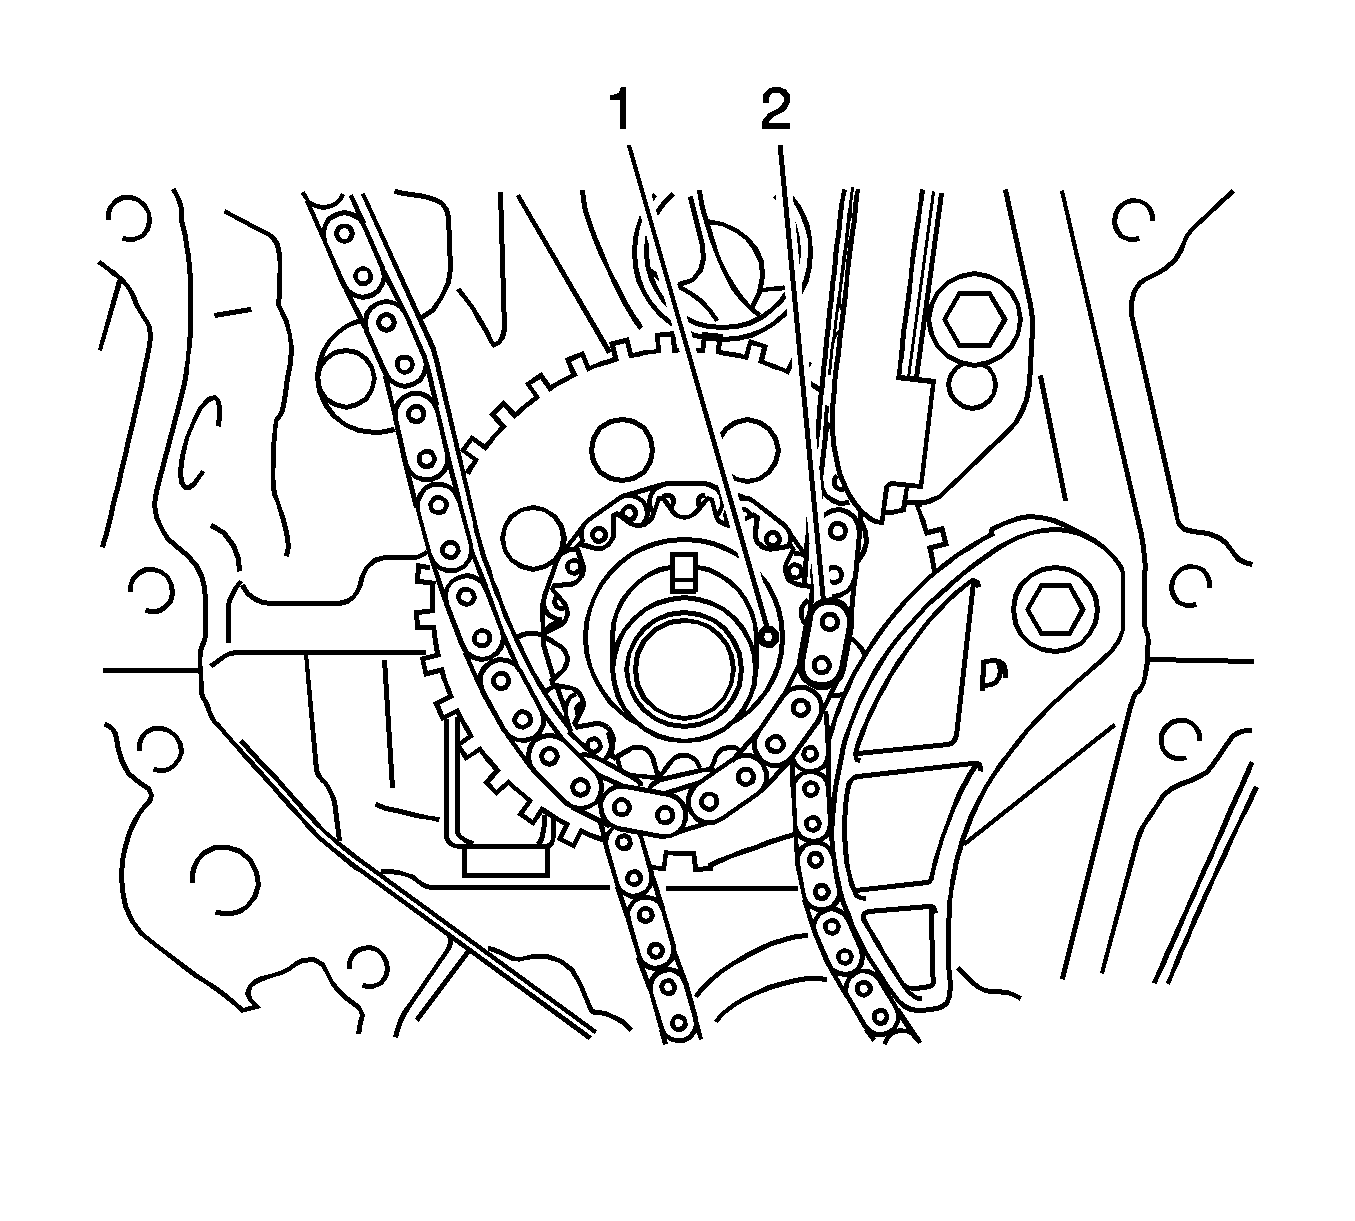
Note: The mark plate on the crankshaft side is colored yellow.
